
Oh, there’s nothing quite like that perfect morning breakfast, is there? That moment when you pull apart a steaming muffin and see all those beautiful, buttery air pockets begging for jam. Seriously, forget the stuff in plastic bags at the store! Here at Cookin’ Corner, based on everything I learned watching my grandmother turn simple ingredients into magic, I promise you this recipe for sourdough english muffins is the real deal.
This isn’t some fancy, complicated bread that takes three days. This is my modern interpretation of a reliable classic, designed for the home cook who wants that fantastic, bakery-quality texture and those famous “nooks and crannies” without the fuss. If you’re also diving deep into building your starter, you’ll definitely want to check out my guide on how to make sourdough starter from scratch—it’s the foundation for everything great!
- Why This Easy Sourdough English Muffin Recipe Works (The Secret to English Muffins Nooks and Crannies)
- Gathering Ingredients for Fluffy English Muffins Sourdough
- Step-by-Step Instructions for Stovetop Sourdough English Muffins Recipe
- Expert Tips for Perfect **Sourdough English Muffins Nooks and Crannies**
- Serving Suggestions for Your Homemade Muffins
- Storage and Reheating Instructions
- Frequently Asked Questions About Naturally Leavened Muffins
- Nutritional Estimate for Your Breakfast Bread
- Share Your Homemade Sourdough English Muffins Creations
Why This Easy Sourdough English Muffin Recipe Works (The Secret to English Muffins Nooks and Crannies)
Folks, this recipe cuts straight to the chase. You get that wonderfully tangy flavor and the airy interior without needing a massive overnight proof—although you totally can let it rest overnight if you want that deeper flavor! The magic here is twofold, really. First, we are making great sourdough english muffins by using your discard. That saves food, and honestly, it gives us a lovely, complex tang that yeasted versions just can’t touch.
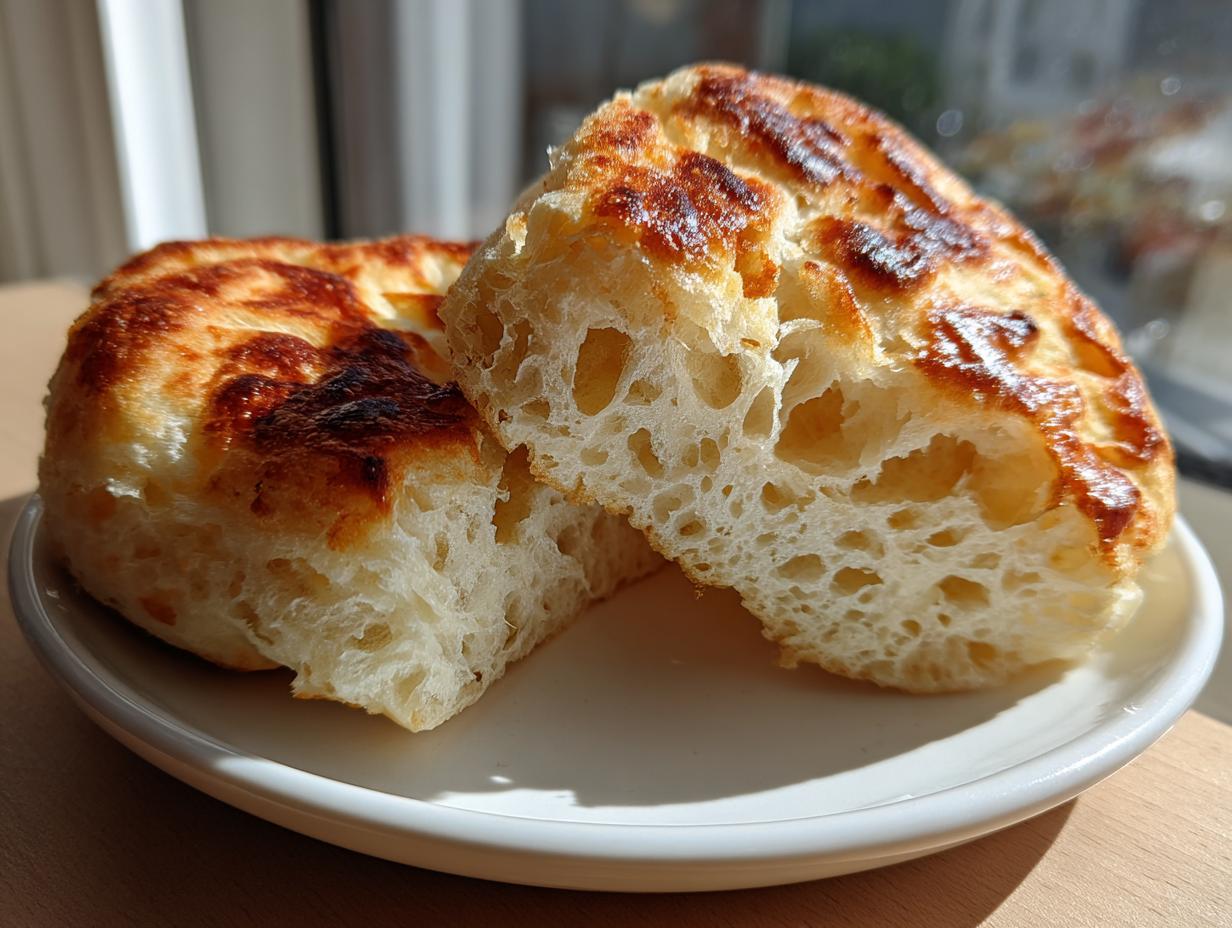
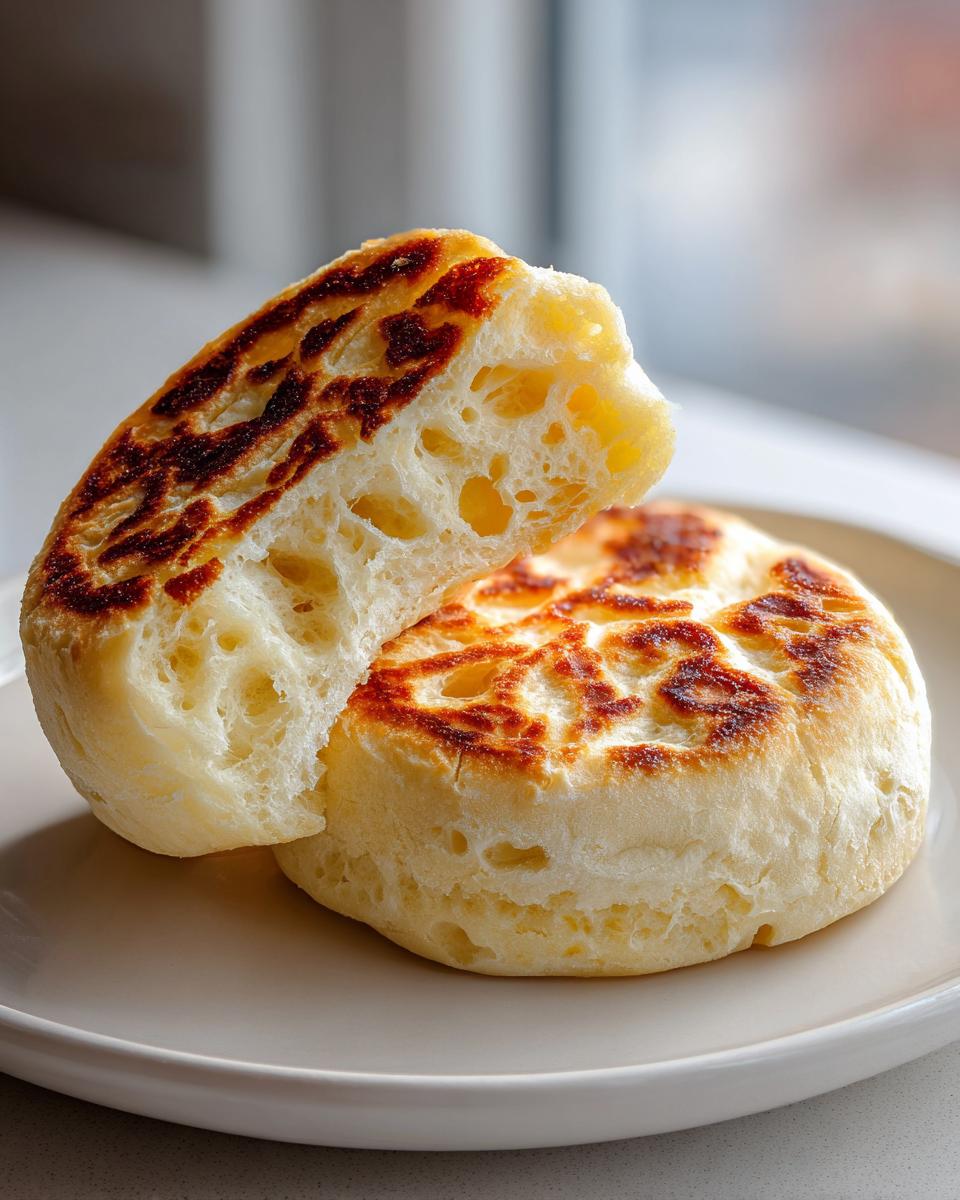
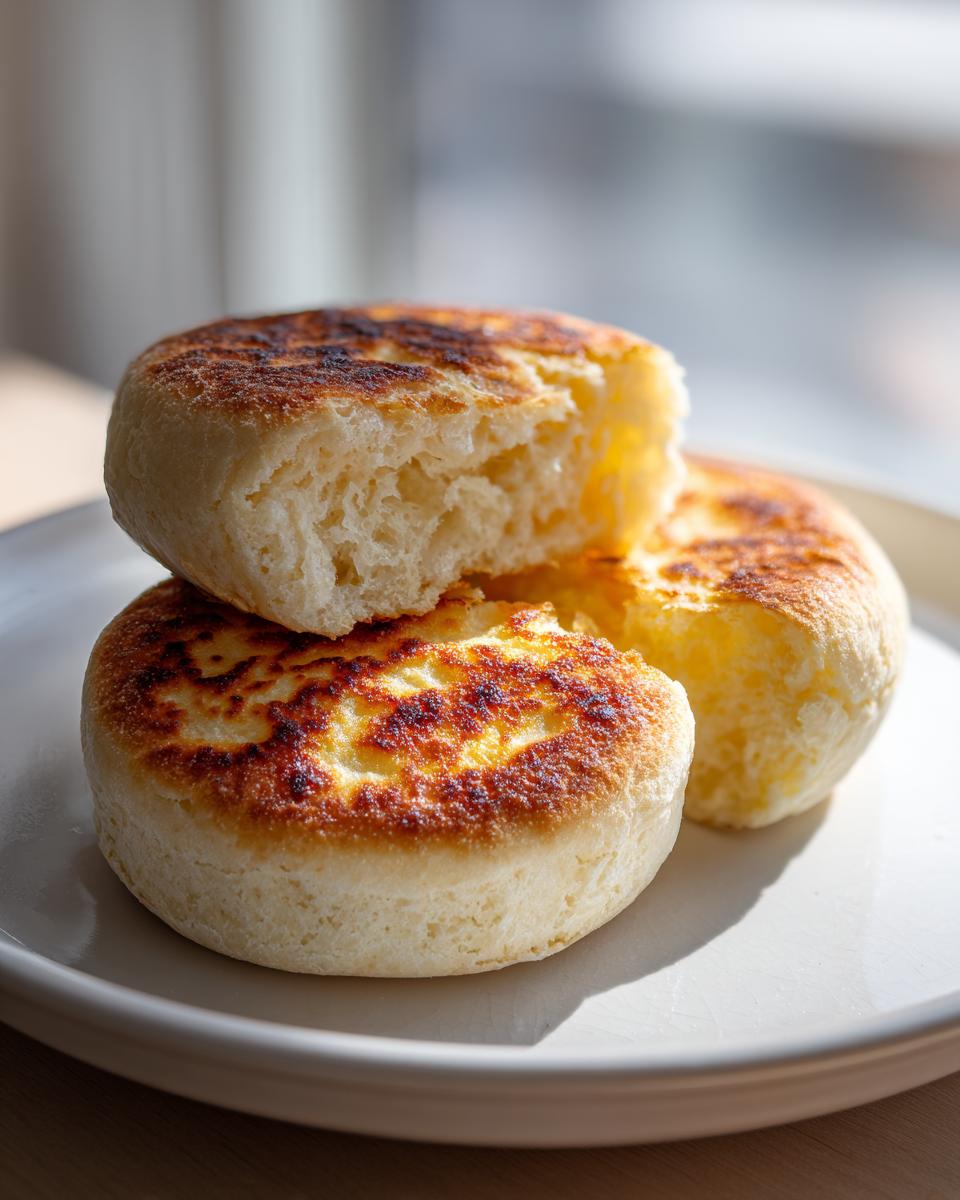
Second, we are achieving those famous holes. That’s all about texture management! We don’t knead this dough heavily because we want to keep those developing gas bubbles intact. And the absolute biggest secret? Cooking them low and slow on a dry griddle. If your skillet is too hot, the outside burns long before the inside gets soft and fluffy. We just pat the dough gently, never roll, because we are protecting those precious air pockets. Learning the specific technique for achieving those homemade English muffin nooks and crannies is what separates good muffins from showstoppers!
Using Sourdough Discard for Tangy Sourdough English Muffins
If you’re deep into the sourdough world, you know that feeling when you have a whole jar of starter discard staring you down. Well, this is my favorite solution for that! Using discard keeps the recipe super simple—no need to feed and wait for peak activity—but it still gives you that signature sour note we love. Just remember what my grandmother always said about any sourdough project: the healthier your starter is, even when it’s just discard, the better your final flavor will be. A nice, active starter, even unfed, gives you richer results than a pale, sad one.
Gathering Ingredients for Fluffy English Muffins Sourdough
Okay, let’s talk ingredients! The beauty of these sourdough english muffins is that they use materials you likely already have if you keep a starter going. We are using 1 cup of that tangy starter discard—no feeding needed, which is such a win!
You’ll need just enough milk, and make sure it’s warm, not hot, because we are activating the baking soda gently. We’re adding honey for a kiss of sweetness that really complements the tang. And here’s a very important detail for getting that beautiful texture and color on the griddle: don’t forget the cornmeal! We dust the surface with it, and that little bit clinging to the bottom gives you that signature crispy crust. If you love easy ways to use your leftovers, you have to see my recipe for fluffy sourdough discard pancakes—another perfect use for that jar!
Step-by-Step Instructions for Stovetop Sourdough English Muffins Recipe
Okay, grab your big whisk and let’s get these beautiful sourdough english muffins moving! Forget complex bread shaping; this is barely more than mixing a pancake batter, truly. We’re aiming for a sticky dough, not a smooth loaf, remember? That stickiness is where the air gets trapped!
Mixing the Batter and Resting Period
First things first, we need to wake up the baking soda! Mix your warm milk, your sourdough discard, and that little bit of honey right in a bowl until it looks like a happy, slightly lumpy wet mix. In a separate bowl, whisk your dry guys—flour, salt, and baking soda—that baking soda is our main lifter here. Now, bring them together. I want you to mix this gently with a spatula until you *just* see no more white streaks of flour. That’s key! If you beat it up, you’ll develop gluten and lose all those airy pockets we work so hard to create. Then, stir in that melted butter.
Once it’s combined, cover it up. Don’t mess with it! Let it sit on the counter for a solid 30 minutes. This rest time is crucial because it lets the baking soda do its job and start reacting with the acid in your starter. You’ll see it puff up a tiny bit. If you want another easy but slightly different tangy treat, this process is similar to my easy sourdough pancakes recipe!
Cutting and Griddle Cooked Sourdough Technique
Time to get dusty! Generously coat a clean counter space with cornmeal—this is non-negotiable for that classic texture. Gently turn your slightly puffy batter out onto the cornmeal. You are not kneading or folding; you are just patting it down with your hands until it’s about three-quarters of an inch thick. Do NOT use a rolling pin; we are preserving every single bubble! Use a 3-inch cutter to punch out your rounds and carefully place them on a cornmeal-dusted sheet.
Get your cast-iron griddle heating up over medium-low heat. I emphasized *medium-low*! These sourdough english muffins need patience. Place them on the dry, hot surface and let them cook undisturbed for a full 6 to 8 minutes per side. This slow cooking is what makes them soft and fully cooked inside while keeping that beautiful golden brown outside. You’ll smell that toasty aroma when they are ready to flip. Trust me on the heat—it’s everything!
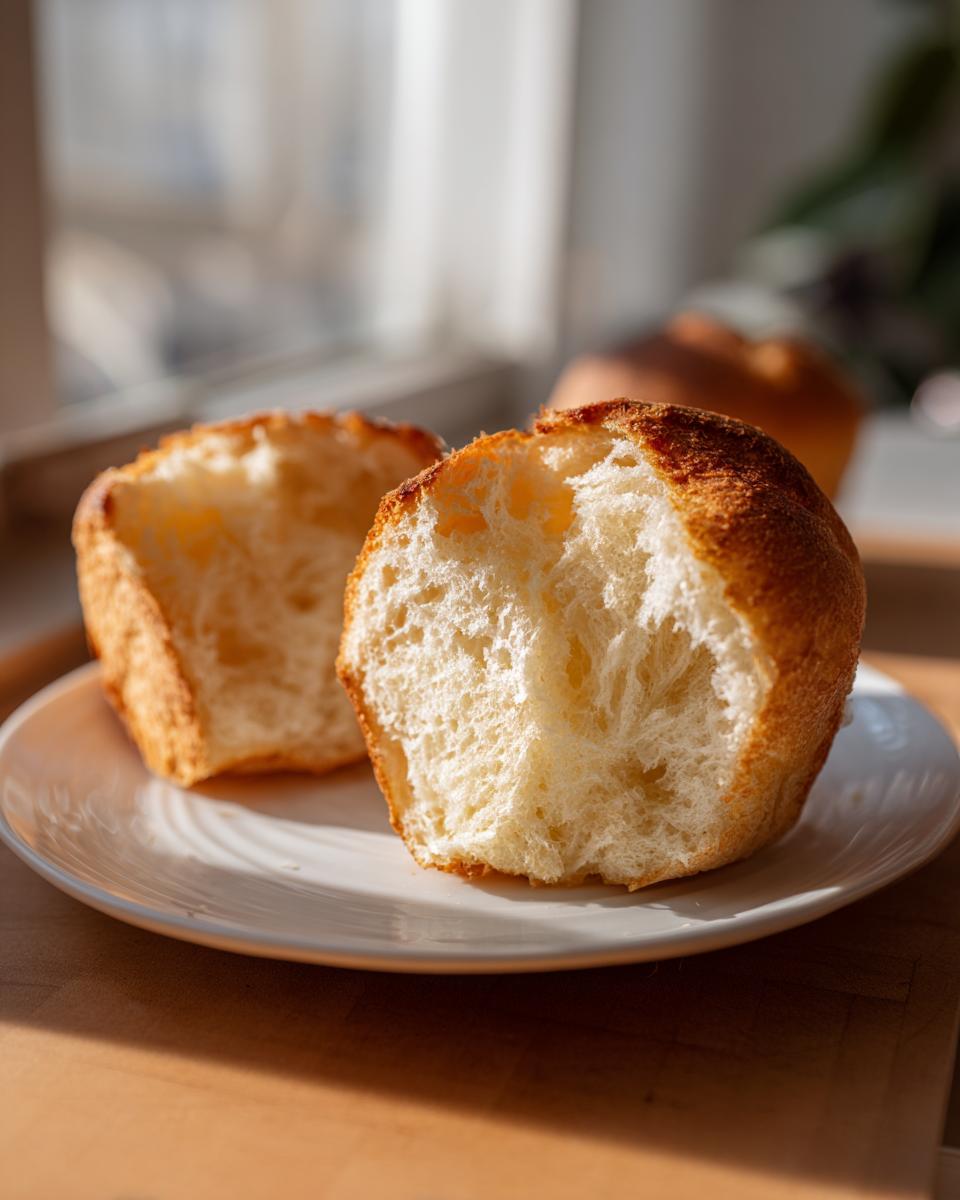
Expert Tips for Perfect **Sourdough English Muffins Nooks and Crannies**
I know you’ve been waiting for this part! The real payoff comes when you go to split them open. You absolutely cannot use a knife for this step if you want those beautiful, craggy interiors. A knife just saws through the structure we worked so hard to build.
The Fork Splitting Secret
You need to use a fork. Seriously, grab a standard table fork and gently pierce around the edge of the muffin before you twist it open. The fork creates those jagged, uneven edges—that’s what we call the nooks! Those tiny little caverns are specifically designed to grab melted butter, warm jam, or soak up egg yolk when you make a breakfast sandwich. Any knife cuts them smooth; the fork keeps them rustic and perfect. It’s a small thing, but it makes a huge difference when you’re aiming for bakery-style results.
Optional Overnight Fermentation for **Sourdough English Muffins**
While this recipe is designed to be quick, I sometimes take the dough—right after I mix in the melted butter—place it in a bowl, cover it tightly, and stick it in the fridge overnight. That long, cold rest lets the natural acids develop so much more, giving you a deeper, much more satisfyingly tangy flavor in your final sourdough english muffins. It also makes them even easier to digest, which is a bonus we all love about naturally leavened goods. If you do this, just take the dough out about an hour before you plan to cut them so they aren’t so rock-hard when you pat them out. You can see some variations in technique over at Little Spoon Farm, which is always a great resource for farmhouse baking!
If you’re looking for other dependable recipes that just *work* when you need them to, you should bookmark my easy cottage pie recipe; it’s another family favorite that guarantees comfort!
Serving Suggestions for Your Homemade Muffins
Now that you’ve pulled those beauties off the griddle, the real fun begins! These are the ultimate breakfast sandwich bread, hands down. Forget thin, flavorless store-bought versions. I love splitting mine open, toasting them until the edges are slightly crispy, and slathering them with butter and homemade blueberry jam—that contrast between the soft inside and the crunchy toasted outside is just heaven.
Of course, they are the perfect base for Eggs Benedict if you’re feeling fancy on a Sunday. If you want the perfect partner for your warm, tangy muffin, you have to try my trick for fluffy, creamy scrambled eggs. It might sound simple, but the eggs make the sandwich!
Storage and Reheating Instructions
These **sourdough english muffins** are absolutely best the day you make them, right off the griddle, crispy and hot. But if you’re smart like me, you’ve made a triple batch because they freeze wonderfully! If you have leftovers that are just a day or two old, keep them sealed tight in a zip-top bag at room temperature. Please don’t put them in the fridge! Refrigeration is the enemy of soft baked goods; it makes them go stale faster.
When you’re ready to enjoy one later, the best preparation method is replicating that morning crispness. You must split them open first! Seriously, fork-split them completely in half. Then, you can toast them. They toast up beautifully this way, and all those **nooks and crannies** open right up to catch whatever you’re slathering on them.
For long-term storage, pop those split muffins into a freezer-safe bag. They last great for about three months. When you want one, pull it straight from the freezer—don’t even bother thawing it—and pop it right into your toaster on a medium setting. They warm right through, and you end up with a surprisingly fresh, soft texture. It saves so much time on a busy morning, and it means you always have amazing **homemade english muffins** ready to go!
If you need another sturdy dish for meal prep that freezes well, you should really check out my classic easy cottage pie recipe. It’s just as reliable!
Frequently Asked Questions About Naturally Leavened Muffins
I get so many questions on the difference between methods and what to do if things go sideways, which is totally normal when baking! Don’t you worry if you run into a snag; we can fix it. These muffins are forgiving when you know the secret spots to watch, like the heat on your stove.
Can I bake these sourdough english muffins instead of using a griddle?
Oh, I know it’s tempting to just put them in the oven, especially if you’re making a big batch! But honey, if you put these in the oven, you end up with something more like a small, dense roll or a slightly flat biscuit, not an English muffin. The whole point of this recipe is that dry heat from the skillet or griddle cooks the sides slowly while the baking soda creates those wonderful, airy pockets inside. That slow, radiating heat is what creates our signature crispy exterior and the famous **nooks and crannies**. Keep them on the stovetop for the truly authentic experience!
What is the difference between using active starter vs. discard for these muffins?
This is a great question for everyone managing their starter! For this specific recipe, using unfed sourdough discard works perfectly fine. Why? Because we are relying heavily on the baking soda reacting with the milk and the existing activity in the discard to give us that lift. The discard brings plenty of flavor, giving us that essential tangy homemade muffins profile we love. If you use an *active*, well-fed starter, your muffins might rise a bit more dramatically, but since we aren’t doing a long proof, the flavor difference is mostly just minor sweetness vs. slight tang. Either way works, but discard is the great waste-saver here!
My muffins are pale. What went wrong with my griddle cooked sourdough?
Pale muffins mean one of two things, and it almost always comes down to heat control! If they look pale or blonde after cooking for nearly 15 minutes total, it means your griddle wasn’t hot enough. Remember how I stressed medium-low heat? If the heat is too low, the muffin cooks so slowly that the baking soda runs out of gas before it can properly brown the outside. I always test my **griddle cooked sourdough** by dripping a tiny drop of water on the surface; it should sizzle immediately but not evaporate in one second flat. Give them a little more heat next time—not screaming high, but definitely medium-low!
If you want to learn even more about managing your starter culture, have a peek at my beginner’s guide on making sourdough starter—it covers all the basics!
Nutritional Estimate for Your Breakfast Bread
Now, I always tell folks not to stress too much about the numbers when it comes to handmade breakfast staples like these—the joy factor is way higher than the calorie count! But just so you have an idea, based on the ingredients listed above, one of these fluffy sourdough english muffins lands around 180 calories. This is just a general estimate, mind you, because what you use for milk or honey can change those figures up or down a bit!
- Calories: About 180
- Fat: Roughly 4g
- Protein: About 5g
- Carbohydrates: Around 32g
This estimate is based on getting 8 muffins out of the batch. You get a little protein in there from the flour and the starter, which is a lovely bonus for something you usually dunk in butter!
Share Your Homemade Sourdough English Muffins Creations
Honestly, the best part of sharing these ancient family-style recipes—even when they’re adapted for modern kitchens—is hearing from you! I’ve poured my heart into making sure this easy sourdough English muffin recipe works just as perfectly for you as it does for me.
If you made a batch, please, please, please let me know how they turned out! Did you capture those elusive, beautiful nooks and crannies we talked about so much? Did you manage to split them perfectly with just a fork? Drop your thoughts down below in the comments. I read every single one!
And if you snapped a picture of your stack of golden, griddle-cooked treasures—maybe slathered in butter or as the base for a gourmet breakfast sandwich—I would absolutely love to see it! You can send pictures my way through my contact page; seeing your success stories truly makes my day and keeps the spirit of Cookin’ Corner alive.
If you test this out, don’t forget to leave a rating at the top of the page so other home bakers know this is a reliable recipe for fluffy, tangy, homemade breakfast bread!
PrintEasy Sourdough Discard English Muffins with Perfect Nooks and Crannies

Make soft, fluffy homemade sourdough English muffins using your starter discard. These griddle-cooked muffins have the classic airy interior and crispy exterior you want for breakfast.
- Prep Time: 15 min
- Cook Time: 20 min
- Total Time: 65 min
- Yield: 8 servings 1x
- Category: Breakfast
- Method: Griddle Cooking
- Cuisine: American
- Diet: Vegetarian
Ingredients
- 1 cup active sourdough discard (unfed starter)
- 1 cup all-purpose flour
- 1/2 cup milk, warm
- 1 tablespoon honey or sugar
- 1 teaspoon baking soda
- 1/2 teaspoon salt
- 1 tablespoon unsalted butter, melted
- Cornmeal, for dusting
Instructions
- Combine the sourdough discard, warm milk, and honey in a medium bowl. Whisk until smooth.
- In a separate bowl, whisk together the flour, baking soda, and salt.
- Add the dry ingredients to the wet ingredients. Mix gently with a spatula until just combined. Do not overmix; the batter will be thick and sticky.
- Stir in the melted butter until incorporated.
- Cover the bowl and let the batter rest at room temperature for 30 minutes. This allows the baking soda to activate.
- Lightly dust a clean surface with cornmeal. Turn the sticky batter out onto the cornmeal. Gently pat the dough into a rough rectangle about 3/4 inch thick. Do not knead.
- Use a 3-inch round cutter (or the rim of a glass) to cut out the English muffin rounds. Place the rounds on a baking sheet lined with parchment paper and lightly dusted with cornmeal.
- Let the cut rounds rest, uncovered, for 15 minutes while you heat your cooking surface.
- Heat a dry cast-iron griddle or large skillet over medium-low heat. You want the surface hot enough to brown slowly, not burn quickly.
- Place the English muffin rounds onto the hot griddle, leaving space between them. Cook for 6 to 8 minutes per side, until deeply golden brown. The low heat is key to cooking them through and developing the interior texture.
- Remove the muffins from the griddle and let them cool completely on a wire rack.
- When ready to eat, split the muffins open using a fork to preserve the signature ‘nooks and crannies’. Toast before serving with butter and jam.
Notes
- For a tangier flavor, you can cover the batter and let it rest in the refrigerator overnight (up to 12 hours) before proceeding with step 4. If you refrigerate, let the dough warm up slightly before cutting.
- Do not use a rolling pin; gently patting the dough keeps the air pockets intact, which creates the best nooks and crannies.
- Split muffins with a fork, not a knife, to maximize the surface area for butter absorption.
Nutrition
- Serving Size: 1 muffin
- Calories: 180
- Sugar: 2
- Sodium: 250
- Fat: 4
- Saturated Fat: 2
- Unsaturated Fat: 2
- Trans Fat: 0
- Carbohydrates: 32
- Fiber: 1
- Protein: 5
- Cholesterol: 10