
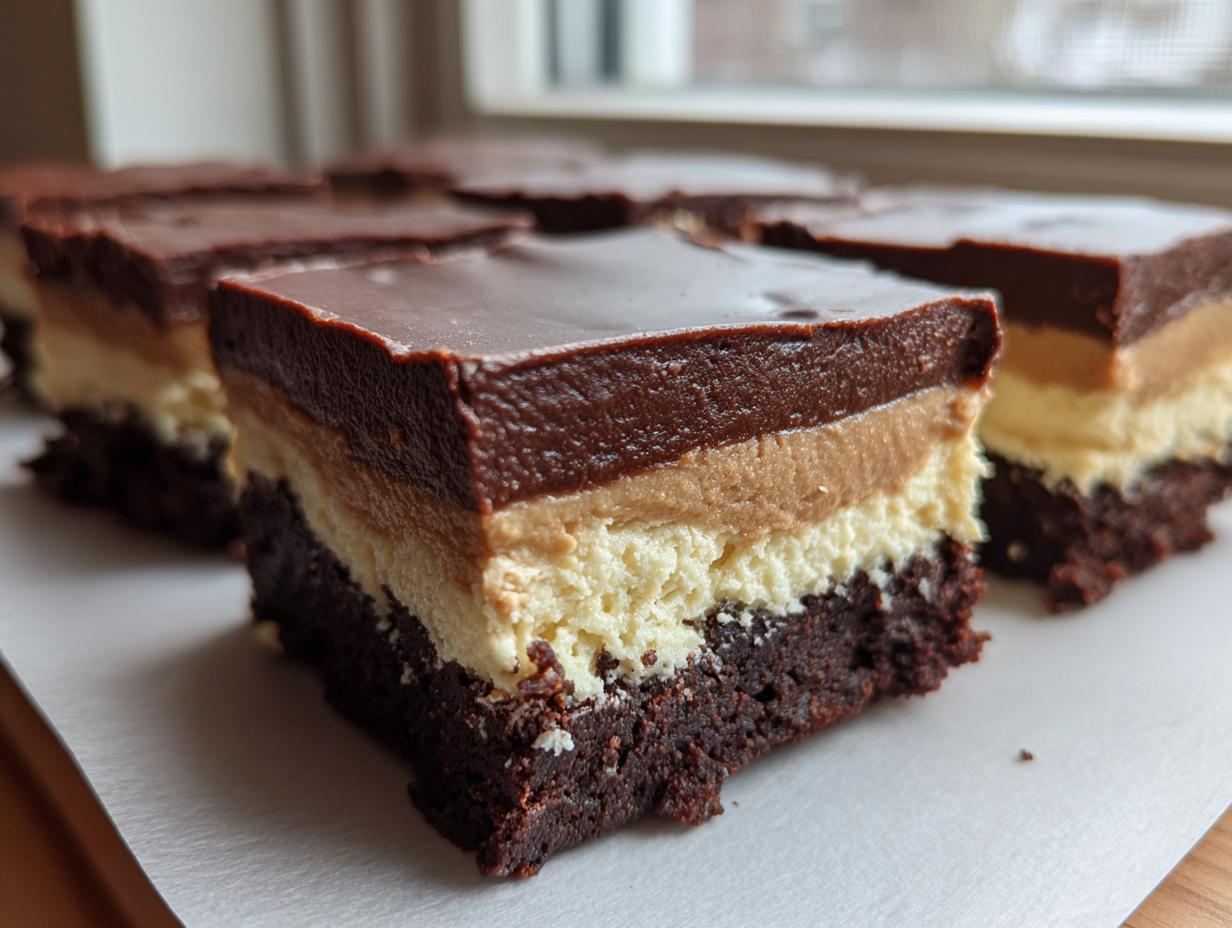
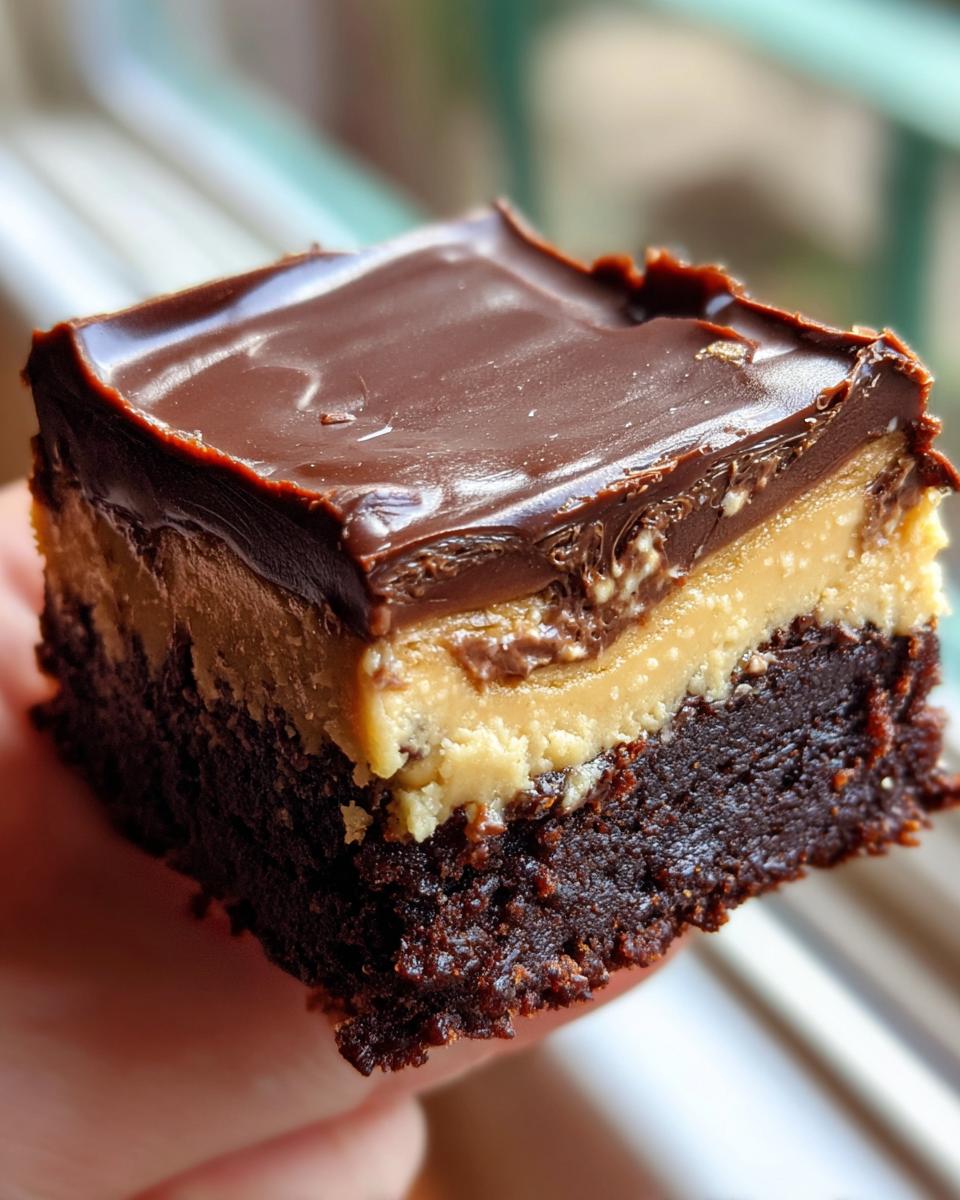
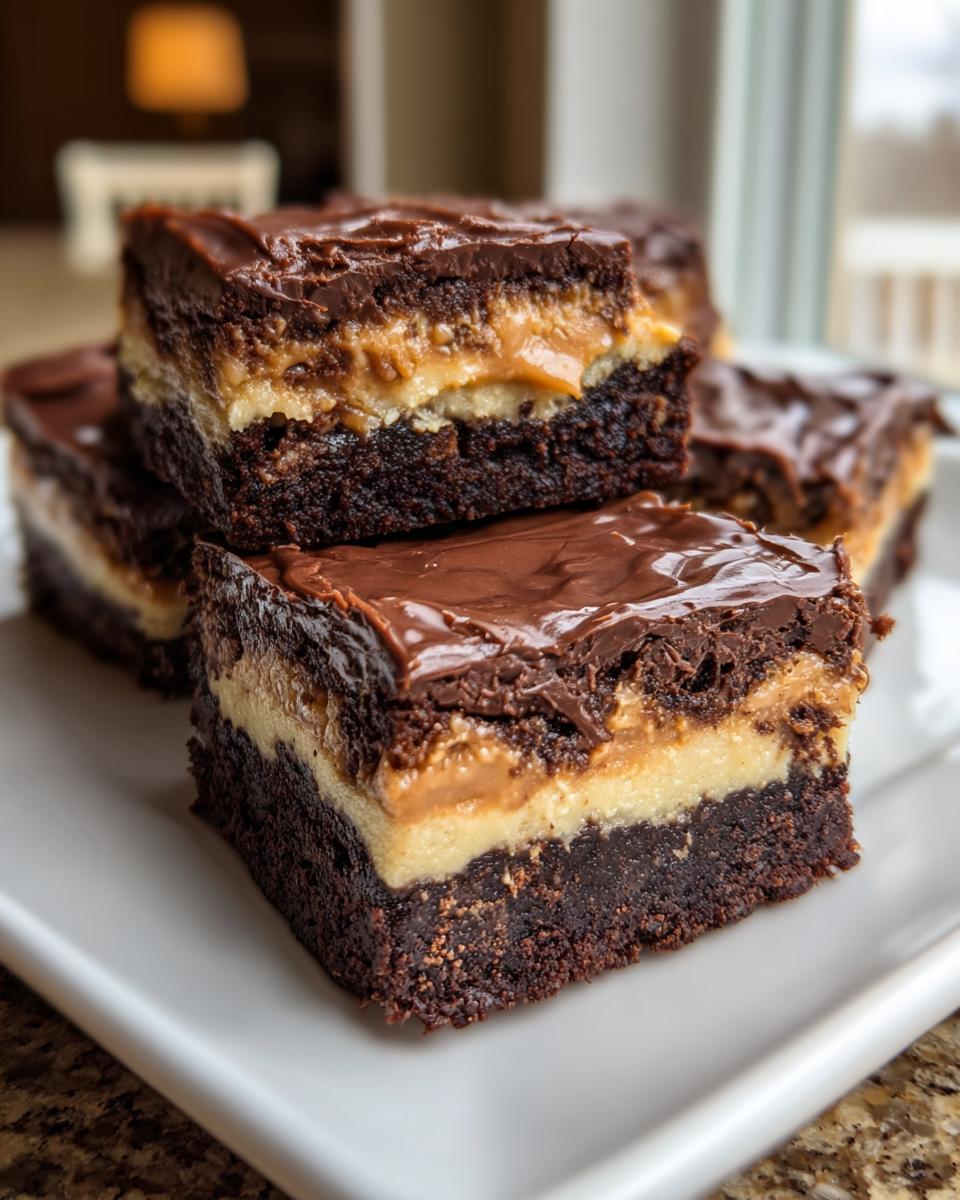
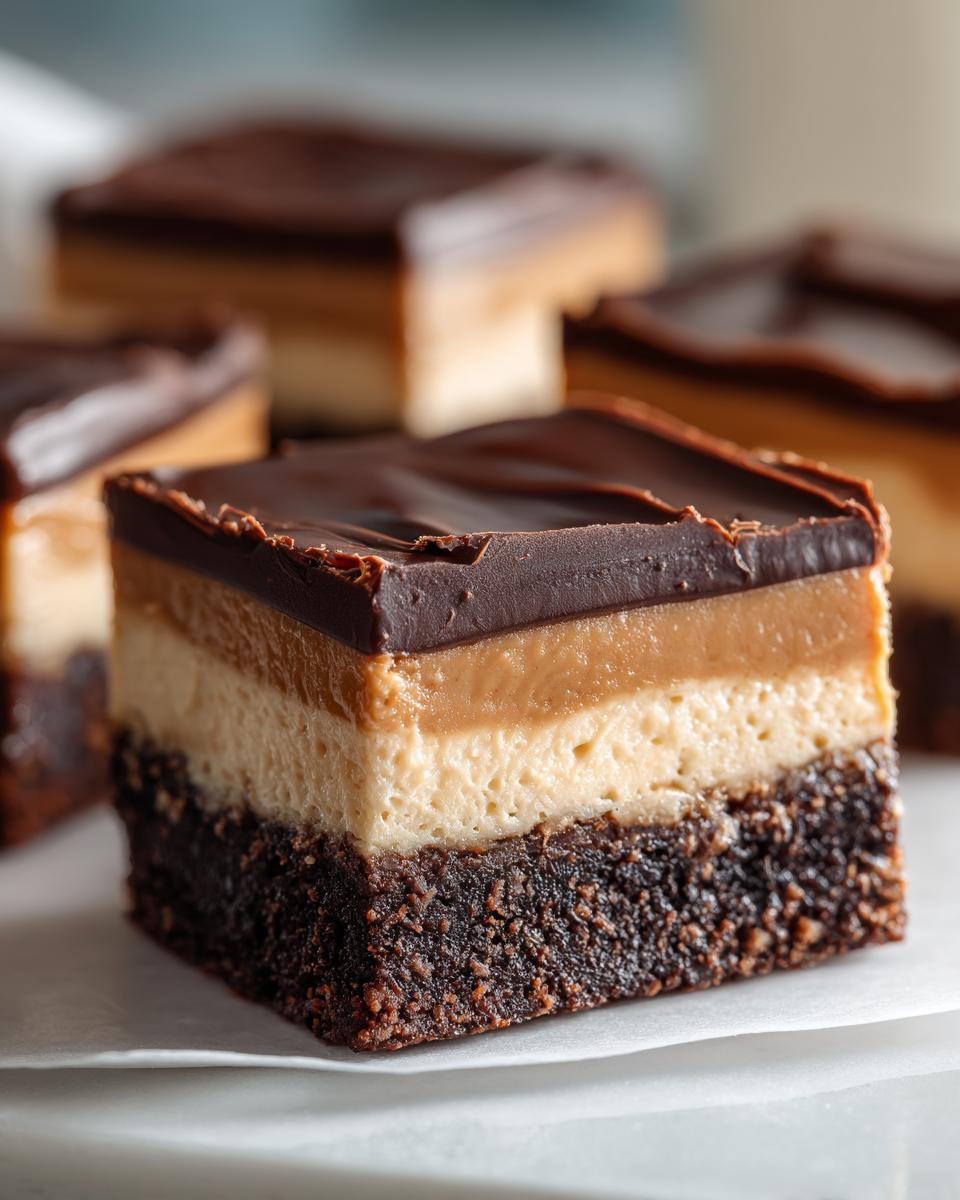
Oh my goodness, is there a flavor combination more perfect than rich, dark chocolate crashing right into creamy, sweet peanut butter? I don’t think so. We’ve all loved buckeye candy, right? But what happens when we take that incredible duo and wrap it up in a decadent, slightly chewy brownie? You get what I call the ultimate hybrid dessert: **buckeye brownies**!
Here at Cookin’ Corner, my goal is always to take those classic American flavors we all adore and turn them into something totally show-stopping but still completely dependable. I spent ages messing around with ratios to make sure this layered brownie recipe sets up beautifully every single time. If you love my peanut butter cup cookies, you absolutely need these bars next! Trust me, this three-layer beauty is going to be your new go-to for parties or those deep, dark sweet cravings. You can see how much love others put into this classic combination over at Lil’ Luna’s site, too!
- Why You Will Love These Buckeye Brownies
- Gathering Ingredients for Your Layered Buckeye Brownies
- Step-by-Step Guide to Making Perfect Buckeye Brownies
- Expert Tips for Perfect Buckeye Brownies
- Variations for Your Peanut Butter Brownies
- Storage and Reheating for Your Chocolate Peanut Butter Bars
- Serving Suggestions for Rich Brownie Bars
- Frequently Asked Questions About Buckeye Brownies
- Nutritional Estimate for Decadent Chocolate Treats
Why You Will Love These Buckeye Brownies
I know you’re looking for a dessert that delivers on flavor *and* presentation, and that’s exactly what happens here. Why should you make room in your baking schedule for these layers of deliciousness? Well, let me tell you:
- They are the definition of decadence—think of them as rich brownie bars that decided to up their game!
- You get that perfect textural contrast: a fudgy bottom layer that melts right into a thick, soft, creamy peanut butter center.
- It’s the ultimate sweet and salty dessert experience in every single bite. Seriously addictive!
- These are total crowd pleaser desserts; I always bring these to gatherings and they vanish first. They just scream ‘special occasion.’
- This layered brownie recipe might look incredibly fancy, but it’s surprisingly straightforward to assemble!
- It’s the combination everyone asks for—peanut butter and chocolate together, finally getting the gorgeous bar cookie treatment they deserve. If you struggle with brownies, check out my tips for getting that perfectly crackly top on a standalone batch!
Gathering Ingredients for Your Layered Buckeye Brownies
Okay, since we are building this beauty up layer by layer, we need to make sure we have everything prepped! When it comes to these homemade buckeye candy brownies, organization is key because we are working with three distinct components. Don’t worry, you won’t need anything too crazy, just some pantry staples and good quality chocolate chips.
For the fudgy base, you’ll want the melted butter, sugar, eggs, vanilla, flour, cocoa powder, and those little chocolate chips for extra richness. Then, get your filling ready by making sure you have softened butter—that’s important for smoothness—creamy peanut butter, milk, and about three full cups of sifted powdered sugar. We absolutely need that sugar sifted for the filling!
Finally, for that glossy chocolate finish, we’re making a quick ganache using chocolate chips and a touch of shortening or coconut oil to keep it shiny and pourable. If you want to see how I make a killer standalone peanut butter fudge, check that out, but these ingredients work perfectly for the middle layer here! These will definitely turn heads at your next gathering, similar to the beautiful treats found on Lil’ Luna’s recipe page.
Step-by-Step Guide to Making Perfect Buckeye Brownies
Okay, here we go! This is where the magic happens, turning those gorgeous ingredients into the incredible layered experience we’re aiming for. Remember, patience is everything, especially when dealing with layers. We want structure, not soup! If you’re prepping ahead, check out how I keep leftovers fresh in my guide on brownie refrigerator cake making.
Preparing and Baking the Fudgy Brownie Base
First things first, get that oven warmed up to 350°F (175°C)! And listen to me on this: line that 9×13 pan with parchment paper, letting the edges hang over like little handles. This is your insurance policy for getting these beauties out in one slab later! Mix up your wet ingredients—melted butter and sugar first, then slowly beat in those eggs. Whisk your dry stuff separately before gently folding it all together. We want fudgy, not tough, so mix only till the flour disappears. Fold in those first chocolate chips and spread it out evenly. Bake it for about 25 to 30 minutes. You’re looking for moist crumbs showing on a toothpick, not a clean dry stick! Don’t forget to let it cool down completely before the next step—I mean, fully cool! Learning the timing here is key to success with these simple brownie bars.
Creating the Creamy Peanut Butter Fudge Layer
While that layer cools down (and trust me, it needs time!), whip up the filling. The secret to a smooth peanut butter filling is using butter that is actually softened—room temperature soft, not melted soft. Beat your softened butter and peanut butter together until they are really light and fluffy. Then, in goes the sifted powdered sugar a cup at a time, followed by the milk until it sings. It should be spreadable but sturdy. Once the brownie is totally cool—and I mean stone cold—gently spread this luscious peanut butter mixture over the top edge-to-edge. Pop that pan into the fridge for at least an hour. We need this layer firm enough to support the final chocolate pour!
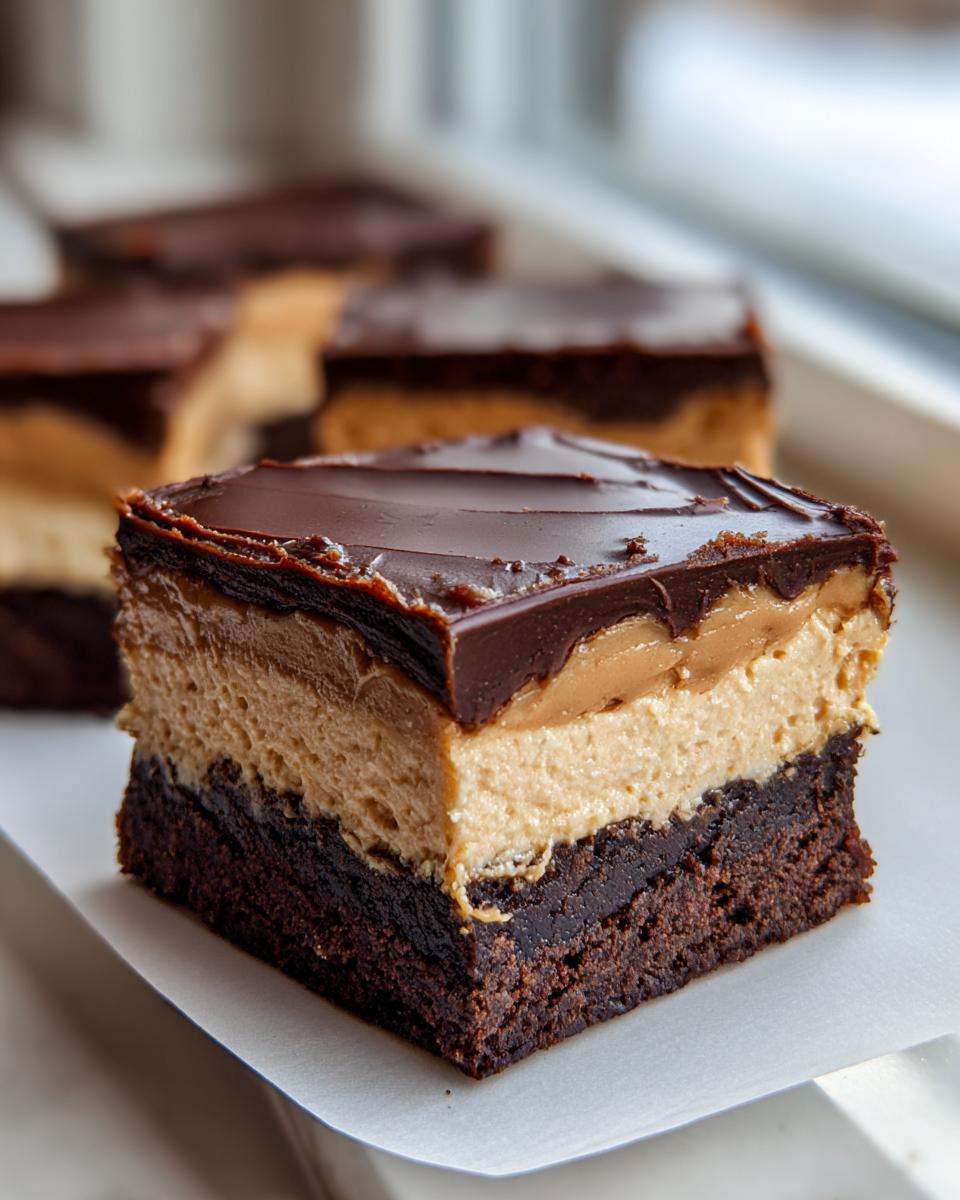
Finishing the Buckeye Brownies with Chocolate Ganache
Now for the grand finale! The ganache topping seals the deal. In a microwave-safe bowl, combine the chips for the topping and your shortening or coconut oil—that little bit of shortening makes the ganache super glossy and easy to cut, which is great for these thick bars. Microwave in short bursts—30 seconds at a time—stirring well between each blast, until it’s smooth as silk. Pour that melted chocolate right over the chilled peanut butter layer. Work fast to spread it evenly before it sets up! Then, back into the fridge for at least two hours until that chocolate top is totally firm. Seriously, these look incredible topping by topping, almost as good as my favourite cheesecake cookies!
Expert Tips for Perfect Buckeye Brownies
It’s one thing to follow directions, but it’s another thing entirely to nail that perfect, bakery-quality texture. Since these are such rich bars, a few tiny tweaks can take your **buckeye brownies** from great to absolutely legendary. I’ve learned these tricks since the hard way, so please, take my advice so you don’t have to!
First, let’s talk about that fudgy texture in the base layer. If you want them mega-fudgy, you absolutely must err on the side of underbaking just slightly. Remember what I said about moist crumbs on the toothpick? If the toothpick comes out clean, you’ve gone too far and you’ll end up with a chewy, slightly dry base instead of that perfect melt-in-your-mouth texture we want.
The biggest game-changer for presentation, especially with any layered bar cookie, is patience with the chill time. You cannot rush setting that peanut butter layer, and you definitely can’t rush the final chocolate top. If you try to cut these when the chocolate is even slightly soft, you get a huge mess. Seriously, give them a full two hours in the fridge, maybe even longer.
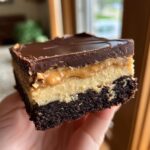
When it *is* time to cut, here is my secret for Instagram-worthy edges: Use a very sharp, long knife, and wipe the blade clean and briefly run it under hot water between every single cut. That hot blade glides right through the firm chocolate ganache and the set peanut butter filling without dragging or cracking the top layer. It takes an extra minute, but it makes all the difference!
If you’re looking for other ways to elevate your chocolate game, my recipe for the best brownie recipes has a few extra tricks for depth of flavor. And if you’re having a party and want something decadent but slightly different, my friends over at Cooking Virtuoso have some neat ideas too!
Variations for Your Peanut Butter Brownies
I love adapting recipes because let’s be real—sometimes you need a shortcut, and sometimes you just want to see how far you can push a classic flavor profile! These **Peanut Butter Brownies** are already amazing from scratch, but if you’re short on time or working with specific dietary needs, I’ve got you covered. We want everyone to enjoy this sweet and salty dessert, after all!
If you’re aiming for an Easy Buckeye Dessert, my first suggestion is simple: cheat on the base layer! You can absolutely use your favorite boxed brownie mix. Just prepare the mix according to the 9×13 pan instructions on the back, spreading it into your parchment-lined pan, and bake it. Then, cool it down and proceed as normal with the peanut butter fudge filling and the chocolate ganache. It saves you about 20 minutes of mixing time, and honestly, the texture still holds up beautifully because the layers stabilize each other.
For those who need to mix things up a bit more, here are a few ideas:
- Flaky Salt Finish: Before the chocolate ganache sets up in the fridge, sprinkle a tiny amount of flaky sea salt over the top. That hit of salt against the super-sweet peanut butter layer is just incredible. It really enhances that sweet and salty dynamic!
- Nut-Free Option: If you need to make these allergy-friendly, you can substitute the peanut butter with a good quality sunflower seed butter or tahini. Make sure you check the label for cross-contamination if allergies are severe! You might need to adjust the milk slightly in the filling because seed butters have a different oil content.
- Extra Chocolate! If you’re anything like me and feel like there’s no such thing as too much chocolate, try stirring in some chopped milk chocolate bars or mini peanut butter chips into the brownie batter along with the semi-sweet chips listed in the original recipe.
If you love using mixes to speed things up, you might also enjoy my recipe for cake mix cookie bars for another easy crowd pleaser dessert base. And for those who want the official low-down on using a mix for this recipe, I saw a great breakdown by the folks at Baking You Happier!
Storage and Reheating for Your Chocolate Peanut Butter Bars
Now that you’ve gone to all this trouble to create these magnificent three-layer treasures, we need to talk about keeping them perfect! Because we have that creamy peanut butter center right underneath a solid layer of ganache, these **Chocolate Peanut Butter Bars** have a little bit of a different storage requirement than a plain old brownie.
The absolute best place for these, hands down, is the refrigerator. That peanut butter fudge layer needs that nice, cool environment to stay firm and not get too soft, especially if your kitchen runs warm. You can totally keep them tightly covered—I use plastic wrap directly against the chocolate layer, then cover the whole pan or container—in the fridge for about a week. They taste fantastic straight from the cold, too; it gives that peanut butter filling a really satisfying firmness! If you’re looking for other chilled dessert ideas, you might want to check out my recipe for an easy no-bake ice cream pie.
Can you freeze them? Yes, you absolutely can! If you know you won’t eat them all in a week, I highly recommend slicing them first, putting wax paper between each bar, and stashing them in an airtight, freezer-safe container. They freeze beautifully for up to three months. The texture holds up really well because of that sturdy chocolate top layer.
Thawing is easy peasy. Just pull out what you want to eat and let them thaw on the counter or in the fridge for a few hours. Seriously, they come back to life perfectly!
Serving Suggestions for Rich Brownie Bars
We’ve made a big, beautiful slab of pure chocolate and peanut butter perfection, so now comes the best part: serving! These rich brownie bars are intense, my friends. They could be a dessert all on their own, but sometimes, just sometimes, you need to complement that intensity with the perfect sidekick. These are definitely certified **Crowd Pleaser Desserts**, whether you serve them plain or dressed up a little!
If you’re serving these after a heavy meal, sometimes simplicity is best. A nice, tall glass of cold milk is my number one suggestion—it just cuts through that richness perfectly. If you’re feeling a little fancier, a scoop of good quality vanilla bean ice cream alongside a warm brownie square is unbeatable. The slight temperature difference between the cold ice cream and the room-temperature bar is just divine.
For evening servings or a dessert board, I always pair these with something warm to drink. A strong cup of black coffee or espresso really balances out the sweetness of the peanut butter layer. If you have kids (or just love warm, cozy drinks yourself), you absolutely have to try my recipe for whipped hot chocolate! It’s lighter than regular hot cocoa but still feels incredibly indulgent next to these heavy bars.
One last little trick to make them look even more professional when you put them out? Right before serving, dust the tops of the bars lightly with high-quality, unsweetened cocoa powder using a fine-mesh sieve. It adds a gorgeous matte finish contrast to the shiny ganache and just screams ‘I put effort into this!’—even though we know it took barely any extra time!
Frequently Asked Questions About Buckeye Brownies
It’s natural to have questions when you’re layering three different components! I always get asked about texture and timing, so I wanted to put a little FAQ section together right here to clear up any last worries before you start mixing up these beauties. I love that you’re diving into making these **Chocolate Peanut Butter Bars**!
Can I make the peanut butter layer firmer in these Buckeye Brownies?
Oh, absolutely! That’s an easy fix, especially if your kitchen is a little warm or if you just prefer a really solid, almost fudge-like center. Remember in the main instructions? We used a quarter cup of milk for that peanut butter filling. If you want it firmer, just scale that back slightly, maybe down to two tablespoons of milk. It will need a little extra mixing to come together smoothly, but it sets up much sturdier when chilled. That makes them even better for stacking or transporting to parties!
What is the best way to cut these Layered Brownie Recipe bars cleanly?
This is probably the most asked question, and it all comes down to two things: coldness and a clean blade! First, you must let the bars chill completely—we are talking totally set chocolate ganache on top—I usually leave them overnight if I can manage it! Second, when you cut, use a really sharp, long knife. Run that knife under really hot water for about 10 seconds, dry it off quickly, and make your first cut. Wipe the knife clean, run it under hot water again, dry it, and make the next cut. Rinse and repeat. This hot knife trick ensures you get those smooth, professional edges on your **Layered Brownie Recipe** squares without dragging that lovely top layer.
If you’re planning ahead, you can find more great tips for timing your baking schedule in my guide on make-ahead recipes!
If you love clean cuts, you might also want to check out the lovely texture tips provided by the folks at SLS Recipes on handling these dense bars!
Nutritional Estimate for Decadent Chocolate Treats
Now, I know when we’re baking something this gloriously rich, we aren’t exactly checking calories, but some of you lovely bakers always ask for the rundown! So, here is the generalized estimate for one of these amazing, decadent chocolate treats. Please remember, these numbers are just an estimation based on the recipe measurements provided, and they can definitely shift depending on the brand of peanut butter or the type of chocolate chips you use!
- Serving Size: 1 bar
- Calories: 380
- Sugar: 35g
- Sodium: 150mg
- Fat: 24g
- Saturated Fat: 11g
- Unsaturated Fat: 13g
- Trans Fat: 0.5g
- Carbohydrates: 40g
- Fiber: 2g
- Protein: 5g
- Cholesterol: 60mg
See? That’s a lot of goodness packed into one little square! It’s a little slice of heaven, which justifies the occasional indulgence. I always say, if you’re going to have dessert, you might as well make it count, right? Just enjoy it, and maybe go for a nice long walk later!
PrintUltimate Layered Buckeye Brownies
Make these decadent Buckeye Brownies featuring a fudgy chocolate base, a thick, creamy peanut butter fudge layer, and a glossy chocolate ganache topping. This layered brownie recipe combines the best of chocolate and peanut butter into one rich bar.
- Prep Time: 25 min
- Cook Time: 30 min
- Total Time: 3 hours 55 min
- Yield: 24 servings 1x
- Category: Dessert
- Method: Baking
- Cuisine: American
- Diet: Vegetarian
Ingredients
- 1 cup (2 sticks) unsalted butter, melted
- 2 cups granulated sugar
- 4 large eggs
- 1 teaspoon vanilla extract
- 1 cup all-purpose flour
- 3/4 cup unsweetened cocoa powder
- 1/2 teaspoon salt
- 1/2 cup semi-sweet chocolate chips (for brownie layer)
- 1 cup (2 sticks) unsalted butter, softened (for peanut butter layer)
- 1 cup creamy peanut butter
- 3 cups powdered sugar, sifted
- 1/4 cup milk
- 1 1/2 cups semi-sweet chocolate chips (for ganache)
- 1/2 cup semi-sweet chocolate chips (for ganache)
- 2 tablespoons shortening or coconut oil (for ganache)
Instructions
- Preheat your oven to 350°F (175°C). Line a 9×13 inch baking pan with parchment paper, leaving an overhang on the sides for easy removal.
- Prepare the brownie layer: In a large bowl, whisk together the melted butter and granulated sugar until combined. Beat in the eggs one at a time, then stir in the vanilla extract.
- In a separate bowl, whisk together the flour, cocoa powder, and salt. Gradually add the dry ingredients to the wet ingredients, mixing until just combined. Do not overmix.
- Fold in the 1/2 cup of chocolate chips. Spread the batter evenly into the prepared 9×13 inch pan. Sprinkle the remaining 1/2 cup of chocolate chips over the top.
- Bake the brownie layer for 25 to 30 minutes, or until a toothpick inserted near the center comes out with moist crumbs attached. Let the brownie cool completely in the pan.
- Prepare the peanut butter fudge layer: In a large bowl, beat the softened butter and peanut butter together until smooth. Gradually add the sifted powdered sugar until fully incorporated. Mix in the milk until the mixture is smooth and creamy.
- Spread the peanut butter mixture evenly over the cooled brownie layer. Place the pan in the refrigerator for at least 1 hour, or until the peanut butter layer is firm.
- Prepare the chocolate ganache topping: Place the 1 1/2 cups of chocolate chips and the shortening/coconut oil in a microwave-safe bowl. Microwave in 30-second intervals, stirring well after each, until the chocolate is completely melted and smooth.
- Pour the melted chocolate ganache over the chilled peanut butter layer. Spread quickly and evenly to cover the entire surface.
- Return the pan to the refrigerator for at least 2 hours, or until the ganache is set.
- Once set, use the parchment paper overhang to lift the entire slab from the pan. Cut into squares to serve your rich brownie bars.
Notes
- For a fudgy texture, avoid overbaking the brownie base. The center should still look slightly underdone when you remove it.
- If you prefer a firmer peanut butter layer, reduce the milk in the filling to 2 tablespoons.
- You can use a box brownie mix for the base layer to make this an easy box brownie recipe, following package directions for a 9×13 pan.
Nutrition
- Serving Size: 1 bar
- Calories: 380
- Sugar: 35g
- Sodium: 150mg
- Fat: 24g
- Saturated Fat: 11g
- Unsaturated Fat: 13g
- Trans Fat: 0.5g
- Carbohydrates: 40g
- Fiber: 2g
- Protein: 5g
- Cholesterol: 60mg