
If you grew up in the Midwest like I did, you know that some days just demand true, stick-to-your-ribs comfort food. It’s that delicious, soul-soothing feeling you get from something baked slow and low until it’s bubbly and glorious. Forget complicated recipes that leave you scrubbing pans until midnight; the answer to those hectic Tuesday nights is right here. Today, we’re diving headfirst into the ultimate easy weeknight solution: the magnificent pierogi casserole. Trust me, this cheesy, savory bake using those humble frozen pierogi is about to become your regular rotation centerpiece.
- Why This Cheesy pierogi Casserole is Your New Favorite Comfort Food Casserole
- Gathering Ingredients for Your pierogi Casserole
- How to Prepare the Classic Baked pierogi Casserole
- Slow Cooker pierogi Casserole: Crockpot Casserole Ideas
- Tips for the Best kielbasa pierogi Recipe Success
- Serving Suggestions for Your pierogi Casserole
- Storage and Reheating Instructions for pierogi Casserole
- Frequently Asked Questions About pierogi Casserole
- Share Your Experience Making This pierogi Casserole
Why This Cheesy pierogi Casserole is Your New Favorite Comfort Food Casserole
When I look for a dinner that truly checks every box—quick, satisfying, and tastes like a hug—this pierogi casserole rises to the top every single time. It’s everything you want in a classic comfort food casserole without all the fuss. This recipe is proof that you don’t need hours of effort to deliver truly hearty weeknight meals that the whole family will cheer for. It’s just ridiculously good, and it comes together faster than you might think! If you love how simple a great bake can be, maybe check out my recipe for easy cheeseburger casserole too, but this pierogi dish is special.
- It’s hearty enough for a Sunday dinner but quick enough for a Wednesday.
- Clean-up is almost non-existent since everything bakes in one dish.
- That combination of smoked sausage, dill, and sharp cheddar is just magic.
Quick Assembly Using Frozen pierogi Recipes
Honestly, I love how this recipe leans heavily into using frozen pierogi recipes. That’s the genius of it! You boil them up quickly while you brown the kielbasa, and suddenly, you’re ready to build the layers. No tedious rolling or filling required here. This truly qualifies as one of those amazing one pan dinner recipes because you toss it all into the dish, pour the sauce, and bake. Done!
Rich, Creamy pierogi Casserole Texture
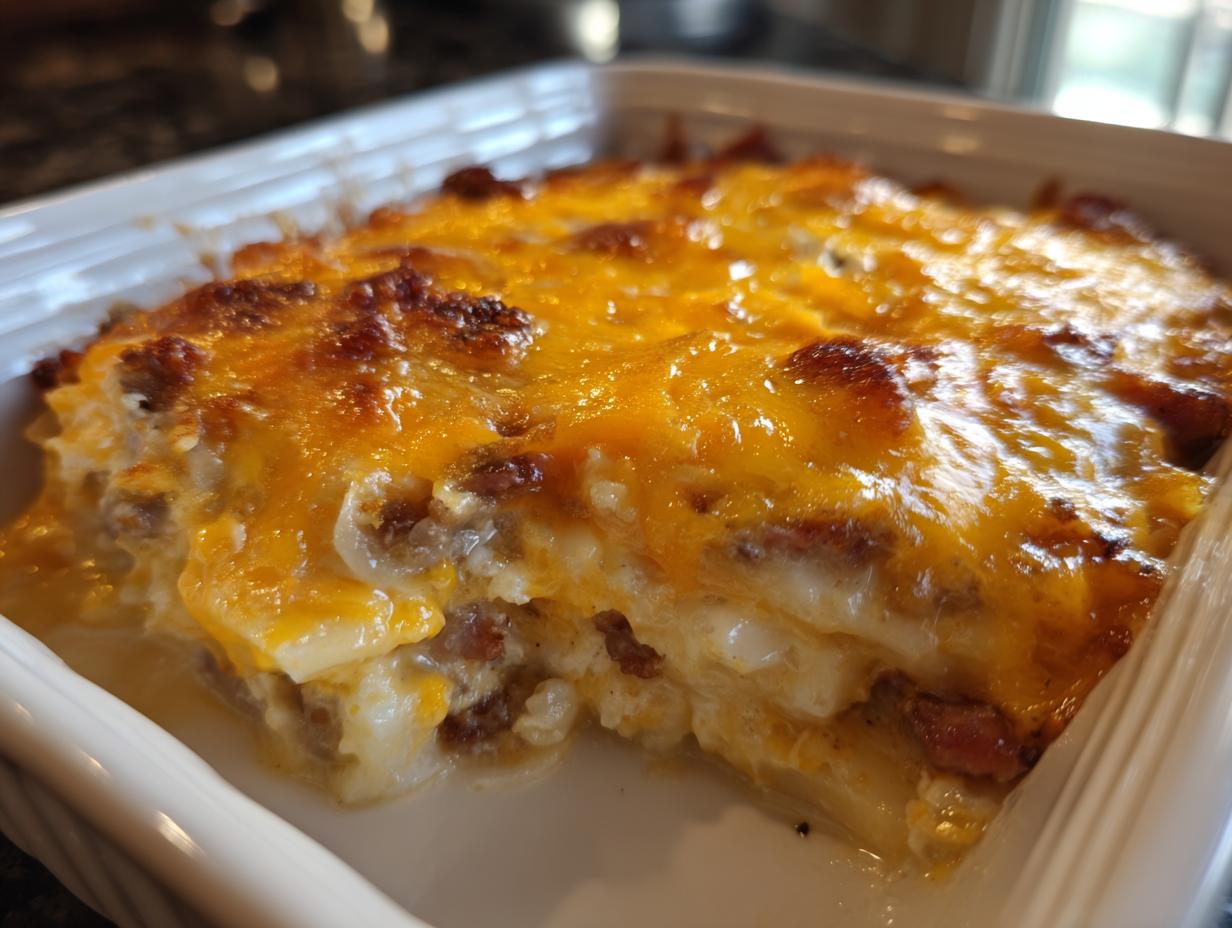
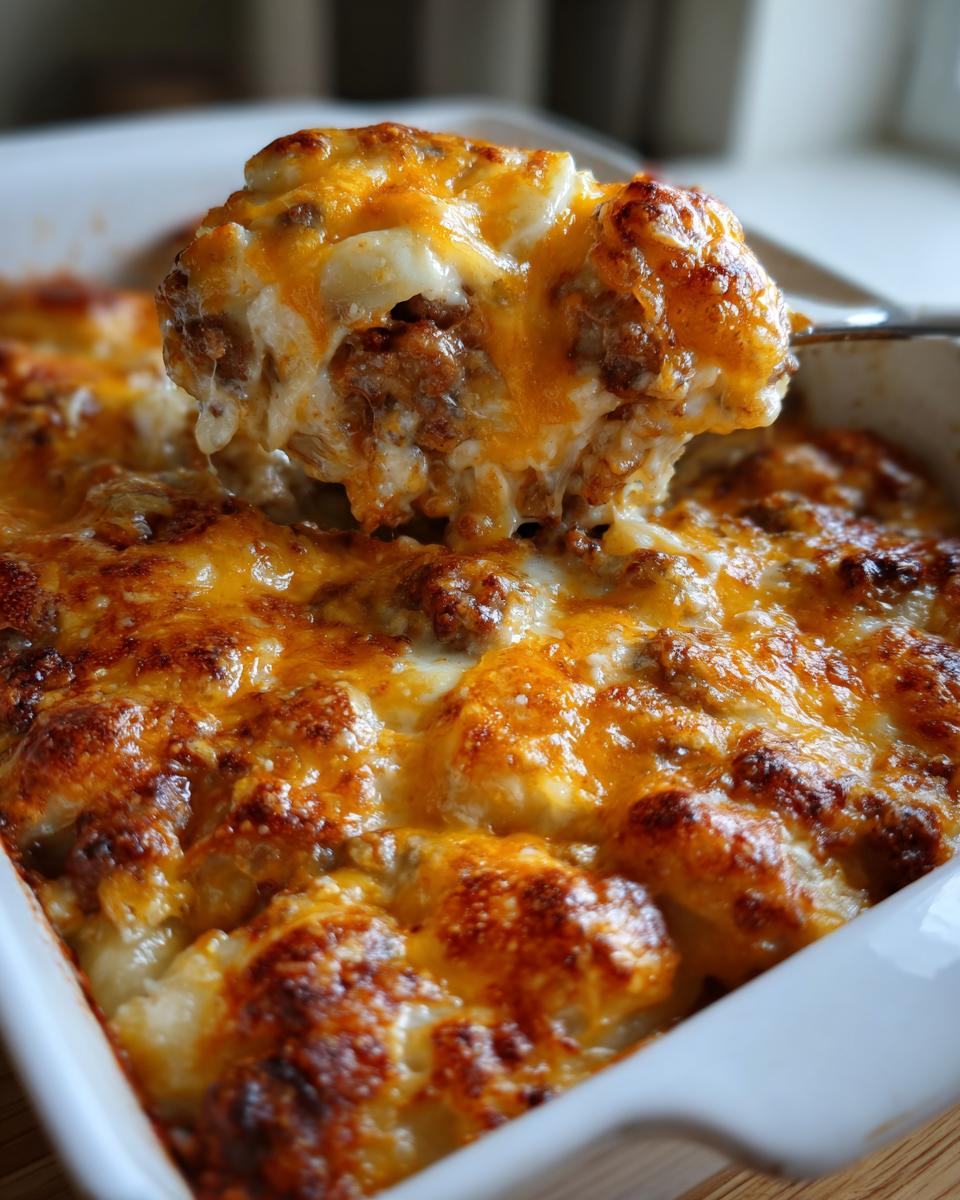
Oh, the texture! This is not some dry bake, I promise you that. We use a velvety sauce made with soup and sour cream that coats every potato and cheese pocket. When this hits the oven, it creates such a wonderful, almost decadent experience. That bubbling sauce mingling with the melted cheese and savory bacon creates the most satisfying, creamy pierogi casserole slice you’ve ever had. It’s rich, it’s savory, and it’s perfectly balanced.
Gathering Ingredients for Your pierogi Casserole
Okay, let’s talk about what you need to get this beauty assembled. Since this is a pierogi casserole, we’re using potato and cheese pierogi—the classics rule here. You’ll also need that smoky pop from kielbasa, plus some bacon for that rich flavor that makes any filling dinner ideas so much better. I’ve listed out exactly what you need below. Remember, good ingredients make a good casserole, period. We want everything prepped so assembly is a breeze. It’s all about efficiency for this great budget friendly casserole!
- 1 (24 ounce) package frozen potato and cheese pierogi
- 1 pound smoked kielbasa sausage, sliced
- 1 cup chopped onion
- 4 slices bacon, cooked and crumbled
- 1 (10.5 ounce) can cream of chicken soup
- 1 cup sour cream
- 1/2 cup milk
- 1 teaspoon dried dill weed
- 1/2 teaspoon black pepper
- 2 cups shredded cheddar cheese, divided
Ingredient Notes and Substitutions
This recipe is wonderfully flexible, which is great for when you’re putting together meal prep casserole items. If you don’t love kielbasa, go ahead and swap it out! Smoked turkey sausage works perfectly, or even some leftover rotisserie chicken if you’re cleaning out the fridge. Some folks like to use sauerkraut pierogi, but just be aware that they will release more liquid, so make sure you drain everything super well if you go that route. Always use real cheddar—don’t try to cheat us out of the good stuff!
How to Prepare the Classic Baked pierogi Casserole
This is where the magic happens for our oven version of the cheesy pierogi bake! I’m walking you through the standard baking method today because sometimes you just want to smell that gorgeous, savory aroma filling your house. First things first—turn that oven up to 375 degrees Fahrenheit and make sure you’ve greased up that 9×13 dish really well. You’re going to boil your frozen pierogi just until they are tender—don’t overcook them! While those are cooking, brown your kielbasa and soften those onions. We want all that flavor concentrated before it goes into the layers for this simple baked pierogi goodness. If you need a refresher on oven techniques for baked items, check out my guide on oven-roasted potatoes; the principle of getting a good sear first is similar!
Creating the Creamy pierogi Casserole Sauce Base
You absolutely have to whisk this sauce first! In a separate bowl, forget using an electric mixer—a good old whisk works perfectly here. You’re just combining that can of cream of chicken soup, your sour cream, the milk, and that little bit of dill weed and pepper. Whisk it until it’s totally smooth because we want that luscious, creamy pierogi casserole coating every single layer of pierogi we put in there.
Layering and Baking Your Cheesy pierogi Bake
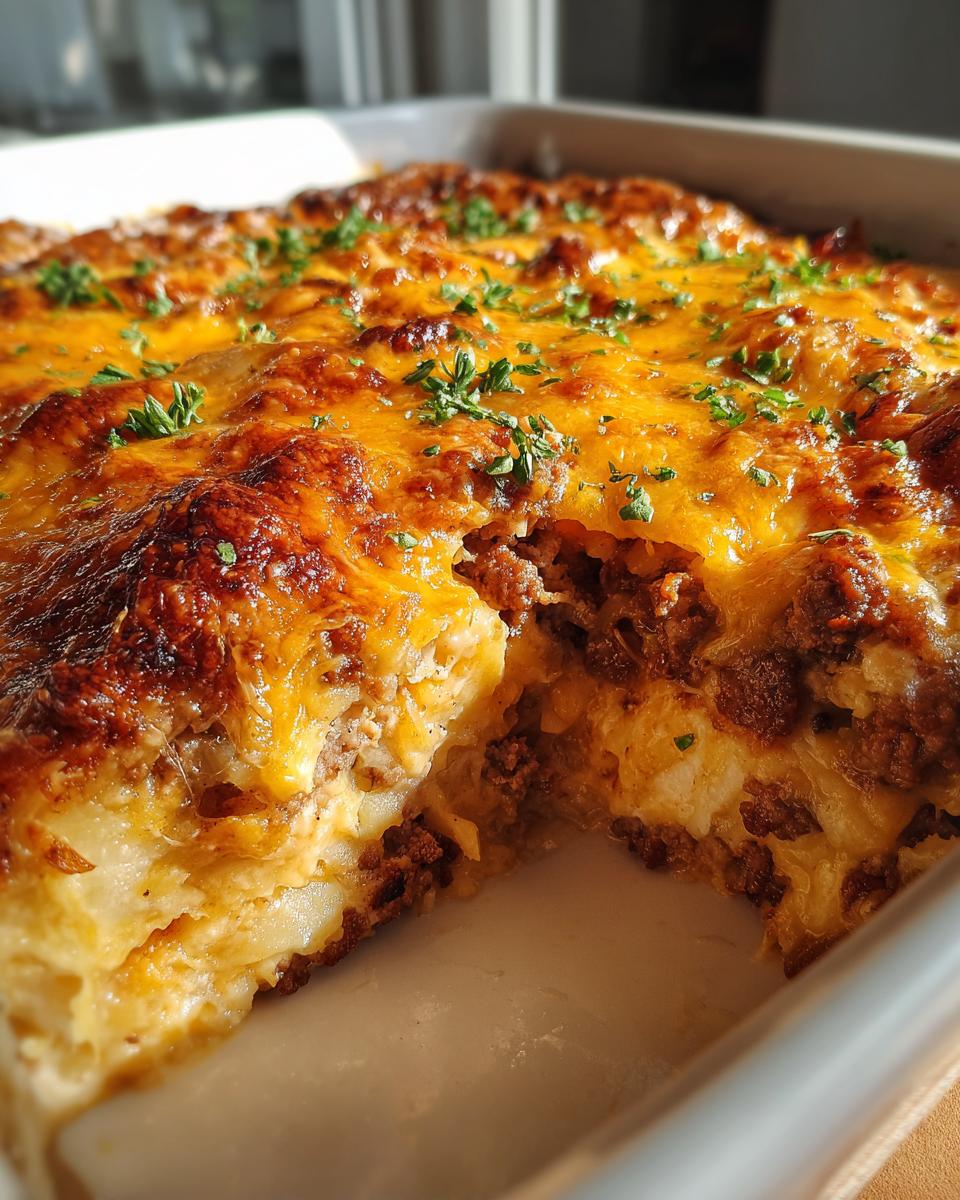
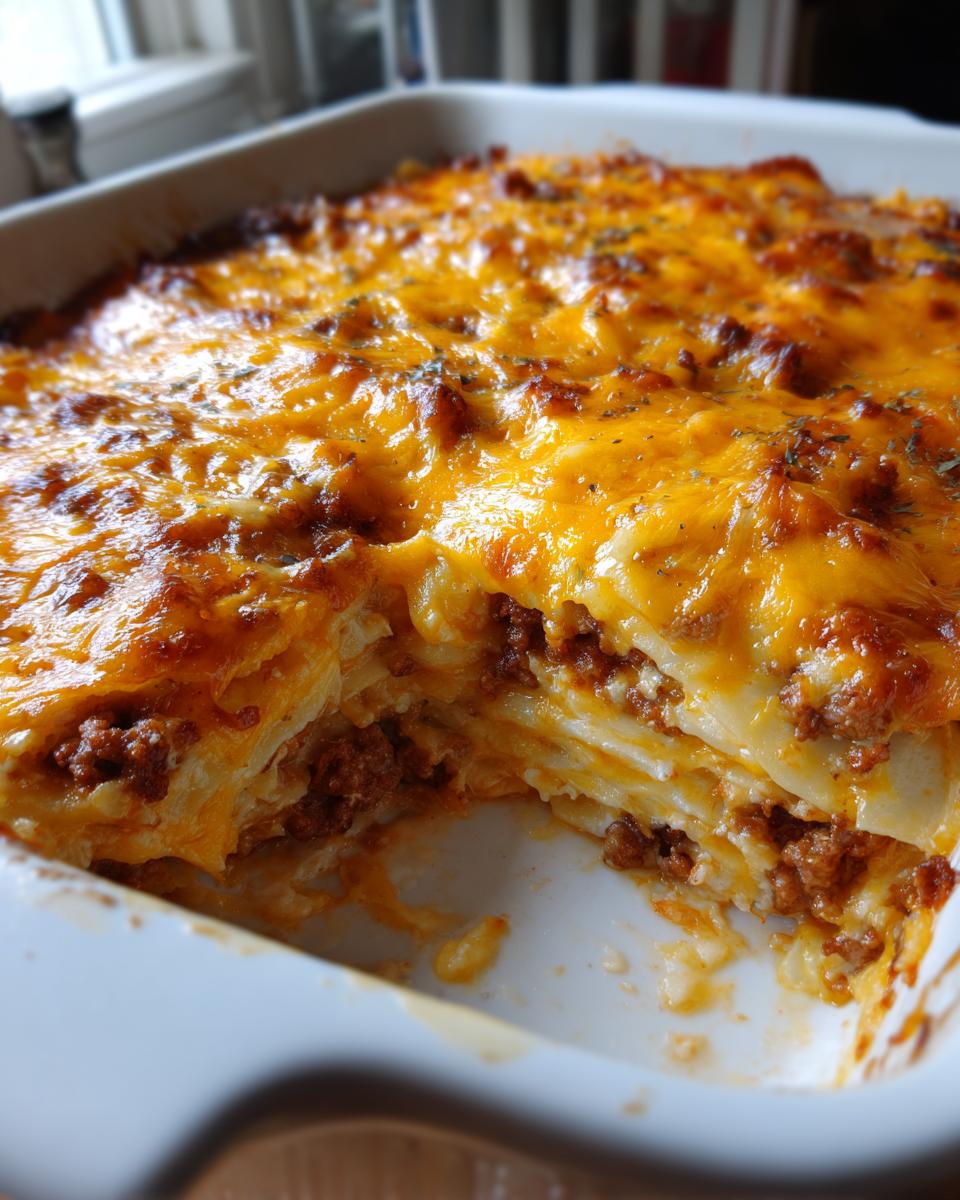
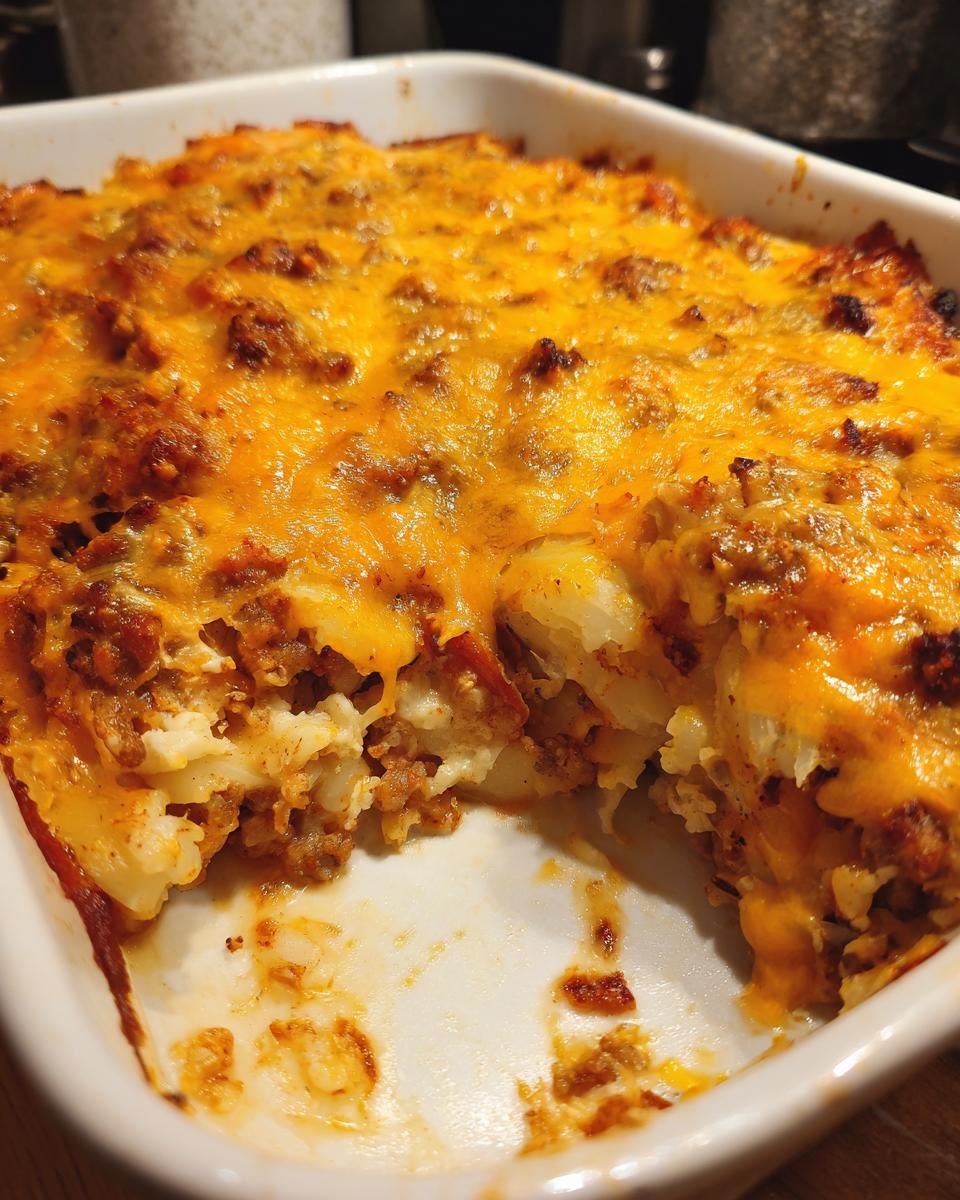
Time to build! You layer half the pierogi, half the kielbasa/onion mix, half the bacon, and then half your shredded cheddar cheese. Repeat that once more to use up all those yummy solids. Then, pour that creamy sauce evenly over the very top layer. Pop it into the oven for about 25 to 30 minutes. You’re looking for bubbly sides and a top where that cheddar cheese turns a lovely golden brown. Don’t skip Step 9: let it rest for five minutes! It keeps those slices neat when you serve up this incredible easy pierogi dinner.
Slow Cooker pierogi Casserole: Crockpot Casserole Ideas
Now, I know what you’re thinking: “Sarah Jane, this smells amazing, but I just don’t have 30 minutes to bake tonight.” Don’t you worry your head about it! This pierogi casserole is a fantastic candidate for the slow cooker, making it one of my favorite crockpot casserole ideas for those days when the oven is just too much effort. If you are looking for slow cooker pierogi recipes that are hands-off, this is it.
You treat the assembly exactly the same way as the baked version, but instead of layering it in a dish for the oven, you layer everything into your greased slow cooker—all the pierogi, sausage, sauce, bacon, and the first cup of cheese. You skip pouring the sauce over the top layer of cheese, though; we save that for later!
You want to cook this baby on the low setting for about four hours, or if you’re in a real pinch, high for an hour and a half to two hours. Check it carefully! The real trick to making this a perfect family friendly casserole is adding that final cup of cheese on top during the last 15 minutes of cooking. This ensures it melts beautifully right before serving, kind of like you just pulled it out of the oven. If you’re curious about other slow cooker meals that save your weeknights, you might enjoy my recipe for crockpot beef tips. And if you want to see another take on this exact setup, this pin over at classic crockpot pierogi casserole is a great resource too!
Tips for the Best kielbasa pierogi Recipe Success
Even though this is technically an easy dish, a couple of little things can take your kielbasa pierogi recipe from good to absolutely unforgettable. Listen, moisture control is everything here! Before those pierogi even think about joining the party, you have to drain them really, really well after boiling. If you skip this step, you’re inviting a soupy disaster, and nobody wants that in their comfort food casserole. I usually let them sit in the colander for a full minute or two just to weep out all that extra water.
My favorite final trick for that bakery-fresh look? If you want that top cheese layer to look extra tempting—that beautiful, slightly browned crust—you can carefully place the dish under the broiler for just a minute or two at the very end. Watch it like a hawk, though! If you’re done baking and need a quick sauce fix later, you can certainly try making a simple gravy from scratch, similar to the base I use for my homemade brown gravy recipe, but for this, the creamy soup base truly is best.
Serving Suggestions for Your pierogi Casserole
Since this pierogi casserole is wonderfully rich, creamy, and incredibly filling—definitely one of those filling dinner ideas—we need something bright right there next to it on the plate. You don’t want anything heavy, trust me! I usually go for something super simple that cuts through that cheese and smoked sausage flavor. A crisp, easy-to-toss green salad with a sharp vinaigrette is just perfect balance.
Alternatively, if you want something tangy, my easy refrigerator pickles on the side work surprisingly well to give you that little acidic snap. It makes the whole plate feel lighter, even though the main dish is pure comfort. It’s all about making your family friendly casserole feel complete without needing a huge fuss on the side.
Storage and Reheating Instructions for pierogi Casserole
So, you’ve got leftovers? Good! That just means you get another easy meal later this week. Once the pierogi casserole has cooled down a bit, you want to cover that dish tightly with foil or scoop the servings into an airtight container. It keeps great in the fridge for about three or four days. When it’s time for round two, I don’t trust the microwave much for casseroles because it can make things rubbery.
To keep that texture nice and creamy, aim for the oven. Pop a serving into an oven-safe dish, cover it loosely with foil, and heat it at 350 degrees for about 15 to 20 minutes until it’s piping hot all the way through. If you are in a massive rush, a quick zap in the microwave is better than nothing, just give it a quick stir halfway through!
Frequently Asked Questions About pierogi Casserole
I always get a few questions when people try making this for the first time! It’s only natural when you’re messing with such a beloved dish, right? Most folks are looking to adjust it for their family schedule or swap out an ingredient or two. If you’re wondering about making it ahead of time, yes, you absolutely can assemble this entire pierogi casserole the night before. Just cover it tightly and keep it refrigerated, then add about 10 minutes onto your baking time the next day.
If you’re looking for other easy, cozy dishes, my recipe for the easy one-pan creamy tuna pasta skillet is another fantastic go-to for busy nights!
Can I use different pierogi fillings in this pierogi Casserole?
You certainly can play around with the fillings! Potato and cheese is traditional, but meat pierogi works just fine. If you decide to use sauerkraut pierogi, you need to be extra mindful about draining, as those release a *lot* of liquid during boiling, which could make your final bake watery.
How do I prevent my pierogi Casserole from getting watery?
This is the golden rule for any great casserole! You must drain those boiled pierogi until they feel slightly dry—let them weep in the colander for a couple of minutes. Also, make sure you sauté your kielbasa and onions until most of their moisture has cooked off before layering them in. No excess puddles!
Share Your Experience Making This pierogi Casserole
Now it’s your turn to try this amazing pierogi casserole! I truly hope this brings that same cozy, nostalgic feeling to your dinner table that it brings to mine. Once you try it, please pop back here and leave me a rating and a comment so I know how it turned out for you. I always love hearing about any little tweaks or changes you made—maybe you added a different spice or tried a different cheese? If you made something delicious on the side, share that tip too! Sometimes the best ideas come from you all. And if you’re looking for something quick and creamy for a snack later, try my easy 5-minute creamy peanut sauce recipe!
PrintHearty Cheesy Pierogi Casserole with Kielbasa

Make this easy pierogi dinner using frozen pierogi, kielbasa, and cheese for a rich, satisfying comfort food casserole perfect for weeknights or potlucks.
- Prep Time: 15 min
- Cook Time: 30 min
- Total Time: 45 min
- Yield: 6 servings 1x
- Category: Dinner
- Method: Baking
- Cuisine: American
- Diet: Vegetarian
Ingredients
- 1 (24 ounce) package frozen potato and cheese pierogi
- 1 pound smoked kielbasa sausage, sliced
- 1 cup chopped onion
- 4 slices bacon, cooked and crumbled
- 1 (10.5 ounce) can cream of chicken soup
- 1 cup sour cream
- 1/2 cup milk
- 1 teaspoon dried dill weed
- 1/2 teaspoon black pepper
- 2 cups shredded cheddar cheese, divided
Instructions
- Preheat your oven to 375 degrees Fahrenheit. Lightly grease a 9×13 inch baking dish.
- Cook the frozen pierogi according to package directions until tender. Drain well and set aside.
- In a large skillet over medium heat, cook the sliced kielbasa until lightly browned. Add the chopped onion and cook until softened, about 5 minutes. Remove from heat.
- In a medium bowl, whisk together the cream of chicken soup, sour cream, milk, dill weed, and black pepper until smooth. This creates your creamy pierogi casserole base.
- In the prepared baking dish, layer half of the cooked pierogi. Top with half of the kielbasa and onion mixture, half of the crumbled bacon, and 1 cup of the shredded cheddar cheese.
- Repeat the layers: remaining pierogi, remaining kielbasa mixture, remaining bacon, and the final 1 cup of cheddar cheese.
- Pour the sour cream mixture evenly over the top layer of cheese.
- Bake for 25 to 30 minutes, or until the casserole is bubbly and the cheese on top is melted and lightly golden brown.
- Let the cheesy pierogi bake rest for 5 minutes before serving.
Notes
- For a slow cooker pierogi option, combine all ingredients (except the top layer of cheese) in a greased slow cooker. Cook on low for 3 to 4 hours or on high for 1.5 to 2 hours. Sprinkle the remaining cheese on top during the last 15 minutes of cooking.
- You can substitute smoked turkey sausage or cooked chicken for the kielbasa if you prefer a different flavor profile for this family friendly casserole.
- If you want a crispier top, place the dish under the broiler for 1-2 minutes after baking, watching closely to prevent burning.
Nutrition
- Serving Size: 1 serving
- Calories: 580
- Sugar: 5
- Sodium: 950
- Fat: 38
- Saturated Fat: 18
- Unsaturated Fat: 20
- Trans Fat: 1
- Carbohydrates: 38
- Fiber: 2
- Protein: 24
- Cholesterol: 95