
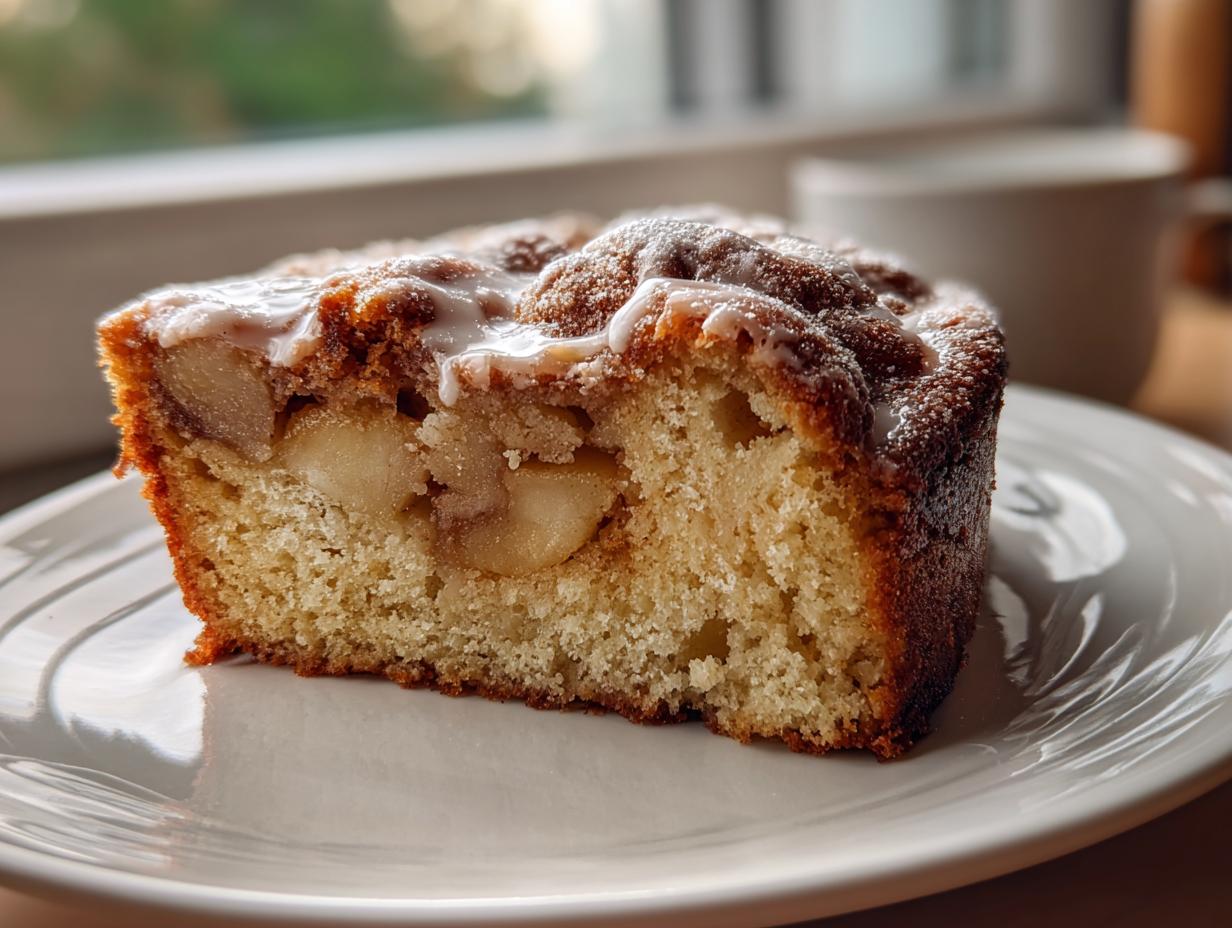
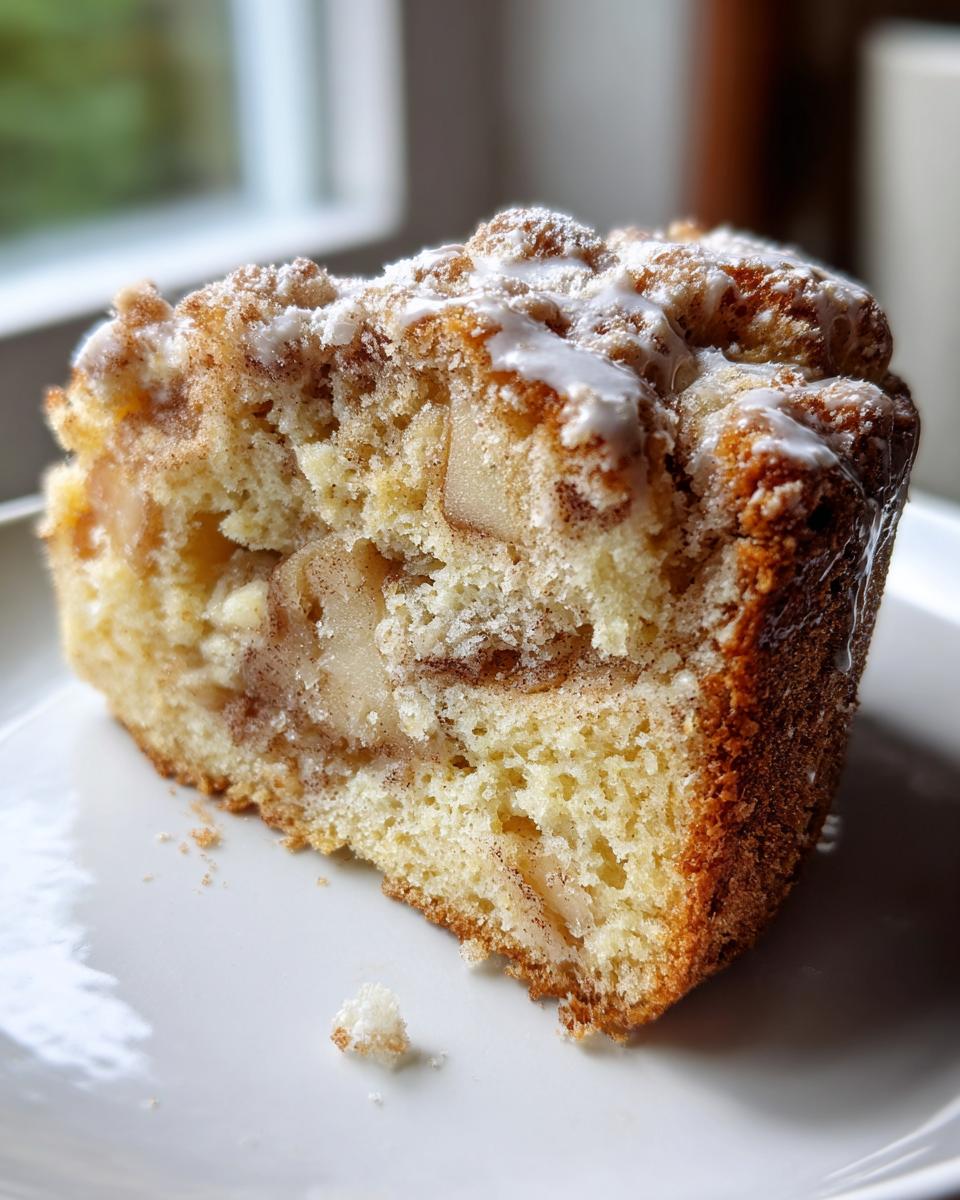
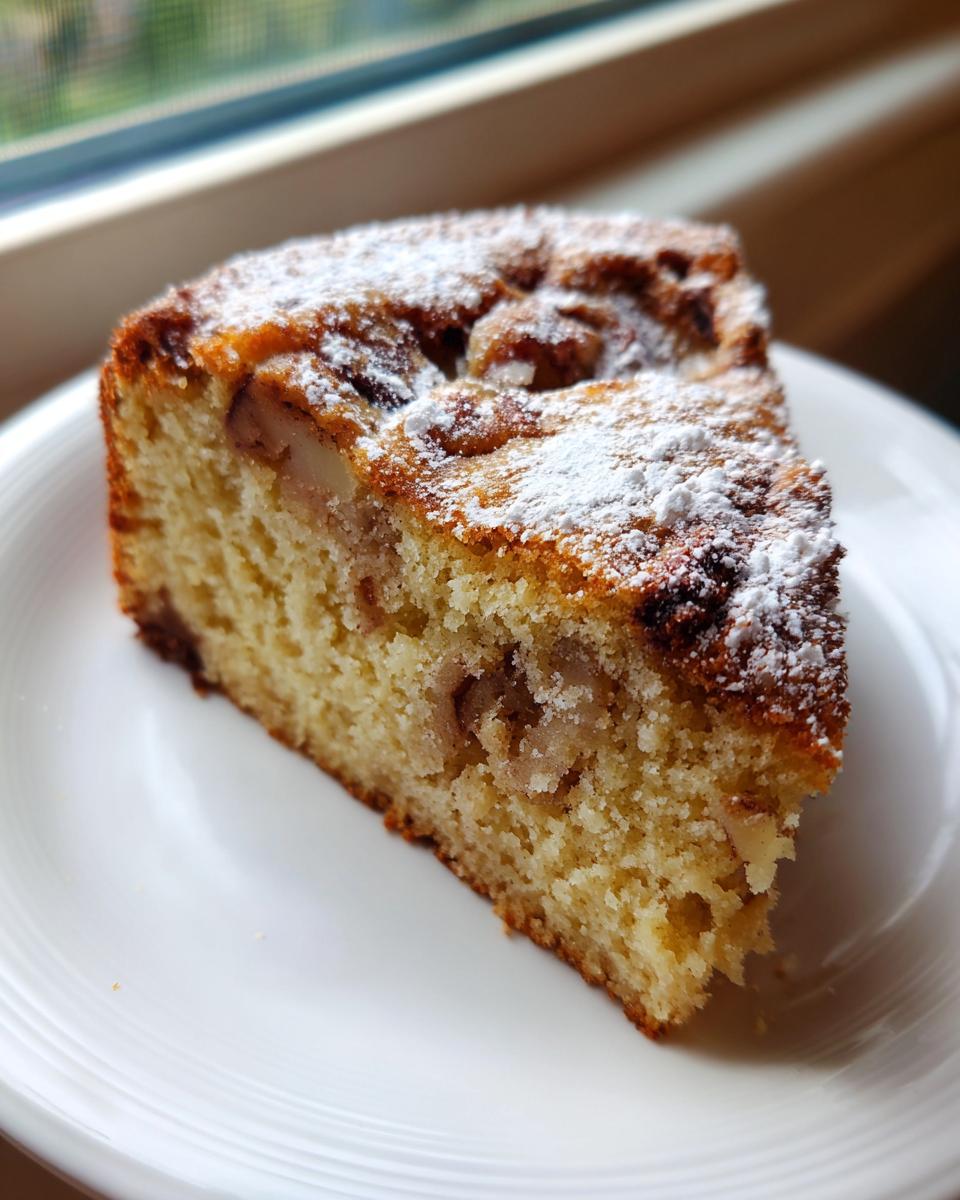
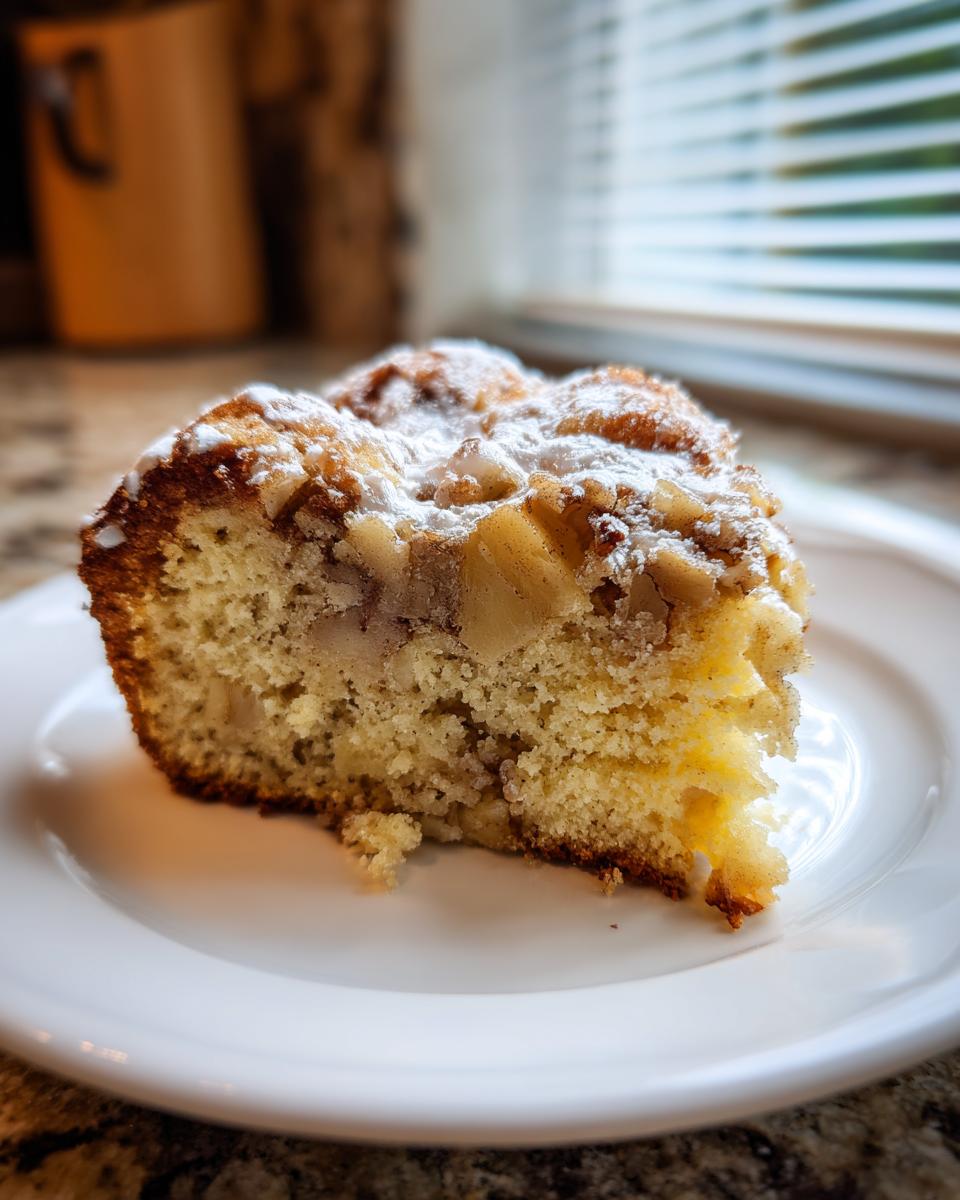
Some flavors just wrap you up in a blanket, don’t they? That warm, spiced hug you get from a truly heirloom baked good—that’s what I chase every time I step into my kitchen. Here at Cookin’ Corner, we believe those old recipes hold the secret to the very best comfort food. And no baked good says ‘special gathering’ quite like the one I’m sharing today. This is my recipe for the Ultimate Moist and Tender jewish apple cake. It’s naturally dairy-free, which means it’s perfect for Rosh Hashanah, but honestly, I make it all fall long. My grandmother, Sarah Jane Thompson, used to sneak me bits of the batter when I was small, and that memory is baked right into every slice. If you love that cozy flavor profile, you absolutely must try my classic apple crumble recipe too!
- Why This Jewish Apple Cake Recipe Stands Out (E-E-A-T)
- Gathering Ingredients for Your Traditional Apple Cake
- Step-by-Step Instructions for This Easy Apple Dessert
- Serving Your Heirloom Cake Recipe for the Holidays
- Storage and Keeping Your Jewish Apple Cake Fresh
- Frequently Asked Questions About This Traditional Apple Cake
- Baking Tips for the Best Apple Cake Every Time
- Estimated Nutritional Breakdown for Your Jewish Apple Cake
- Share Your Easy Apple Dessert Creations
Why This Jewish Apple Cake Recipe Stands Out (E-E-A-T)
When I share a recipe, you know it’s been tested until it’s absolutely perfect—that’s the promise of Cookin’ Corner heritage baking. This Jewish Apple Cake recipe is legendary in our family because it just works. It’s incredibly tender, loaded with apples, and best of all, it’s naturally dairy-free. That flexibility means you can serve it proudly for any holiday gathering, even alongside meat meals. It’s a sturdy classic that never dries out, which is why this traditional apple cake has lasted generations.
The Secret to a Truly Moist Apple Cake
The moisture here comes from two places that never let you down: we use oil instead of butter, which keeps everything exquisitely soft, and we pack in three cups of diced apples! That high fruit ratio releases steam while baking, locking in that perfect, soft crumb. It’s honestly the flavor you dream about hearing people ask for year after year. If you like this kind of texture, you might also adore my moist apple bread!
Gathering Ingredients for Your Traditional Apple Cake
Okay, let’s talk provisions! To create this amazing traditional apple cake, you can’t just grab the first thing you see. Clarity in measuring is what keeps this recipe foolproof, trust me. We need a good heavy hitter foundation for the cake structure, and then the star—the apples—get their own special treatment.
For the Cake Batter, grab:
- 2 cups all-purpose flour
- 2 teaspoons baking powder
- 1 teaspoon baking soda
- 1 teaspoon ground cinnamon (this is the first round of spice!)
- 1/2 teaspoon salt
- 1 1/2 cups granulated sugar
- 1 cup vegetable oil (don’t skip—this is key for dairy-free moisture)
- 4 large eggs, ready to go
- 1 teaspoon vanilla extract
- 3 cups peeled, cored, and precisely diced apples (seriously, dice them, don’t slice them!)
And for that apple topping mixture, get ready for the best part:
- 1/2 cup packed light brown sugar
- 1 teaspoon ground cinnamon (the second round!)
- 1/2 cup chopped walnuts or pecans (if you use these, make sure they are chopped, not whole!)
Finally, if you’re making the optional finish, you’ll need powdered sugar and a splash of orange juice for the glaze. If you’re looking for an easy way to use up apples before you bake, you’ve got to see my recipe for thick homemade apple pie filling!
Ingredient Notes and Substitutions for Jewish Apple Cake Recipe
When selecting your fruit, I absolutely insist on either Granny Smith for that perfect tartness or Honeycrisp if you want a sweeter cake. The flavor really depends on the apple you choose. Remember, that full cup of vegetable oil isn’t there by accident; it’s what makes this cake incredibly tender and keeps it fully dairy-free, which is handy for holiday planning. If you skip the walnuts or pecans, the cake is still phenomenal! And just a quick note: the orange juice for the glaze is totally optional; you can also use lemon juice for a sharper kick if that’s more your style.
Step-by-Step Instructions for This Easy Apple Dessert
I know reading instructions on a screen can feel weird when you’re busy baking, but these steps are your roadmap to the best apple cake you’ve ever made. We’re moving fast, but we’re being smart about mixing. Please, for the sake of a tender crumb, stick to what I say about stopping when things are just combined!
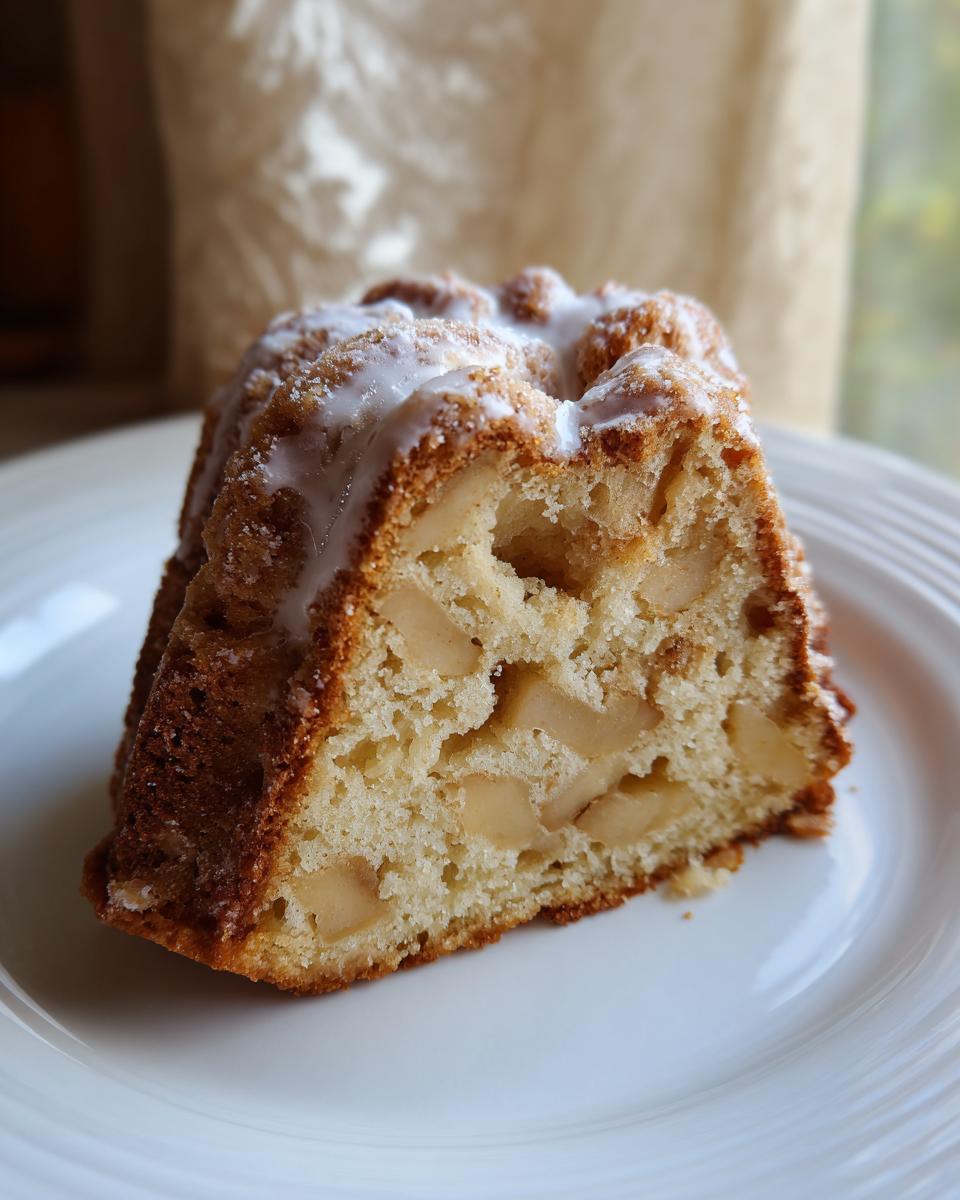
First things first: get your oven warmed up. Step one is preheating to 350 degrees F. Make sure you grease and flour your pan super well—we’re using a 10-inch tube pan or a 9×13 inch baking dish for this batch. Don’t skip the greasing part; nobody likes a stuck cake!
Next, tackle the dry ingredients. Whisk together the flour, baking powder, baking soda, that first teaspoon of cinnamon, and salt in a medium bowl. Set that aside. You’ll want to keep your wet and dry ingredients separated until the last minute.
In a big bowl, it’s time to build the base. Whisk the granulated sugar and the vegetable oil together until they look happy and combined. Then, beat in those four eggs, one by one, making sure they get really incorporated after each addition. Stir in the vanilla extract. Now, this is important: gradually add your dry mix into this wet stuff, but only mix on low speed until you barely see streaks of flour left. Seriously, do not overmix this batter!
Preparing the Apples and Batter for the Cinnamon Apple Cake
While the main batter is resting, we prepare the flavor bombs! In a separate bowl, you need to toss those diced apples with the packed light brown sugar and the second teaspoon of cinnamon. If you decided to use nuts, toss them in with the apples now—this keeps them from sinking straight to the bottom.
This next move is crucial for texture: You need to gently fold the apple mixture into that cake batter. Use a rubber spatula and just cut down the center and scoop up the apples until they look generally spread out. No aggressive stirring allowed! Pour that beautiful, chunky batter right into your prepared pan.
Baking and Cooling the Apple Bundt Cake
Time for the heat! For a tube pan, you’re probably looking at 50 to 60 minutes. If you used a 9×13 pan, it’ll be a touch quicker, closer to 40 to 45 minutes. How do you know it’s done? A wooden skewer inserted right into the center needs to come out clean—that’s the magic test. Resist the urge to open the oven too early!
Once it passes the skewer test, don’t rush it out of the pan. Let the apple Bundt cake cool down in that pan for a solid 15 minutes on a wire rack. After that little time-out, carefully invert it onto the rack so it cools completely. If you try to frost or glaze it while it’s still warm, you’ll have a melted mess. Wait until it’s totally cool before you even think about drizzling on that bright optional glaze!
If you need an easy blender recipe while you wait for your cake to bake, check out my easy hollandaise sauce!
Serving Your Heirloom Cake Recipe for the Holidays
This is the cake that shows up for every special moment. I always make a double batch when the weather starts turning cool because it’s my can’t-fail Holiday Apple Dessert. Whether we’re celebrating Rosh Hashanah or just having friends over for an autumn evening, this heirloom cake recipe is the answer. I often serve it simply on my grandmother’s old wooden platter, maybe with a tiny dollop of whipped cream, but honestly, it’s perfect plain. It always smells like home instantly! You should check out how others are serving this delicious cake over at The Farm Girl Gabs.
Variations: Making an Apple Loaf Cake or Glazed Jewish Apple Cake
If you’re making this for breakfast or needing smaller portions, you can easily turn this into an Apple Loaf Cake! Just take your finished batter and divide it evenly between two standard loaf pans. You’ll have to shave about 10 to 15 minutes off the baking time, so start checking it early with that skewer test. The quick bread version of this jewish apple cake is fantastic wrapped up for gifts, too.
And about that glaze—I usually preach simplicity, but when I want to dress this cake up, the optional orange glaze is the way to go. Whisking in a little fresh orange juice instead of just milk brightens the whole cake up. It cuts through that rich cinnamon perfectly and makes it feel extra festive for Hanukkah or a big Thanksgiving dessert spread. Don’t forget to grab a recipe for a great cranberry apple cider punch to go with it!
Storage and Keeping Your Jewish Apple Cake Fresh
Now, the hardest part: having leftovers! If you manage to keep any of this moist apple cake around past the first day, you want to treat it right so it tastes just as good tomorrow. Since this recipe uses oil and is dairy-free, it holds up beautifully, which is such a relief.
For short-term storage, like storing it until the next day for breakfast, keeping it right on the counter is just fine. Just make sure it’s covered tightly with plastic wrap or you put it in a good airtight container. Room temperature storage works perfectly for up to two days. It really doesn’t need refrigeration unless your kitchen is super hot and humid, and honestly, sometimes the fridge can dry out any cake a little quicker.
If you made the optional orange glaze, that’s another story. That glaze is pretty stable, but I always recommend covering it well and keeping it mildly cool. If you’re planning far ahead, I always find that wrapping slices tightly in plastic wrap and then tucking them into a freezer bag freezes really well for up to three months. I show you how I handle freezing other fruit treats, like my easy homemade apple butter, which might inspire you!
When you want to bring a frozen slice back to life, don’t thaw it just on the counter! Microwaving it for just 10 to 15 seconds brings all that moisture right back to the surface, making it taste like it just came out of the oven. It’s like magic, honestly, and keeps this traditional apple cake tasting perfect!
Frequently Asked Questions About This Traditional Apple Cake
You know how it is—when a recipe is this good, people always have thoughts! I’ve gathered up the questions I get asked most often about this traditional apple cake and popped the answers right here so you don’t have to hunt around. It’s easy to get exactly the results you want when you know the little tricks!
Can I make this Dairy Free Cake ahead of time?
Oh, absolutely you can! That’s one of the best parts about using oil in this recipe; it’s a champ at staying fresh. I usually make mine a day ahead of a party if I can, because honestly? It tastes even better once the cinnamon and apples have had a night to truly marry in the flavor profile. Just make sure it’s wrapped up tight, like I mentioned before, and it’ll be perfect for your gathering tomorrow. You can even find more great make-ahead sweets when you look at my apple fritter recipe ideas!
What is the best pan size for this Jewish Apple Cake Recipe?
My original instructions call for a 10-inch tube pan, which gives you that gorgeous, classic holiday shape. If you don’t have a tube pan, though, please don’t stress out! A 9×13 baking dish works like a charm, though you’ll need to reduce the baking time slightly as I noted in the steps. It just comes down to what shape you love most for serving your jewish apple cake. If you want to see another beautifully shaped cake recipe, check out this classic version for inspiration!
Why do I need to use vegetable oil instead of melted butter?
Great question! While butter is lovely, oil is the secret ingredient that makes this specific traditional apple cake so incredibly moist and tender without relying on dairy. Butter often solidifies when cool, which can make a cake dense. Vegetable oil stays liquid and soft, keeping the crumb light and fluffy, even on day two. It’s genius, really, and keeps the cake perfectly dairy-free!
Baking Tips for the Best Apple Cake Every Time
Even with a tried-and-true heirloom cake recipe, little things can throw your bake off track. I’ve learned a few things over the years watching my grandmother—and making my own mistakes, whoops!—that guarantee this cake stays perfectly moist and tender. These three tips are my non-negotiables for achieving the best apple cake!
First, let’s talk about those apples again, because this is where most people slip up. You must make sure your diced apples aren’t wet! If you are using crisp, fresh apples, you’re probably fine, but if you’re using apples that have been sitting around or if you’ve mixed them and let them sit too long before folding them in, they’ll release too much water. That excess liquid can slightly deflate your batter right before baking, leading to a gummy spot in the middle. So, if your apples look slightly moist after tossing them with the brown sugar, give them a quick blot with a paper towel before folding them in gently. It’s worth the extra second!
Next up is the pan prep. I already mentioned using cake goop, but let me tell you why it’s so important for this specific cake. Since this Jewish apple cake is heavier due to all that fruit, a quick dusting of flour isn’t always enough. Smear that cake goop all over the tube pan—get into every little crevice. When you invert that beautiful thing onto the rack, you want it to slide right out without sticking, especially around that center tube. A stuck cake on the bottom is a tragedy!
Finally, remember what I said about not overmixing the batter once you add the flour? This is critical. Once the flour hits the wet ingredients, you are developing gluten, and gluten loves structure—but we don’t want a tough cake here! We want that tender crumb. Mix only until you can no longer see dry streaks of flour. It should look slightly shaggy, and that’s okay! Those final folds with the apples will finish the mixing process. If you follow these things, you’ll have a flawless bake every time. For a delicious variation on the glaze, take a peek at the orange glaze they use over at Savor the Best.
If you end up with great results, or if you want to explore other comforting recipes like my soft oatmeal cookies, let me know how this cake turned out for you!
Estimated Nutritional Breakdown for Your Jewish Apple Cake
Now, I always tell people that when you’re baking something this delicious, you shouldn’t worry too much about the numbers, but I know some of you like to have the estimates on hand. This information is for one generous slice of the finished jewish apple cake, assuming you made the full yield of ten servings.
Keep in mind that because this is an heirloom cake recipe featuring a lot of fruit and oil, the numbers look different than, say, a standard dry vanilla cake. But that’s the trade-off for that incredible, moist texture we love!
- Serving Size: 1 slice
- Calories: 350
- Sugar: 35g
- Fat: 18g (mostly unsaturated, thank goodness!)
- Carbohydrates: 48g
- Protein: 4g
- Cholesterol: 75mg
I pulled these numbers based on all the ingredients listed in the recipe—the oil, the sugar, the flour, and the apples. If you choose to go heavy on the optional powdered sugar glaze or add lots of nuts, or if you slice your cake into smaller pieces, these numbers will obviously change. So, take these as a helpful guide rather than gospel! After all, one bite of this traditional apple cake and you’ll know it was worth every calorie.
When you’re done with your dessert planning, maybe you need a hearty main course? You really should check out my recipe for easy chicken pot pie casserole—it’s the perfect cozy follow-up to this wonderful fall bake!
Share Your Easy Apple Dessert Creations
Oh, now that you’ve gone through all the steps to bake this truly easy apple dessert, the best part begins: enjoying it! I hope the scent of cinnamon apple cake filled your house as wonderfully as it does mine every time I make this. Seriously, I always find myself sneaking a slice with my morning coffee the next day.
I absolutely love hearing from you all! Did you decide to stick with the 10-inch tube pan or did you go for the quicker 9×13 version? Did you try the bright orange glaze or keep it simple with just a dusting of powdered sugar? Please let me know down in the comments below! Every time you rate this jewish apple cake or leave a note about how much your family loved it, it just encourages me to keep digging up those older, treasured recipes for you.
And if you took a picture of your finished traditional apple cake—especially if you got a perfect piece out of the pan without any sticking—I would be thrilled if you shared it! Tag me on social media so I can see your beautiful work. It means the world to me to see these heirloom recipes working their magic in kitchens across the country.
If you’re looking for another easy cookie recipe to send home with guests after you’ve served this glorious cake, you have to try my chocolate brownie cookies recipe next!
PrintUltimate Moist and Tender Jewish Apple Cake (Dairy-Free & Perfect for Holidays)
This heirloom Jewish Apple Cake recipe yields a moist, tender cake packed with apples and cinnamon flavor. It is naturally dairy-free and perfect for Rosh Hashanah, Thanksgiving, or any family gathering.
- Prep Time: 20 min
- Cook Time: 60 min
- Total Time: 80 min
- Yield: 10 servings 1x
- Category: Dessert
- Method: Baking
- Cuisine: American/Jewish
- Diet: Dairy Free
Ingredients
- 2 cups all-purpose flour
- 2 teaspoons baking powder
- 1 teaspoon baking soda
- 1 teaspoon ground cinnamon
- 1/2 teaspoon salt
- 1 1/2 cups granulated sugar
- 1 cup vegetable oil
- 4 large eggs
- 1 teaspoon vanilla extract
- 1/4 cup orange juice (optional, for glaze)
- 3 cups peeled, cored, and diced apples (about 4 medium apples, such as Granny Smith or Honeycrisp)
- 1/2 cup packed light brown sugar
- 1 teaspoon ground cinnamon (for apple mixture)
- 1/2 cup chopped walnuts or pecans (optional)
- 1 cup powdered sugar (for glaze, optional)
Instructions
- Preheat your oven to 350 degrees F. Grease and flour a 10-inch tube pan or a 9×13 inch baking pan.
- In a medium bowl, whisk together the flour, baking powder, baking soda, 1 teaspoon cinnamon, and salt. Set this dry mixture aside.
- In a large bowl, whisk together the granulated sugar and vegetable oil until combined. Beat in the eggs one at a time, mixing well after each addition. Stir in the vanilla extract.
- Gradually add the dry ingredients to the wet ingredients, mixing on low speed until just combined. Do not overmix the batter.
- In a separate bowl, toss the diced apples with the brown sugar and the remaining 1 teaspoon of cinnamon. If using nuts, mix them in now.
- Gently fold the apple mixture into the cake batter until evenly distributed.
- Pour the batter into your prepared pan.
- Bake for 50 to 60 minutes for a tube pan, or 40 to 45 minutes for a 9×13 pan, or until a wooden skewer inserted into the center comes out clean.
- Let the cake cool in the pan on a wire rack for 15 minutes before inverting it onto the rack to cool completely.
- If making the optional glaze, whisk together the powdered sugar and orange juice until smooth. Drizzle over the cooled cake before serving.
Notes
- For the best texture, use firm, tart apples like Granny Smith.
- This is an heirloom cake recipe that is naturally dairy-free, making it suitable for serving with meat meals.
- For an Apple Loaf Cake, divide the batter between two standard loaf pans and reduce the baking time by about 10-15 minutes.
Nutrition
- Serving Size: 1 slice
- Calories: 350
- Sugar: 35
- Sodium: 200
- Fat: 18
- Saturated Fat: 2
- Unsaturated Fat: 16
- Trans Fat: 0
- Carbohydrates: 48
- Fiber: 2
- Protein: 4
- Cholesterol: 75