
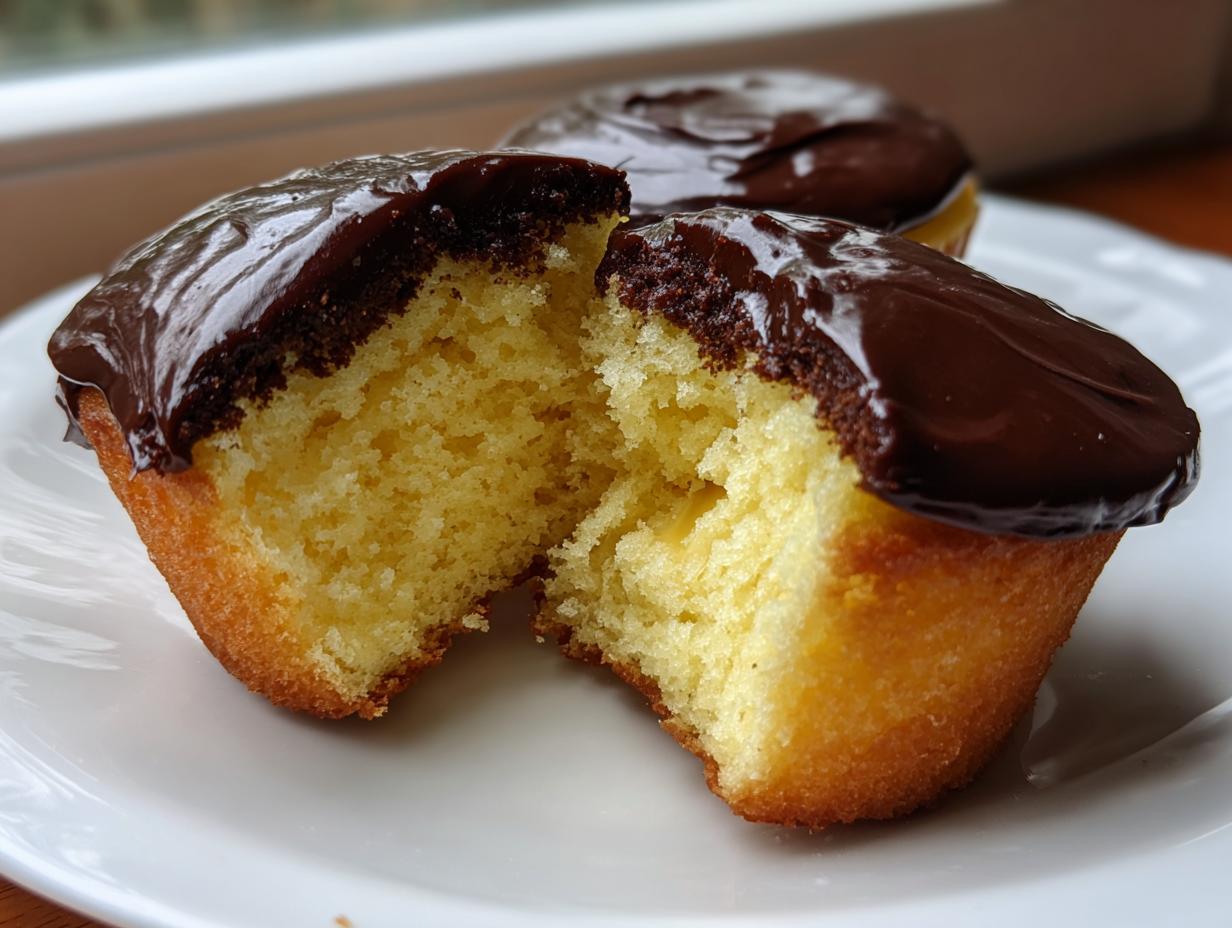
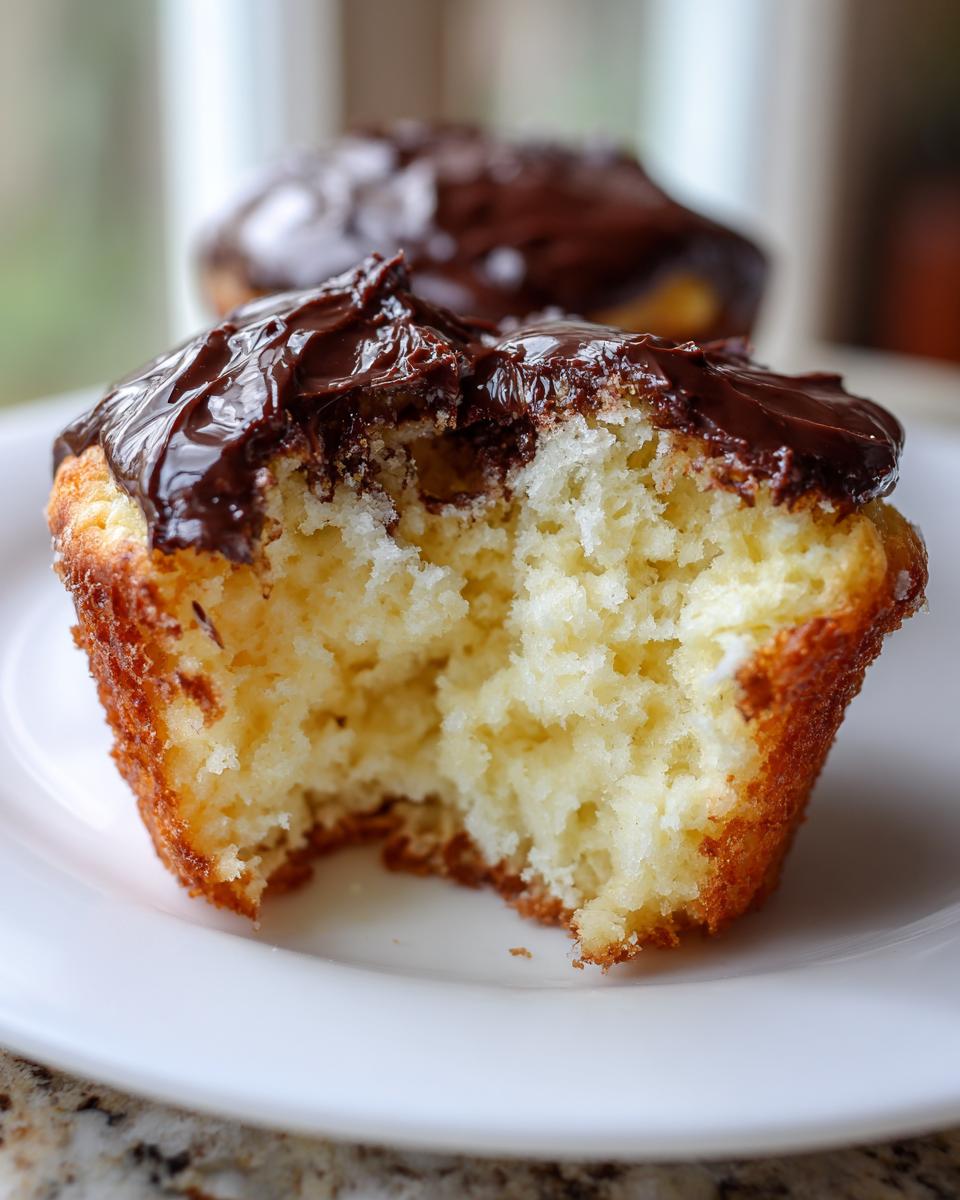
There are some desserts that just taste like a warm Saturday afternoon, and for me, Boston Cream Pie is at the top of that list. It’s got that perfect trilogy of flavors—fluffy vanilla cake, that glorious, creamy center, and that sharp jacket of chocolate. Well, when I was figuring out how to bring that classic taste into a party-ready format, I landed on these absolute showstoppers: boston cream pie cupcakes. My grandmother used to make a massive pie for church socials, and these little beauties capture that exact nostalgic magic, shrunk down perfectly. If you enjoyed my recipe for banana pudding cupcakes, you are going to adore making these! Trust me, transferring that iconic dessert into individual servings is the best baking decision you’ll make all year!
- Why You Will Love These Boston Cream Pie Cupcakes
- Gathering Ingredients for Your Boston Cream Pie Cupcakes Recipe
- Step-by-Step Instructions for Perfect Boston Cream Pie Cupcakes
- Expert Tips for Bakery Style Boston Cream Pie Cupcakes
- Ingredient Notes and Substitutions for Your Boston Cream Cupcakes Recipe
- Storing and Reheating Your Boston Cream Pie Cupcakes
- Frequently Asked Questions About Boston Cream Pie Cupcakes
- Serving Suggestions for these Classic Dessert Cupcakes
- Nutritional Estimate for One Boston Cream Pie Cupcake
Why You Will Love These Boston Cream Pie Cupcakes
Seriously, these are a game-changer for any gathering. I’m telling you, they hit every single craving you have:
- They capture the iconic flavor profile of the classic pie in one perfect bite.
- The homemade pastry cream makes these feel incredibly decadent—totally bakery style!
- Making these boston cream pie cupcakes means no messy slicing, which is a baking win in my book.
- They’re surprisingly straightforward, even with three components. If you loved my cookie butter cheesecake cups, you’ll manage these easily!
Gathering Ingredients for Your Boston Cream Pie Cupcakes Recipe
Okay, since this recipe has three working parts—the cake, the filling, and that dreamy chocolate top—it really helps to organize your supplies before we even bother preheating the oven. When I make these, I always lay everything out on the counter. This way, I know I won’t suddenly realize I’m out of milk right when I need to complete the batter!
Getting the right ingredients here ensures you get that truly classic dessert cupcakes experience. We want fluffy vanilla cake, a rich, sweet filling, and a gorgeous, shiny chocolate finish. Don’t worry; once you see everything laid out, it’s much less intimidating than it sounds. If you’re looking for other vanilla recipes, check out my cream cheese banana bread!
For the Fluffy Vanilla Cake Base
This is what gives us those wonderfully fluffy vanilla cupcakes everyone loves. Remember, we need the butter soft!’,
- 1 1/2 cups all-purpose flour
- 1 1/2 teaspoons baking powder
- 1/2 teaspoon salt
- 1/2 cup unsalted butter, softened
- 1 cup granulated sugar
- 2 large eggs
- 1 teaspoon vanilla extract
- 1/2 cup milk
For the Homemade Pastry Cream Cupcakes Filling
This is the heart of the dessert, the custard layer! Don’t rush this part—the pastry cream needs to be completely cold before it goes anywhere near the cupcakes, otherwise, it will melt right out. Chilling it solid overnight is my personal favorite way to ensure the best final texture for your sweet cream filling baking.
- 1 cup prepared pastry cream (for filling)
For the Silky Chocolate Ganache Topped Cupcakes
If you want that professional, glossy top—that truly decadent chocolate glaze dessert look—this two-ingredient ganache is perfection. It sets up beautifully without ever getting hard and crumbly.
- 1 cup semi-sweet chocolate chips (for ganache)
- 1/2 cup heavy cream (for ganache)
Step-by-Step Instructions for Perfect Boston Cream Pie Cupcakes
Let’s get baking! Because we have three distinct components, I like to work in stages. First, we prepare and bake the cake so it has plenty of time to cool down completely. You cannot rush cooling when you are dealing with custard filling, trust me on this one!
Once everything is baked and cooled, we move to coring and filling, which is surprisingly fun. Finally, we make that gorgeous chocolate topping. Follow these steps closely, and you’ll have the most impressive boston cream pie cupcakes anyone has ever tasted!
Baking the Fluffy Vanilla Cake Base
First things first: get that oven warmed up to 350°F (175°C) and line your 12-cup muffin tin. We want these ready to go!
- In one bowl, whisk your flour, baking powder, and salt together—that’s our dry mix.
- In your big mixing bowl, beat that softened butter and sugar until it looks pale and fluffy. This might take a minute or two, but it’s creating the structure!
- Add your eggs one at a time, mixing completely after each one, then stir in the vanilla.
- Now, take your dry mix and your milk and alternate adding them to the wet ingredients. Remember the rule from Grandma’s kitchen? Start and end with the dry stuff.
- Mix gently! I cannot stress this enough: mix only until you absolutely don’t see flour streaks anymore. Overmixing makes them tough, not fluffy!
- Spoon the batter into the liners, filling them about two-thirds full.
- Bake for about 18 to 20 minutes. Test it with a toothpick. When it comes out clean, you know they are done.
Let the cupcakes hang out in the pan for about five minutes to firm up before moving them to a wire rack to cool entirely. If they are even slightly warm when you try to fill them, your pastry cream is going on a little vacation right through the bottom of the liner!
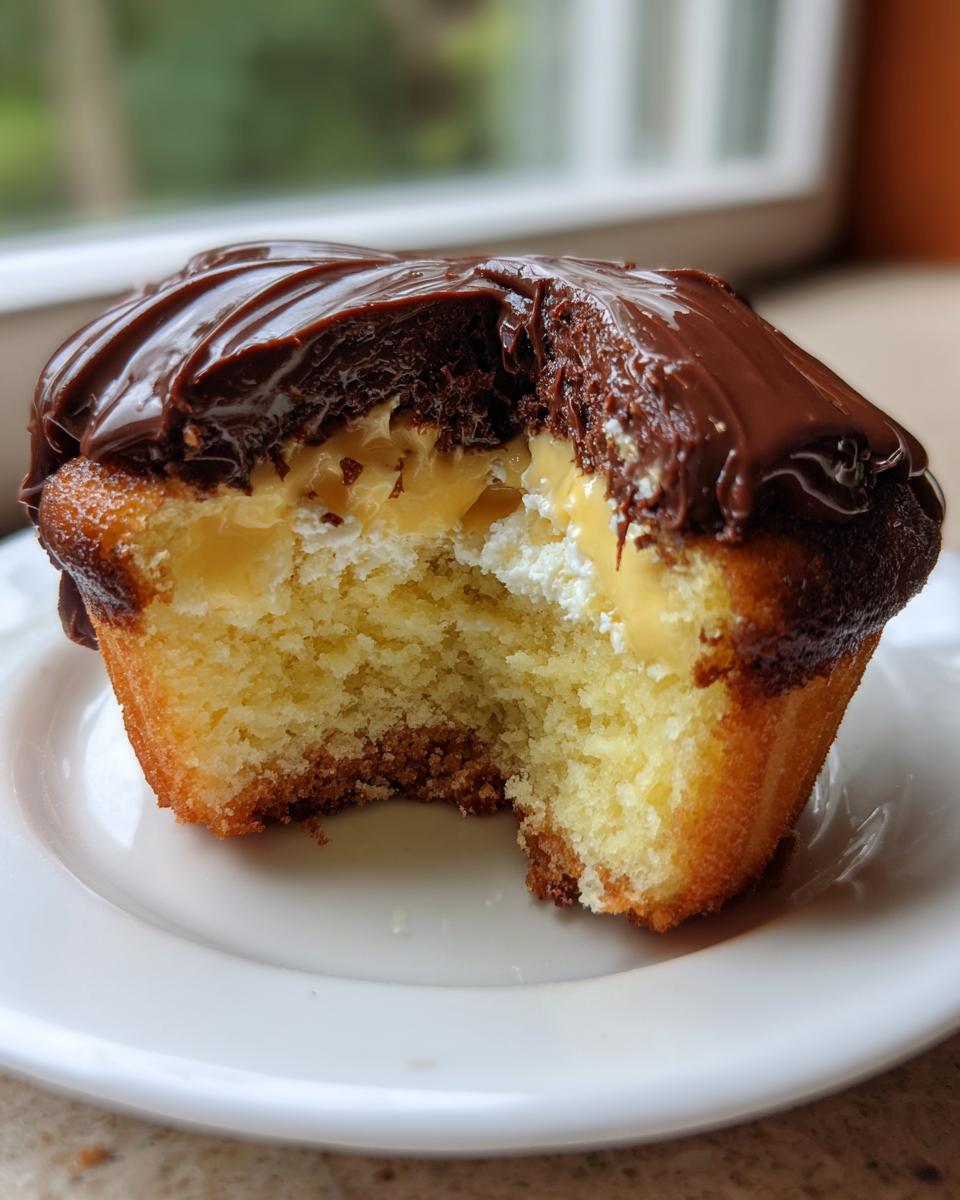
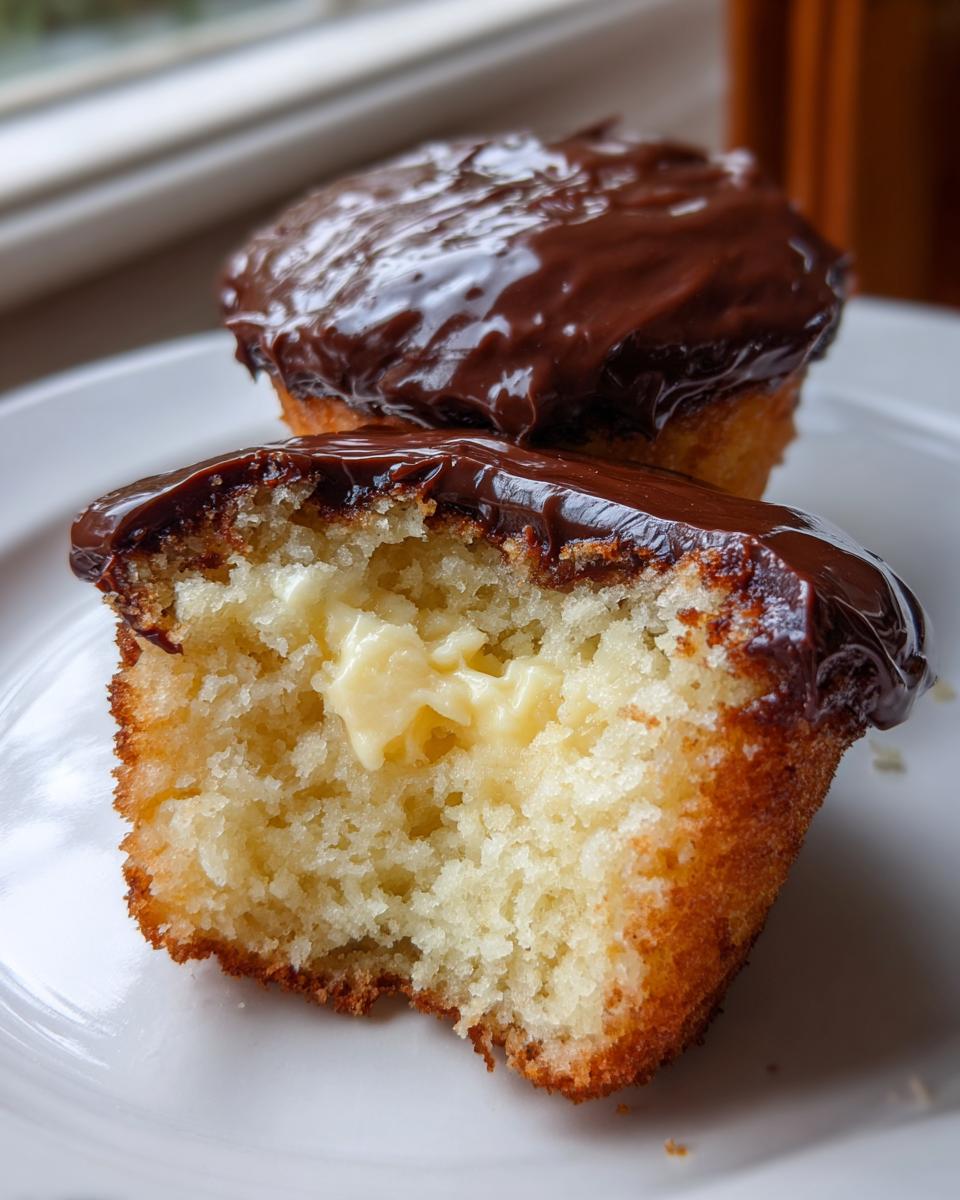
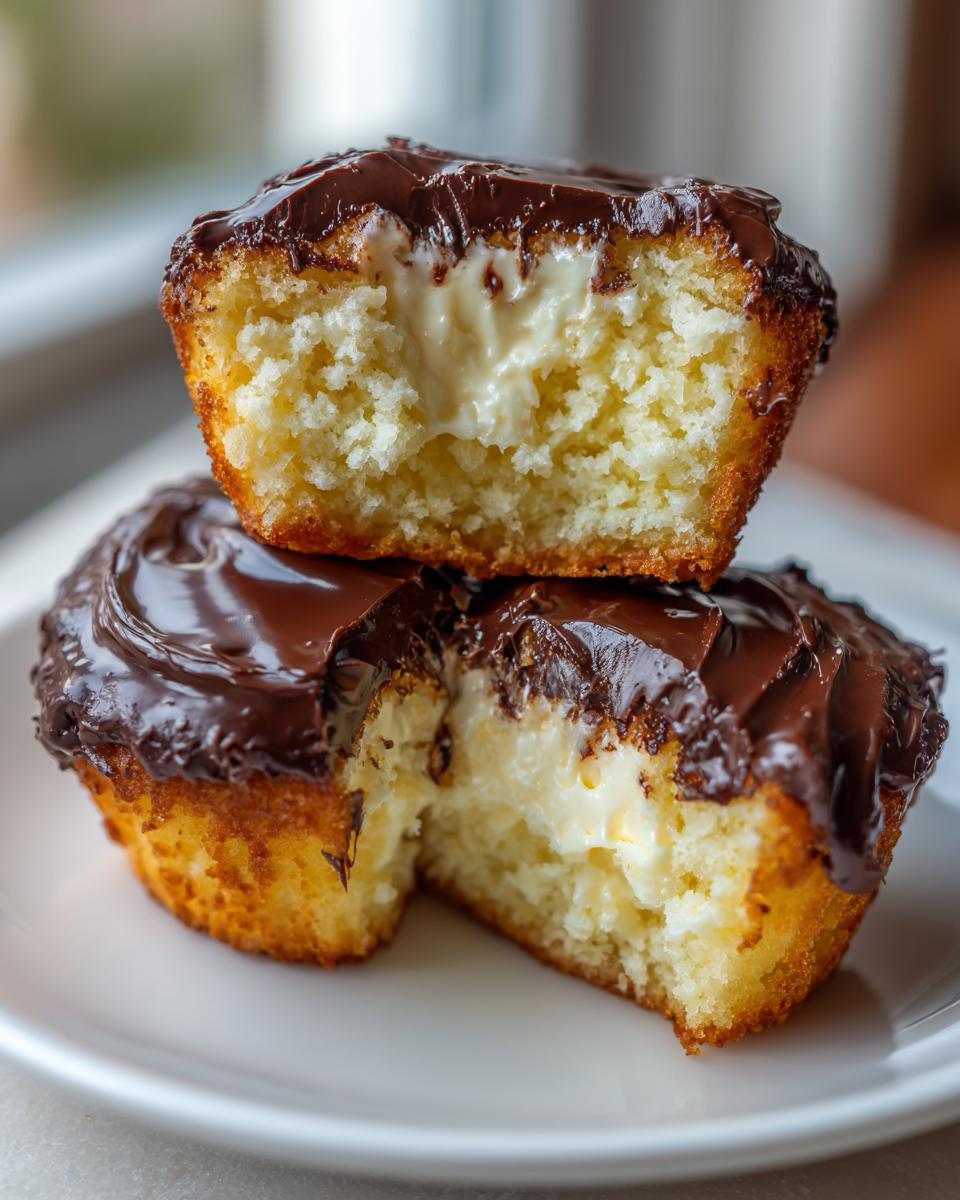
Filling the Cream Filled Cupcakes
This is where we transform our plain vanilla cake into a true Boston Cream treat. Make sure your pastry cream is completely chilled—we are aiming for that beautiful texture needed for the sweet cream filling baking process.
- Once cooled, take a small knife or an apple corer and remove a little plug right out of the center of each cupcake. Don’t dig too deep, we just need a little pocket!
- Carefully spoon or pipe that cold pastry cream into the hole. Fill that little cavity generously!
Creating the Chocolate Ganache and Finishing Your Boston Cream Pie Cupcakes
The chocolate topping is so simple, but it feels so fancy! This is the final step to making your amazing mini boston cream pie replicas.
- Put your semi-sweet chocolate chips into a heatproof bowl.
- Heat the heavy cream until it’s just simmering around the edges—don’t let it boil over! Pour that hot cream right over those chocolate chips. Leave it alone for exactly five minutes; this lets the heat do the work.
- After waiting, whisk it slowly until it becomes glossy and perfectly smooth. That’s your ganache!
- Spoon or pipe the ganache over the filled cupcakes. Let them sit for a little while so the chocolate can set up a bit before you serve them. See? Easy peasy! If you want to learn more about chocolate work, check out my post on creamy chocolate pudding from scratch—it uses similar heating techniques! For other simple baking success, maybe check out my banana bread recipe next!
Expert Tips for Bakery Style Boston Cream Pie Cupcakes
If you want these to look like they came straight from a fancy pastry shop instead of your home oven, I have a couple of tricks I learned watching my aunt frost cakes years ago. We are aiming for that perfect bakery style cupcakes finish!
First, dealing with the filling: For the easiest, neatest filling, use a piping bag fitted with a large round tip—it lets you inject that cream right down into the center hole without making a mess on the top edges. That’s how the pros do it!
Also, when working on the ganache, make sure your cupcakes are completely cool. If you pour that warm chocolate over a crumbly, room-temperature cake, it melts right into the crumbs. For presentation perfection on your boston cream pie cupcakes, chill the filled cupcakes for about 15 minutes *after* filling but *before* glazing. A simple chill makes all the difference when you are dipping the tops. For more baking shortcuts, you absolutely have to try my famous soft and chewy oatmeal cookies!
Ingredient Notes and Substitutions for Your Boston Cream Cupcakes Recipe
When following any classic recipe, sometimes you have to be flexible, especially when it comes to fillings! The notes mentioned that for the pastry cream, you absolutely can use a shortcut if you’re short on time. Don’t sweat it if you don’t want to make baking with custard completely from scratch that day.
For the best results overall, I still push for the homemade pastry cream—it just has a wonderfully delicate flavor that store-bought stuff just can’t copy. However, if you use store-bought vanilla pudding, make sure it’s the thick kind. If it’s too runny, your cream filled cupcakes will just collapse when you try to top them with chocolate! You want that filling to hold its shape.
Also, a quick note on the chocolate chips for the ganache: semi-sweet is the classic choice because it cuts through the sweetness of the cake and the vanilla cream perfectly. If you’re feeling extra indulgent, you could toss in a couple of tablespoons of butter when you heat the cream—it makes the ganache even silkier, almost like a glaze glaze! If you’re looking for something totally different for your next party, check out this fun lemon drop martini recipe; it’s a fantastic palate cleanser!
Storing and Reheating Your Boston Cream Pie Cupcakes
This is the part where we talk reality! Because these cream filled cupcakes have that lovely, rich dairy custard inside, they aren’t something you can just leave on the counter for three days like a plain chocolate chip cookie. If you want them to stay safe and taste absolutely perfect, you have to treat them right.
For short-term storage, say, the rest of the day you bake them, keeping them loosely covered on the counter is fine. But if you are making these ahead for a party later this week, you absolutely must use the refrigerator. I always keep mine in an airtight container, but listen closely: put a paper towel on the bottom, and maybe even one lightly draped over the tops before sealing the lid.
Why the paper towel trick? The humidity in the fridge can make that beautiful chocolate glaze look dull or even a little sweaty. The paper towel helps wick away a tiny bit of that moisture without ruining the shine. Also, make sure you let them sit out on the counter for about 30 minutes before serving. That slightly chilled temperature is fine, but letting the cake and cream warm up just a touch makes them taste richer and brings out the vanilla flavor beautifully.
To answer the big question: Are they good the next day? Yes, they are! The cake stays surprisingly tender due to the moisture from the cream, but aim to eat them within 2 days for the absolute best texture. It’s almost impossible not to eat them all on day one, but if you manage, follow these steps!
Frequently Asked Questions About Boston Cream Pie Cupcakes
You guys always ask the best questions about these little gems! It shows you really care about getting the technique right, which I totally respect. Here are the ones I get asked the most now that people are making these dreamy mini boston cream pie treats at home.
Can I make the vanilla cake base ahead of time?
Absolutely! I often bake the cake portion a day ahead of time. Bake them, cool them completely, store them in an airtight container at room temperature, and that’s it. Just don’t fill them until the day you plan to serve them, as the moisture from the filling can start to soften the cake structure too much if stored for days.
What’s the difference between a good vanilla cake with custard filling and a pudding one?
This is key to getting that real Boston Cream flavor! The difference is richness. A true vanilla cake with custard filling uses pastry cream—which is cooked with yolks and starch—giving it that thick, almost sticky texture that holds up wonderfully when piped into the cake. Pudding is often lighter and has more gelatinous texture, which is fine in a pinch, but pastry cream tastes richer and more like the classic pie filling.
Can I freeze these cream filled cupcakes?
I’d strongly advise against it. While the cake itself freezes fine, the combination of the dairy-based pastry cream and the chocolate ganache does not freeze well together. The texture of the custard gets weird when it thaws, and the ganache often develops slight sugar bloom or gets streaky. These are best made within 24 hours of serving!
My ganache seems too thin—what did I do wrong?
No worries, nothing is ruined! If your ganache is too thin, it usually means you used too much cream or your chocolate chips were lower quality (less cocoa solids to absorb the fat). Just pop the entire bowl into the fridge for 10 to 15 minutes. Stir it every five minutes until it thickens up enough to coat your spoon nicely. It’ll be perfect for topping!
If you’re tackling other creamy bakes, you might find my tips on my creamy chicken pesto pasta helpful for understanding how to manage dairy ratios!
Serving Suggestions for these Classic Dessert Cupcakes
Finding the perfect partner for a decadent treat is almost as fun as making the treat itself! Since these boston cream pie cupcakes are so rich—that soft cake, cold cream, and velvety chocolate—you want pairings that either complement the vanilla sweetness or offer a nice, bright contrast. These are definitely an indulgent dessert idea, so think about what cuts through that richness!
For a simple afternoon coffee break, you can’t beat a strong, dark roast coffee. The slight bitterness of the coffee is just heavenly when chasing that sweet ganache. If you’re serving these at a party, I always put out a simple bowl of fresh raspberries on the side. The tartness cleanses the palate perfectly between bites of the rich filling.
If you’re serving these after dinner, consider keeping the beverage light. A crisp, dry sparkling wine or even a nice glass of cold milk works wonders. We also love offering them alongside the absolute buttery perfection of my whipped shortbread cookies recipe for guests who want something slightly less heavy but still sweet!
Nutritional Estimate for One Boston Cream Pie Cupcake
When you’re enjoying something this delicious, I always tell people not to dwell too hard on the numbers, but I know some of you are curious! Since these classic dessert cupcakes are made with cream and butter, they aren’t exactly light fare, but that’s what makes them such a wonderful indulgence, right?
Please remember that these figures are just estimates based on the standard ingredients listed. If you use lighter cream or different chocolate in your chocolate ganache topped cupcakes, these numbers will shift a little bit! But this gives you a good ballpark idea of what you’re serving up when you offer these beauties.
- Serving Size: 1 cupcake
- Calories: 350
- Sugar: 35g
- Sodium: 180mg
- Fat: 18g
- Saturated Fat: 10g
- Unsaturated Fat: 8g
- Trans Fat: 0.5g
- Carbohydrates: 45g
- Fiber: 1g
- Protein: 5g
- Cholesterol: 65mg
They are satisfying, though! That rich filling and chocolate topping really make these feel like a true treat. Enjoy them guilt-free!
PrintUltimate Boston Cream Pie Cupcakes with Homemade Pastry Cream and Silky Chocolate Ganache
Make these decadent Boston Cream Pie Cupcakes. You get a fluffy vanilla cake base, a smooth pastry cream filling, and a rich chocolate ganache topping. This recipe brings the classic American dessert to a perfect, bite-sized treat.
- Prep Time: 30 min
- Cook Time: 20 min
- Total Time: 50 min
- Yield: 12 servings 1x
- Category: Dessert
- Method: Baking
- Cuisine: American
- Diet: Vegetarian
Ingredients
- 1 1/2 cups all-purpose flour
- 1 1/2 teaspoons baking powder
- 1/2 teaspoon salt
- 1/2 cup unsalted butter, softened
- 1 cup granulated sugar
- 2 large eggs
- 1 teaspoon vanilla extract
- 1/2 cup milk
- 1 cup prepared pastry cream (for filling)
- 1 cup semi-sweet chocolate chips (for ganache)
- 1/2 cup heavy cream (for ganache)
Instructions
- Preheat your oven to 350°F (175°C). Line a 12-cup muffin tin with paper liners.
- In a medium bowl, whisk together the flour, baking powder, and salt. Set this dry mixture aside.
- In a large bowl, cream the softened butter and sugar together until light and fluffy.
- Beat in the eggs one at a time, mixing well after each addition. Stir in the vanilla extract.
- Gradually add the dry ingredients to the wet ingredients, alternating with the milk, beginning and ending with the dry mixture. Mix until just combined; do not overmix.
- Spoon the batter evenly into the prepared cupcake liners, filling each about two-thirds full.
- Bake for 18 to 20 minutes, or until a toothpick inserted into the center comes out clean. Let the cupcakes cool in the pan for 5 minutes before transferring them to a wire rack to cool completely.
- Prepare the pastry cream filling if you have not already done so. Once the cupcakes are cool, use an apple corer or small knife to remove a small core from the center of each cupcake.
- Fill the hollowed center of each cupcake with the prepared pastry cream.
- Make the chocolate ganache: Place the chocolate chips in a heatproof bowl. Heat the heavy cream in a small saucepan until it just begins to simmer around the edges.
- Pour the hot cream over the chocolate chips. Let it sit undisturbed for 5 minutes, then whisk until the mixture is smooth and glossy.
- Spoon or pipe the chocolate ganache over the top of each filled cupcake. Let the ganache set slightly before serving.
Notes
- For the best results with the pastry cream, use whole milk and chill the cream completely before filling the cupcakes.
- If you want a quicker filling, you can substitute store-bought vanilla pudding for the homemade pastry cream.
- To achieve a bakery style look, use a piping bag fitted with a large round tip to fill the center hole with cream.
Nutrition
- Serving Size: 1 cupcake
- Calories: 350
- Sugar: 35g
- Sodium: 180mg
- Fat: 18g
- Saturated Fat: 10g
- Unsaturated Fat: 8g
- Trans Fat: 0.5g
- Carbohydrates: 45g
- Fiber: 1g
- Protein: 5g
- Cholesterol: 65mg