
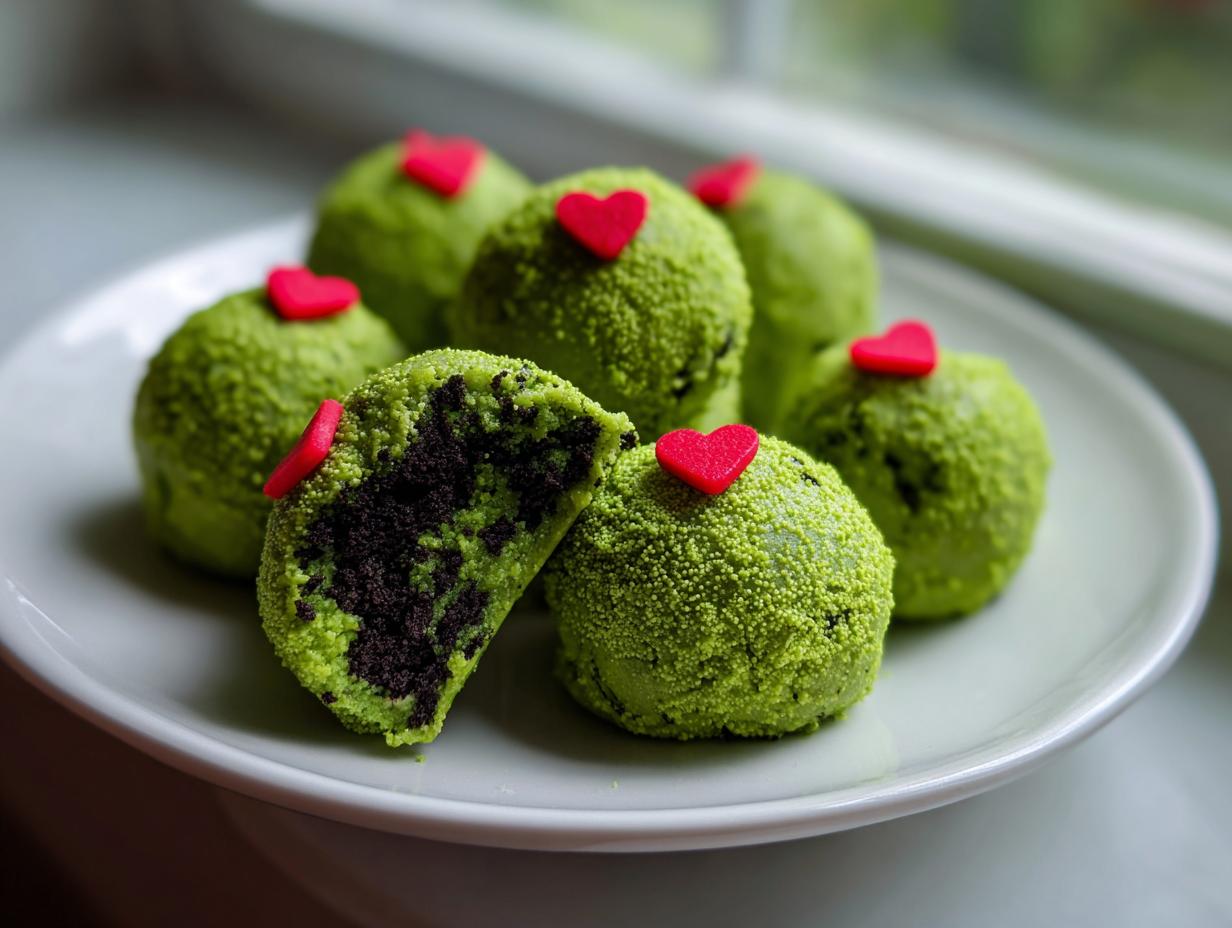
Oh my goodness, doesn’t the smell of gingerbread and cinnamon just instantly fill you with the Christmas spirit? While I adore a classic baked cookie, sometimes the holiday rush hits hard. That’s where Cookin’ Corner shines, bringing you reliable recipes that save the day! If you’re looking for the ultimate, vibrant, and almost criminally easy Christmas dessert, you need these amazing Grinch Oreo Balls right now. They are no-bake, incredibly festive with that signature green coating and little red heart, and they come straight from our family tradition of tested, tried-and-true holiday sweets.
Seriously, these little bites are guaranteed to get laughs at any event. Forget spending hours over an oven when you can whip up these chocolatey truffles in under an hour—plus chill time! We developed this recipe to be foolproof, so whether you’re hosting a huge Christmas party or just need a fun activity for the kiddos, these are your new go-to. You’ll be shocked how easily they come together. Trust me, once you try them, they’ll be on your table every December. If you loved our ultra-simple no-bake Oreo pie, you’re going to flip for this truffle version!

- Why You Need These Grinch Oreo Balls This Holiday Season
- Essential Ingredients for Your Grinch Oreo Balls recipe
- Step-by-Step Instructions for Perfect Grinch Oreo Balls
- Tips for Success Making Simple Christmas Truffles
- Storage and Reheating Instructions for Grinch Oreo Balls
- Serving Suggestions for Bite Sized Christmas Sweets
- Frequently Asked Questions About Grinch Oreo Balls
- Estimated Nutritional Data for Grinch Oreo Balls
- Share Your Adorable Holiday Bites
Why You Need These Grinch Oreo Balls This Holiday Season
Listen, the holidays are busy! Who has time for complicated, multi-step baking when you have parties to attend and gifts to wrap? That’s why these Grinch Oreo Balls are my personal holiday MVP. They look like you spent hours crafting, but honestly, they take just minutes for the actual mixing. They are pure magic and require zero oven time, which is a blessing in December!
- They are genuinely no-bake; just mix, roll, chill, and dip!
- They travel beautifully, making them the perfect contribution to any gathering.
- The bright green color and cute heart instantly bring some playful cheer to the dessert table.
Perfect for Holiday Cookie Exchange ideas
When you’re planning for a big Holiday Cookie Exchange ideas event, presentation counts! Because these are truffles, they hold their shape perfectly, even if they sit out for a little while. They are bite-sized, which is exactly what people want when they are sampling a dozen kinds of treats. Plus, the green color just screams Christmas.
Kid Friendly Christmas Baking Fun
This is where the kids totally shine! You can have the grown-ups crush the Oreos and mix in the cream cheese, but the rolling and decorating? That’s prime real estate for little helpers. Seriously, if you teach a kid to roll a ball and then place one tiny red sprinkle on top before the green coating sets, they feel like they made the star dessert! It’s simple, not messy (mostly!), and they are so proud of their adorable holiday bites.
Essential Ingredients for Your Grinch Oreo Balls recipe
Okay, let’s talk about what you need to bring these little Grinch creatures to life! Since these are Festive Oreo Truffles, the ingredients are super simple, but quality matters, especially with the filling. You absolutely need that full package of Oreos—I usually use the classic kind because that dark chocolate flavor is essential for balancing the sweetness. And please, please make sure your cream cheese is sitting out long enough to get truly soft! No one wants stiff cream cheese chunks in their truffle dough; that just ruins the lovely smooth consistency we are aiming for.
For the coating, we are skipping melted chocolate because honestly, it’s finicky. We use candy melts! They give you that bright, perfect, Grinch-green color without any struggle. I’ve had great luck with the Wilton brand for the most vibrant results. If you need other quick ideas, you can check out my easy 5-ingredient haystack cookies sometime too!
Ingredient Notes and Substitutions for Festive Oreo Truffles
Here’s where I give you the pro tips so your Green Candy Melts Desserts look professional! First, those tiny red hearts? They are the signature, so don’t skip them! You usually find them in the seasonal baking aisle around Christmas—look for them near the edible glitter or specialty sprinkles. They are super small, so be generous when you place them on that wet green coating.
Now, about that green coating: Candy melts are your friend. If you try to use regular white chocolate chips and food coloring, it often seizes or the color doesn’t stay as bright. If your melted green coating feels too thick to dip into, melt in a tiny bit of shortening or coconut oil—just half a teaspoon—it makes the coating shiny and super smooth for dipping.
And a fun trick I learned from a friend who made these last year: try using Red Velvet Oreos instead of the original! It keeps the center nice and fudgy but adds that subtle, romantic red hue peaking through your green shell. It’s so festive!
Step-by-Step Instructions for Perfect Grinch Oreo Balls
Alright, let’s get down to business! This is the part where we turn those simple ingredients into the most adorable Simple Christmas Truffles you’ve ever seen. Remember, success here hinges on patience during the mixing and chilling stages. Don’t rush the chill time—it makes the coating step go from messy nightmare to absolute dream. If you want to learn more about making creamy bases, check out my guide for easy creamy chocolate pudding from scratch, because that smooth texture is what we’re aiming for!
Preparing the Oreo Truffle Base
First things first: we need the crumbs! If you have a food processor, use it until those cookies are looking like fine brown sand. If you’re doing it the old-fashioned way (my favorite!), seal those Oreos in a heavy-duty zip-top bag and just go to town with a rolling pin until they are pulverized. No big chunks allowed, okay?
Once you have your fine crumbs in a medium bowl, bring in the cream cheese. This is where the magic truly begins, but it only works if your cream cheese is *fully* softened. I mean, it should be almost spreadable. If it’s cold, the mixture gets lumpy, and you’ll end up wrestling a crumbly mess instead of an easy dough. Mash it all together with a sturdy spoon or, honestly, just dive in with clean hands! Keep working it until everything is uniformly blended and it feels thick, sort of like play-doh. If it feels slightly sticky, don’t panic, we fix that next!
Chilling and Melting the Green Candy Melts Desserts Coating
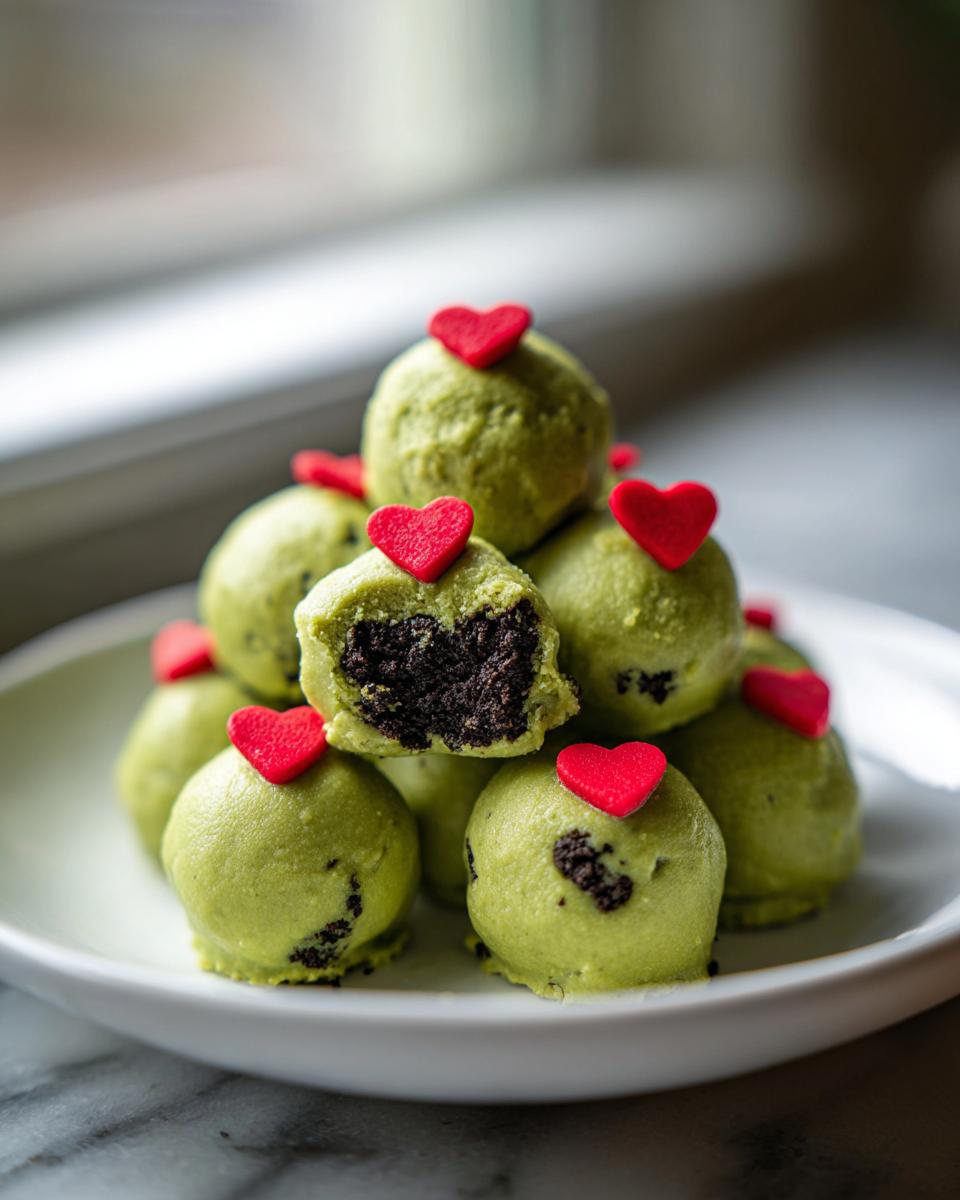
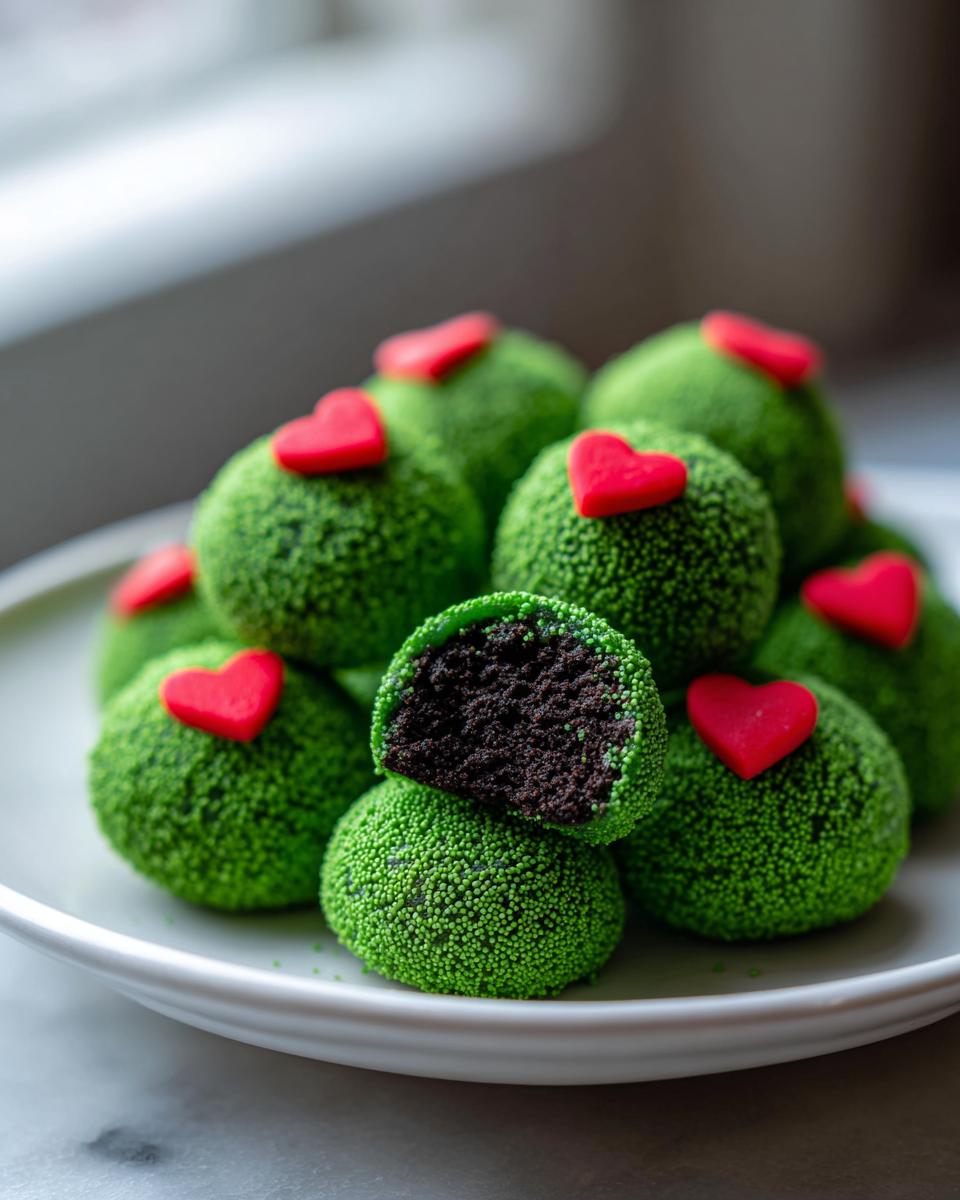
Now we set up the structure. Roll that thick dough into little balls, hitting that one-inch diameter mark for consistency. You should get around 30 to 36. Pop these little gems onto a sheet lined with parchment paper—this is your non-stick hero layer. Straight into the fridge they go for at least 30 minutes. They need to firm up solid!
While that’s chilling, get your green coating ready. I’m a microwaver, but you have to be careful! Melt those green candy melts in 30-second bursts. Seriously, 30 seconds, stir really well, 30 seconds, stir again. If you walk away, they will burn and seize up on you, and that’s a total disaster. If the coating looks too thick to dip easily, stir in just a touch of shortening or coconut oil—this makes the coating thinner and shinier, which is perfect for drizzling or dipping.
Dipping and Decorating Your Grinch Oreo Balls
Once your balls are firm and your coating is smooth, it’s dipping time! Grab your fork—a regular dinner fork works perfectly. Lower one chilled ball onto the tines and submerge it completely in the green coating. Lift it straight up, and gently tap that fork against the side of your bowl. You’ll see the excess coating drip right back in. Don’t worry about neatness; we want it fully coated but not gloppy!
Quickly, before that green sets, place the ball back onto your parchment paper. Now is the moment for the Grinch’s heart! Gently press just one tiny red heart sprinkle right onto the top center of the wet coating. That’s it! That little flash of red against the bright green is what makes these such an iconic treat. Repeat this process quickly until all your Easy Grinch Desserts are decorated. Pop them back in the fridge for about 15-20 minutes until the coating is completely hard and set.
Tips for Success Making Simple Christmas Truffles
Honestly, when making any no-bake truffle, sometimes things just don’t behave! Don’t sweat it; we’ve all been there. The number one issue I see with these Simple Christmas Truffles is the base being too soft. If your dough feels sloppy after mixing, just toss it in the fridge for an extra 15 minutes before rolling. If it’s still too sticky to roll, add a tiny spoonful of powdered sugar right into the dough—it helps absorb that extra moisture.
When coating, remember that cold balls hit warm coating beautifully, but if the coating itself starts to thicken, just microwave it for 15 seconds at a time. This keeps your dipping smooth and prevents ripping the truffle surface. Keep practicing that fork tap, and you’ll master the art of the perfect dip in no time!
If you’re looking for another easy, foolproof holiday favorite, you simply must try my best soft and chewy snickerdoodles recipe next!
Storage and Reheating Instructions for Grinch Oreo Balls
Because our amazing Grinch Oreo Balls are made with cream cheese in the center, we absolutely have to treat them right for storage. You can’t just leave leftovers drying out on the counter like some baked cookies! The good news is that they are fantastic for making ahead of time, which is a lifesaver in my book.
The key here is keeping them airtight and cool. Store your finished, set truffles in a single layer in an airtight container, maybe with a sheet of parchment paper between layers if you have a lot. They need to hang out in the refrigerator. When kept cool and covered, these little No Bake Holiday Treats are good for a full week—sometimes even ten days! I usually make mine the weekend before Christmas, and they are always perfect for our big family party.
Can you freeze them? You bet! This is the secret if you need to prep weeks in advance. Just make sure they are frozen completely before you put them in a freezer-safe, airtight container. They hold up beautifully for up to two months! When you want to serve them, just pull out the container and let them thaw slowly in the fridge overnight. They come out tasting fresh, just like you made them that day. It’s such a handy trick for busy cooks. If you’re looking for other recipes you can stash away for later, check out my guide on great make ahead breakfast recipes!
Serving Suggestions for Bite Sized Christmas Sweets
Now that we have these ridiculously cute and perfectly formed Grinch Oreo Balls, half the battle is done, right? But presenting them? That’s where you take them from “great snack” to “showstopper centerpiece”! Since these are fantastic Party Tray Sweets, you want to make sure they look the part. I love setting up a tiered tray, which always feels so festive.

If you have a white serving platter, use that! The bright green pops against the white ceramic beautifully. To really sell the Grinch theme, use some crumpled green cellophane or tissue paper underneath the balls to look like soft hills or maybe even faux moss. It adds texture and keeps them from rolling around too much. Mix them in with some contrasting colors—maybe some dark chocolate-dipped pretzel rods or some simple white powdered sugar cookies to let those bright green centers really shine.
And of course, you have to serve them with something warm to cut through that sweet chocolate richness. These truffles pair perfectly with a big mug of my easy homemade hot cocoa mix recipe. Or, if you’re serving an adult crowd, a simple dark roast coffee is phenomenal alongside them. They are such simple Christmas truffles, but presentation elevates them instantly!
Frequently Asked Questions About Grinch Oreo Balls
I always get tons of questions when something this cute goes viral during the holidays! People want to make sure their treats are perfect for parties and exchanges. Here are the questions I hear most often about making these fun little Grinch Oreo Balls.
Can I make these Grinch Oreo Balls ahead of time?
Yes, absolutely! I encourage it, especially if you are making a lot of different Christmas treats. They are one of my favorite make-ahead winners. Once you’ve coated them completely and the green shell is hard, they must be stored in the refrigerator in an airtight container. They stay perfectly fresh and delicious for about a week that way. If you need to prep even further out, you can freeze them for up to two months! Just let them thaw in the fridge before you plan on serving.
What is the best way to color the coating green for these Easy Grinch Desserts?
Oh, this is where people get into trouble trying to use regular chocolate chips! For the easiest, brightest green results in your Easy Grinch Desserts, stick to green candy melts. They are already colored and melt super smoothly. If you try to melt white chocolate and add gel food coloring, sometimes the fat content fights the color, and you end up with thin, streaky coating that doesn’t look right.
If you can only find white candy melts, you can use oil-based food coloring (a drop or two) mixed in while they are hot. But honestly, buying the pre-colored green melts saves so much headache and guarantees that perfect, vibrant Grinch hue!
Are these Festive Oreo Truffles safe to leave out at a party?
This is a super important food safety question since these are Festive Oreo Truffles with cream cheese inside! Because of that cream cheese base, they really shouldn’t sit out at room temperature for longer than two hours total, especially if your house is warm from the fireplace!
If you are setting up a big dessert buffet, I recommend keeping the main batch refrigerated and only putting out a small platter of Bite Sized Christmas Sweets at a time. That way, you can swap fresh, cold truffles out as soon as the first batch starts warming up. It keeps them firm and safe!
Estimated Nutritional Data for Grinch Oreo Balls
Now, I know what you’re thinking: are these adorable little things secretly packed with sugar? Well, yes and no! Since these are fun, occasional holiday treats and not an everyday meal, we don’t sweat the specifics too much, but it’s good to have a reference point. Remember, these numbers are based on making about 30 balls using standard ingredients and sizes, so think of this as a helpful guide, not gospel truth!
We focus on enjoying the moment here in the Cookin’ Corner kitchen, but if you need the numbers for your planning, here is the breakdown per one single, perfect, bite-sized sweet:
- Serving Size: 1 ball
- Calories: 140
- Sugar: 14g
- Sodium: 85mg
- Fat: 8g
- Saturated Fat: 4g
- Trans Fat: 0g
- Carbohydrates: 16g
- Protein: 1g
- Cholesterol: 5mg
A big disclaimer, because I want you to bake with confidence: Since we aren’t running a lab here, these are estimates based on the ingredients list! If you use Red Velvet Oreos or a different brand of green candy melts, those numbers might shift a little bit. Enjoy them knowing they are totally worth every single delicious moment!
Share Your Adorable Holiday Bites
Well, that’s it! You now have the full breakdown on how to make the most charming and easy Grinch Oreo Balls for your whole crew. I truly hope these bring a huge smile to your family’s faces this year. They are such a centerpiece for a holiday platter, and honestly, I can never stop at just one of these dreamy, chocolatey truffles.
Now, I need your help keeping this tradition going! If you whip up a batch of these adorable holiday bites, please don’t keep that festive cheer to yourself! Snap a picture of your perfectly green, heart-topped truffles and share them with me on social media. Tag me so I can see how amazing your creations turn out! If you loved how simple and reliable this recipe was, please hop back over and give us a rating—five stars if these officially stole your holiday baking heart!
I always love hearing what everyone is baking up next! I’m busy putting together my Christmas menu right now. Let me know in the comments below: What’s the one other must-have, can’t-live-without holiday treat you make every single year? Use the comments section to share your holiday baking plans, or if you have any last-minute questions about candy melts or sprinkles, just ask! If you ever need to reach out directly, you can always head over to my contact page.
PrintEasy No-Bake Grinch Oreo Balls (The Ultimate Christmas Treat)

Make these adorable Grinch Oreo Balls for a festive, no-bake holiday dessert. They feature a rich Oreo and cream cheese center, coated in bright green candy melts, and topped with a small red heart for a fun Grinch look. These are perfect for your Christmas party tray or cookie exchange.
- Prep Time: 20 min
- Cook Time: 5 min
- Total Time: 55 min
- Yield: 30 servings 1x
- Category: Dessert
- Method: No-Bake
- Cuisine: American
- Diet: Vegetarian
Ingredients
- 1 package (14.3 oz) Oreo cookies (about 36 cookies)
- 8 oz cream cheese, softened
- 12 oz green candy melts
- 1 tablespoon shortening or coconut oil (optional, for smoother dipping)
- Small red heart sprinkles (for the Grinch heart accent)
Instructions
- Place the Oreo cookies into a food processor and pulse until you have fine crumbs. If you do not have a food processor, place them in a large zip-top bag and crush them with a rolling pin.
- Transfer the Oreo crumbs to a medium bowl. Add the softened cream cheese. Mix with a sturdy spoon or clean hands until the mixture is completely combined and forms a thick dough.
- Roll the dough into small balls, about 1 inch in diameter. You should get approximately 30 to 36 balls. Place the rolled balls onto a baking sheet lined with parchment paper.
- Chill the Oreo balls in the refrigerator for at least 30 minutes. This step helps them firm up before dipping.
- Melt the green candy melts according to package directions. You can use a microwave in 30-second intervals, stirring well after each interval, or use a double boiler. Stir in the shortening or coconut oil if using, to thin the coating slightly.
- Dip each chilled Oreo ball into the melted green coating, ensuring it is fully covered. Use a fork to lift the ball out, tapping the fork gently against the side of the bowl to let excess coating drip off.
- Place the coated ball back onto the parchment-lined baking sheet. Immediately place one small red heart sprinkle on top of the wet coating to resemble the Grinch’s heart.
- Allow the Grinch Oreo Balls to set completely at room temperature, or speed up the process by chilling them for another 15-20 minutes until the coating is hard.
- Serve these bite sized Christmas sweets immediately or store them in an airtight container in the refrigerator.
Notes
- For the best texture, make sure your cream cheese is fully softened before mixing it with the crumbs.
- If the green coating becomes too thick while dipping, microwave it for 10-15 seconds to loosen it up again.
- You can use regular Oreos or Red Velvet Oreos for a slightly different flavor profile in your Oreo truffle centers.
Nutrition
- Serving Size: 1 ball
- Calories: 140
- Sugar: 14
- Sodium: 85
- Fat: 8
- Saturated Fat: 4
- Unsaturated Fat: 4
- Trans Fat: 0
- Carbohydrates: 16
- Fiber: 0
- Protein: 1
- Cholesterol: 5