
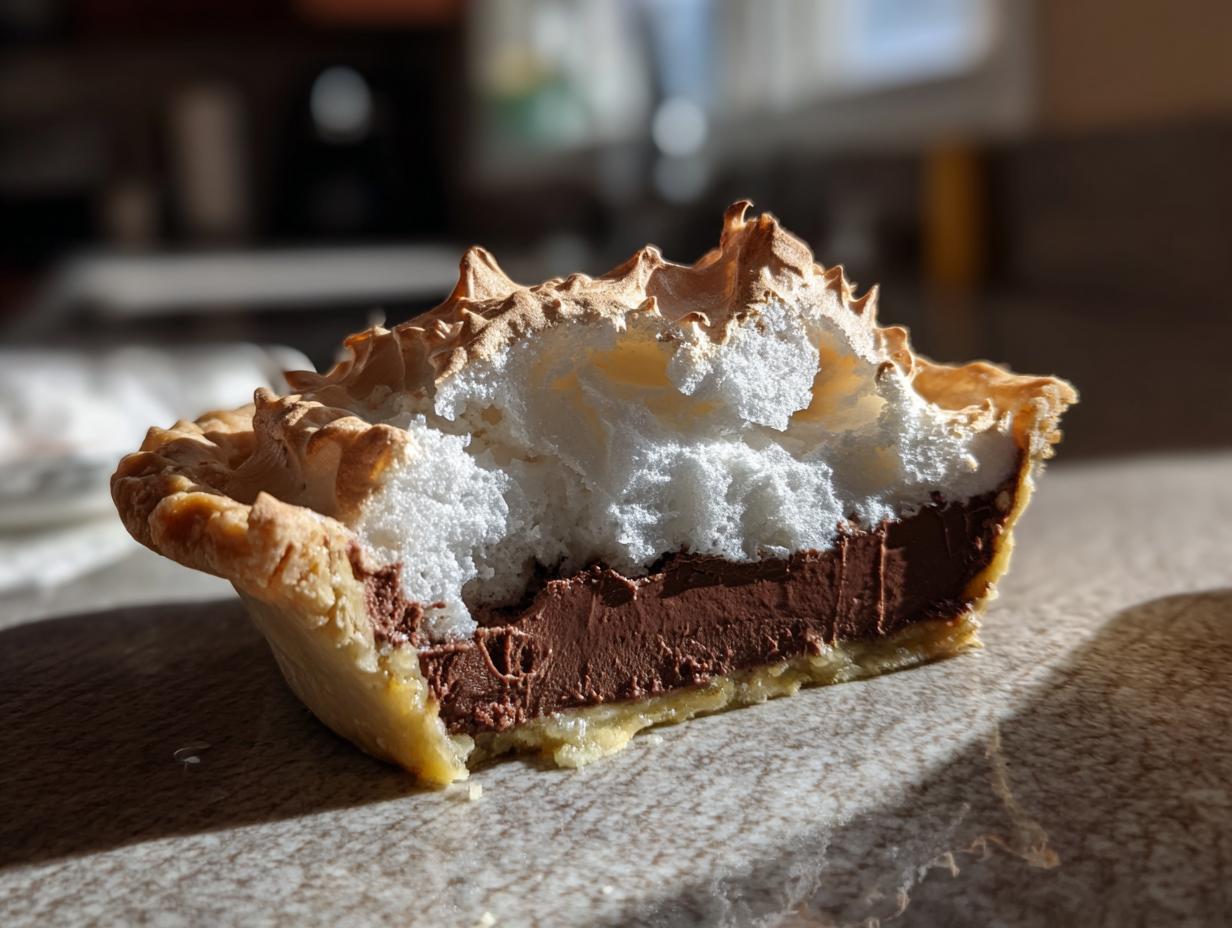
There’s something truly special about a classic American dessert, something rooted deep in comfort and celebration. Think about it—a perfect slice of pie can genuinely stop a conversation! Here at Cookin’ Corner, we hold these traditions close, and that’s why I’ve spent ages perfecting what I truly believe is the Best Homemade Chocolate Meringue Pie with Perfectly Stable Meringue recipe ever created.
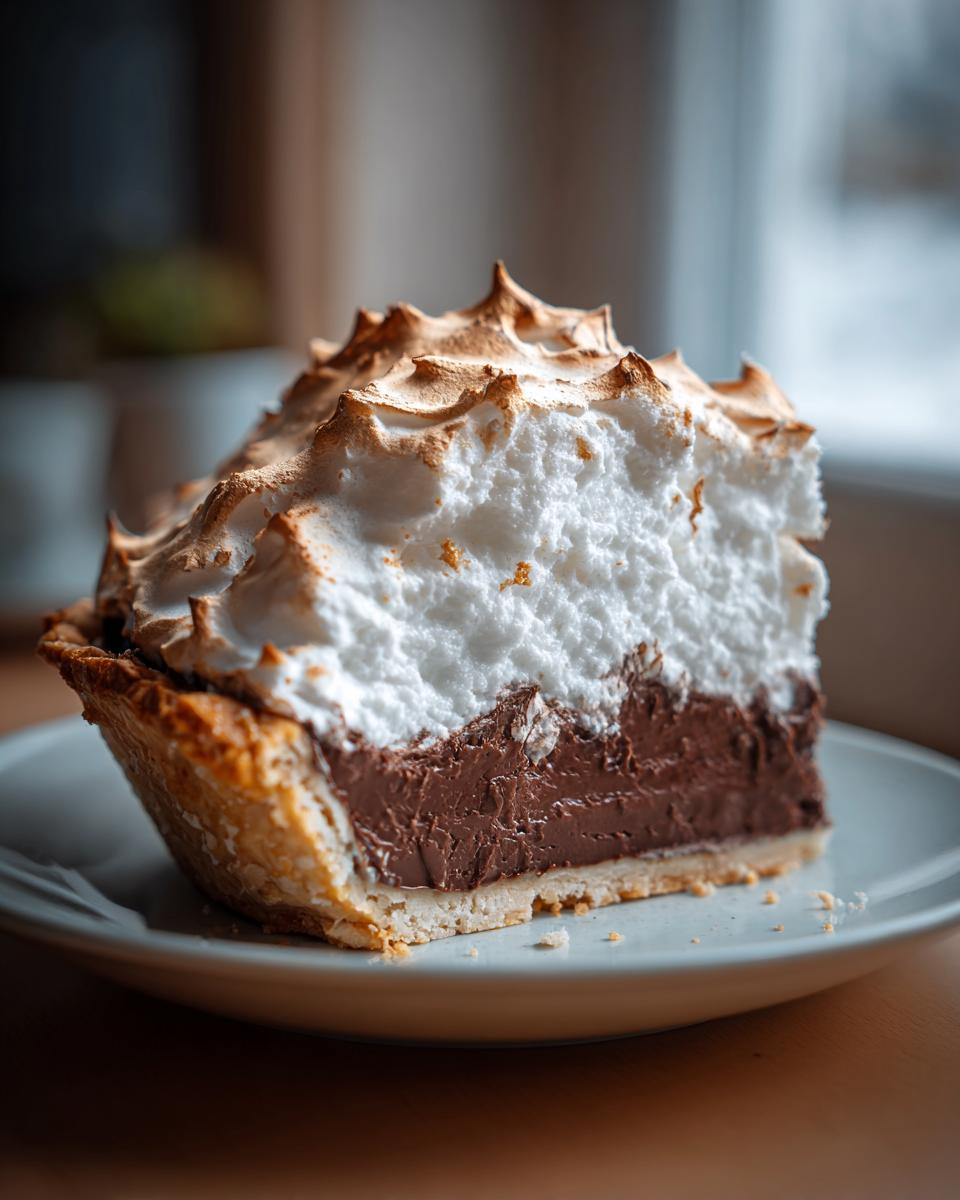
This isn’t just any recipe; it’s the result of countless trials to make sure that gorgeous chocolate meringue pie doesn’t cry, crack, or collapse on you. My grandmother always said a pie must look as good as it tastes, and this version delivers that rich, creamy chocolate custard base that simply melts in your mouth, hidden beneath a cloud of perfectly toasted fluff. Trust me, this showstopper is worth every minute!
- Why This Ultimate Chocolate Meringue Pie Recipe Works
- Gathering Ingredients for Your Chocolate Meringue Pie
- How to Prepare the Best Chocolate Meringue Pie Ever
- Expert Baking Tips for Your Classic Chocolate Meringue Pie
- Ingredient Spotlight: Understanding the Creamy Chocolate Filling Components
- Serving Suggestions for Your Showstopper Dessert
- Storage and Reheating Instructions for Chocolate Meringue Pie
- Frequently Asked Questions About Making Chocolate Meringue Pie
- Share Your Homemade Chocolate Meringue Pie Success
Why This Ultimate Chocolate Meringue Pie Recipe Works
You’re probably here because you’ve dealt with that heartbreaking weeping or cracking meringue before. Don’t worry, I’ve solved those old problems! This recipe is your ticket to a dependable, classic dessert that wows everyone who sees it.
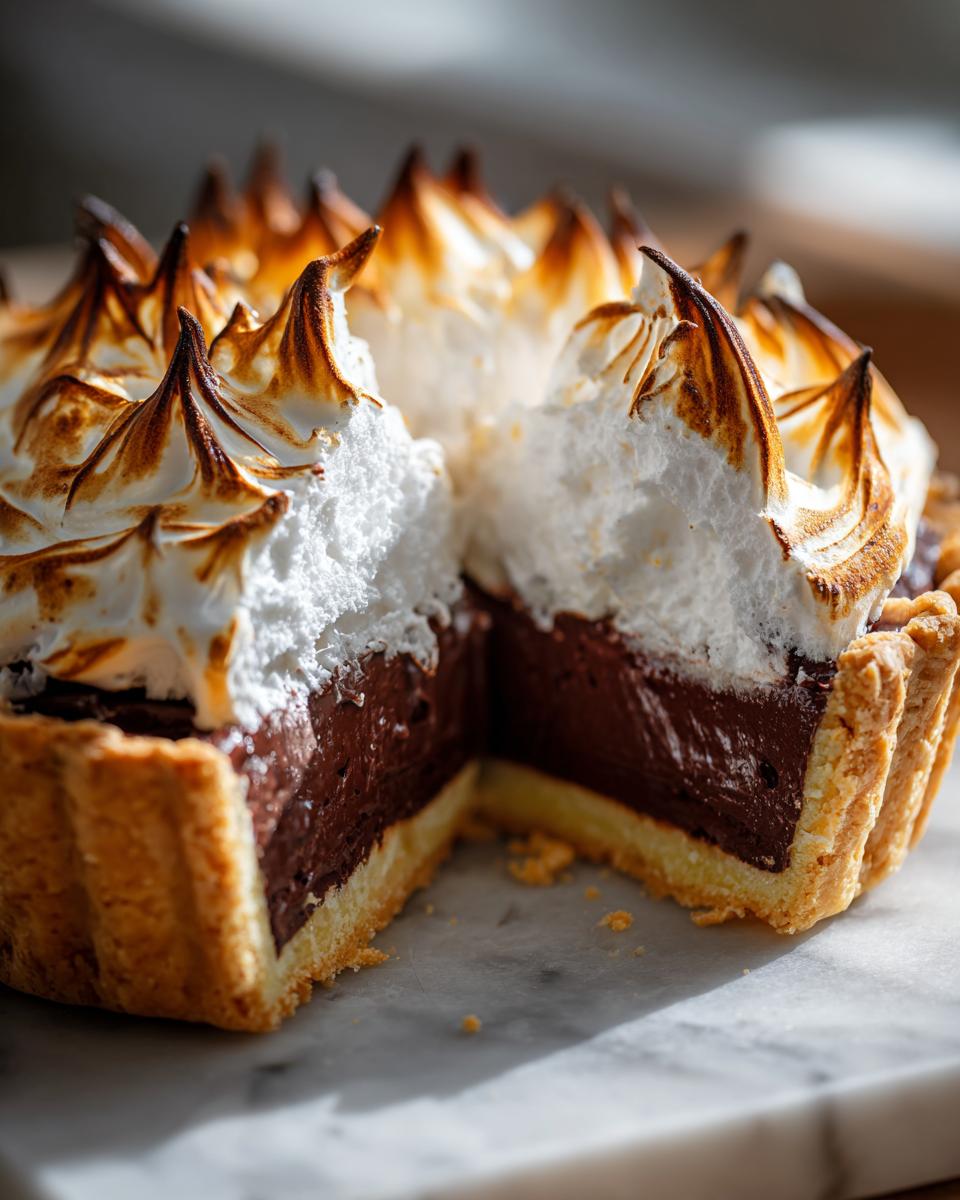
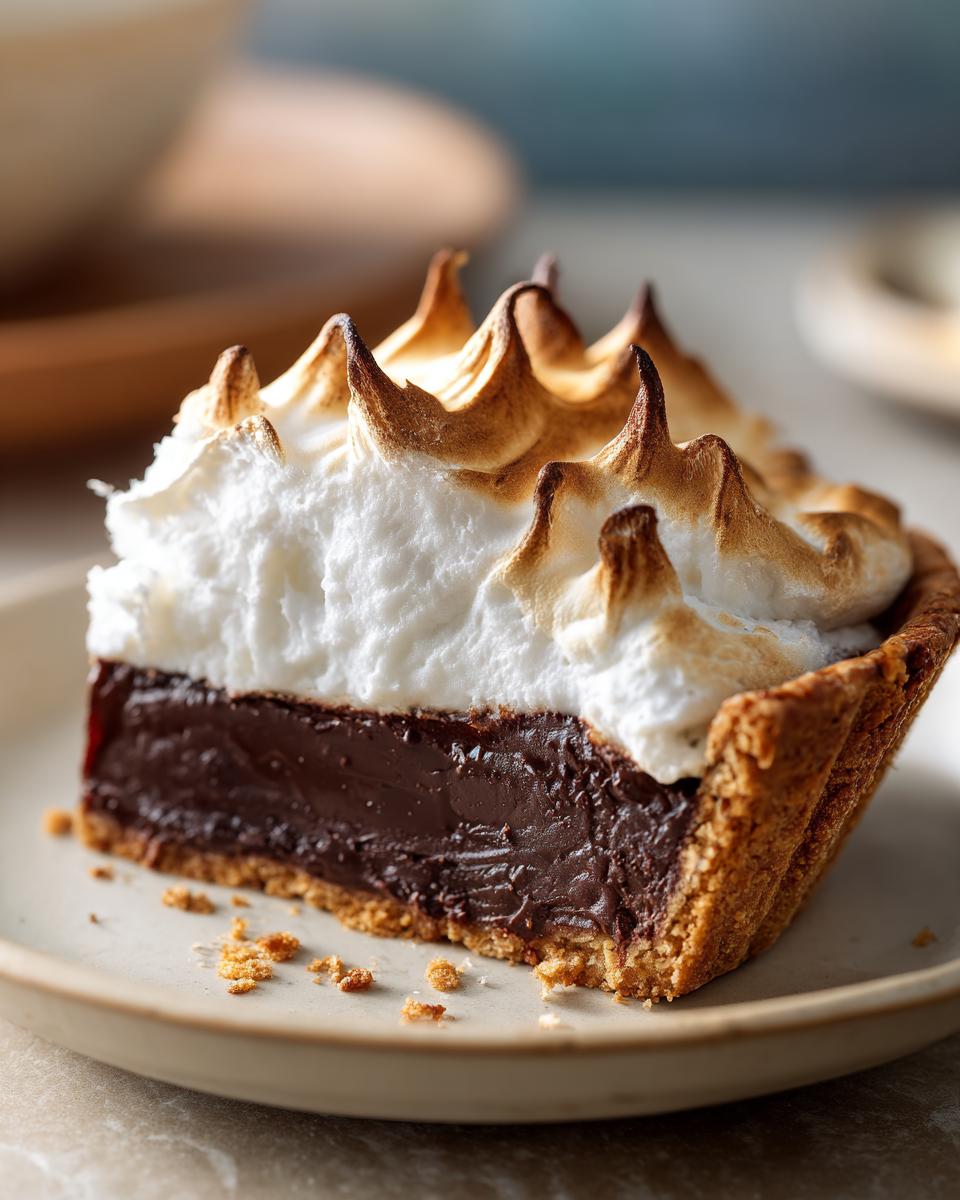
- The filling is deep, dark, and incredibly creamy—nothing watery here.
- The meringue is tall, glossy, and, most importantly, stable!
- It’s an Old Fashioned Meringue Pie technique that keeps the tradition alive right in your own kitchen.
If you loved the richness of my banana cream pie, you are going to adore this silky texture. Check out that custard recipe if you need another classic baking fix!
The Secret to Rich Chocolate Custard Pie
The difference between this pie and a standard pudding pie is that we use chopped, high-quality unsweetened chocolate along with the cornstarch slurry. This builds layers of flavor and gives you that unbeatable, decadent Rich Chocolate Custard Pie texture. It sets up beautifully firm, even when warm!
Achieving a Fluffy Meringue Topping Recipe That Stays Put
For our Fluffy Meringue Topping Recipe, the secret weapon is room-temperature egg whites combined with just a pinch of cream of tartar before adding the sugar. This guarantees we create those sturdy structures needed for tall, glossy peaks. It truly becomes a No-Fail Meringue Recipe when you follow that simple rule.
Gathering Ingredients for Your Chocolate Meringue Pie
Okay, let’s talk setup! Getting your ingredients ready is half the battle won, especially when you’re aiming for that picture-perfect final look. This recipe definitely needs organization because we have three main parts: the crust, that rich chocolate filling, and the gorgeous cloud of meringue on top. Remember, use a pre-baked shell; trying to bake the crust later will just make your meringue melt off!
For my friends making a totally from-scratch pie, you’ll need those standard things for your Buttery Pie Crust Filling ingredients—flour, super cold butter, salt, and ice water. But here are the superstars you really need for the magic inside the pie shell:
For the Buttery Pie Crust Filling
- 1 fully baked and cooled 9-inch pie crust (make sure it’s blind-baked!)
For the Creamy Chocolate Filling
- 1 cup plus 1/2 cup granulated sugar (that’s 1 1/2 cups total, split up!)
- 1/2 cup cornstarch
- 1/4 teaspoon salt
- 1 1/2 cups cold water
- 1 1/2 cups whole milk
- 4 ounces unsweetened chocolate, chopped fine
- 2 tablespoons unsalted butter
- 1 teaspoon vanilla extract
- 3 large egg yolks, beaten lightly
For the No-Fail Meringue Recipe
- 4 large egg whites, make sure they are truly at room temperature!
- 1/4 teaspoon cream of tartar (this is non-negotiable for stability!)
- The remaining 1/2 cup of granulated sugar
How to Prepare the Best Chocolate Meringue Pie Ever
Alright, deep breaths! This is the moment where we create the Best Chocolate Pie Ever. Don’t let the steps scare you; we’re just building layers of pure comfort. First things first, make sure that buttery pie crust is already baked and completely cooled down. Seriously, if it’s even a little warm, the filling will turn soupy before we even get to the meringue; we baked it until it was just lightly golden, remember?
Preparing the Crust and Creamy Chocolate Filling
We start with the filling in a medium saucepan. Whisk together 1 cup of that sugar, the cornstarch, and the salt, then slowly add your cold water until it’s smooth as silk—no lumps allowed! Then stir in the milk and cook that over medium heat until it thickens up and starts bubbling. Now, listen closely because this is crucial: we have to temper those egg yolks so they don’t scramble and ruin our beautiful texture. Take about a cup of that hot milk mixture and slowly drizzle it into your whisked yolks while you stir like crazy. Once that’s incorporated, gently pour that warm yolk back into the saucepan. Cook it just a minute more until it thickens again. Take it off the heat and stir in your chopped chocolate, butter, and vanilla. Wow, the smell alone!
Once everything is smooth and glorious, pour that hot, rich chocolate custard right into that cool, previously baked pie crust.
Making the Fluffy Meringue Topping and Baking the Chocolate Meringue Pie
While the filling is settling in, we whip up that amazing topping. Beat your room-temperature egg whites with the cream of tartar until they just get soft peaks—they should look a little fluffy but still droopy. This is where that extra stability comes from! Now, slowly stream in the rest of your sugar until you get those stiff, glossy peaks. That’s your perfect, fluffy cloud!
Spread that meringue mixture right over the hot filling. And here is the most important move for a showstopper: make sure that meringue definitely touches those crust edges all the way around! This seals in the moisture and stops the dreaded weeping. Pop it into a 350°F oven for about 12 to 15 minutes until the tops are that beautiful golden brown color. After that, the hardest part begins: you must let it cool down completely at room temperature for at least four hours before slicing. I know it’s hard, but patience makes the creamy chocolate filling perfect!
Expert Baking Tips for Your Classic Chocolate Meringue Pie
So, you’ve mastered the filling and whipped up that gorgeous cloud—now let’s talk about keeping this Classic Chocolate Meringue Pie looking pristine! Remember those notes I mentioned in the recipe card? They are pure gold for avoiding kitchen disasters.
The main thing people worry about is weeping, right? That gooey liquid forming between the filling and the meringue. The absolute key here is sealing! When you spread that fluffy meringue over your hot chocolate filling, you have to make sure it sticks to the crust edge all the way around. Press it firmly against the pastry rim. That creates a tight little seal so the moisture stays trapped under the meringue.
And listen, if you’re not feeling the oven-bake to toast the top, my favorite shortcut is using a kitchen torch! It gives you total control over the color, making sure the peaks are perfectly toasted without overcooking the filling underneath. If you want more general baking wisdom, I put together my best advice for pie making over on my Baking Tips for Pies page. For another fantastic take on getting that sturdy structure, I always check out what my friends over at Freddy’s are doing; this link is great if you want a quick view on that torch technique!
Ingredient Spotlight: Understanding the Creamy Chocolate Filling Components
I get asked all the time about that deep, velvety texture in the Creamy Chocolate Filling. It really isn’t just about tossing in a chocolate bar; precision matters here, just like in all good home baking! The primary secret is using unsweetened chocolate instead of just relying on cocoa powder plus sugar. That chocolate bar brings cocoa butter, which sets up beautifully when mixed with the cornstarch slurry and egg yolks.
The cornstarch, by the way, is doing a lot of heavy lifting! It’s the key thickener that turns our warm liquid into that luscious pudding consistency before it even hits the oven. For a richer flavor profile, I sometimes substitute half the unsweetened chocolate for a good quality bittersweet—it adds such a lovely note of complexity! If you want to play around with cocoa powder textures in other recipes, check out my homemade cocoa powder guide.
Serving Suggestions for Your Showstopper Dessert
When you pull this incredible pie out—and believe me, it *is* a Showstopper Dessert—you want the sides to be simple so the pie gets all the attention it deserves. Because the filling is so rich and the meringue is so sweet, I always go for something light and slightly tart.
Fresh raspberries are just perfect scattered around the edge of the plate. If you want a cool contrast, a small scoop of good vanilla bean ice cream works wonders, or try a dollop of lightly sweetened, unsweetened whipped cream. If you’re feeling extra cozy, you can even whip up a batch of my whipped hot chocolate essence to serve alongside it!

Storage and Reheating Instructions for Chocolate Meringue Pie
Listen, the hardest part of any meringue pie is waiting to eat it! But proper storage is absolutely essential for this delicate masterpiece. Generally, an intact chocolate meringue pie is best eaten the day it’s made, honestly. That meringue is at its fluffiest and most beautiful right after it has cooled for those initial four hours at room temperature.
If you absolutely must store leftovers, you need to prepare for condensation, which is the enemy of a crisp meringue topping. Wrap the entire pie loosely with plastic wrap *only once it has completely cooled down*. You want to avoid direct contact between the plastic and the meringue peaks if you can, so try to tent it loosely over the top.
Now, where to store it? You *can* put it in the refrigerator, but only for a short time—maybe until the next morning. Because of the moisture inside the fridge, the meringue will start to get that dreaded ‘weeping’ look where tiny beads of sugar water form. If you want to keep it longer than 24 hours, I actually suggest cutting the slices you need, storing those individual slices in sealed containers, and maybe whipping up fresh meringue for the leftovers later!
And please, skip the reheating temptation! Putting a meringue pie in the oven or microwave after it’s set will just cause the custard to break down and the meringue to deflate or melt entirely. This pie is meant to be enjoyed cool or at room temperature, which is why that initial 4-hour cool-down is just so important to the structure of the chocolate meringue pie. Eat it fresh, my friends!
Frequently Asked Questions About Making Chocolate Meringue Pie
I know that when you’re trying to make a Decadent Chocolate Dessert like this, little questions pop up! You’ve got your pie, but maybe you’re worried about keeping it perfect until dessert time. Here are the things I hear most often when folks are nervous about tackling their first homemade pie.
Can I make the chocolate meringue pie filling ahead of time?
Yes, absolutely! The Creamy Chocolate Filling is actually better made the day before you plan to serve the pie. Once it’s cooked, pour it into your cooled crust and let it set up completely in the fridge overnight. Just don’t add the meringue until just an hour or two before you plan to serve it. If you add the meringue too early, it starts to get rubbery and sets up poorly.
Why is my meringue weeping or sweating?
Oh, the dreaded weep! Nine times out of ten, it means two things happened. First, you didn’t fully merge that meringue right to the edges of the filling, so moisture trapped beneath it escaped. Second, if you stick it in the cold fridge too fast, condensation happens! Remember that crucial step? Bake it until golden, then let it cool slowly on the counter for those full four hours before even thinking about chilling it.
What is the best way to get a golden, perfectly toasted meringue?
For that beautiful, tall look, you have two great choices! If you’re baking the pie as instructed, just use the residual heat in the oven for about 12 to 15 minutes at 350°F until it’s lightly kissed gold. But honestly, my favorite technique for a perfectly Perfectly Toasted Meringue is using a kitchen torch once the pie is completely cooled. It gives you amazing control over those delicate peaks! For more reliable baking advice for all your favorites, check out my post on no-bake pies too—sometimes you just need an easier route!
If you’re looking for other tried-and-true methods for classic desserts, my friends over at Countryside Cravings have some wonderful tips here, especially if you struggle with that first bake!
Share Your Homemade Chocolate Meringue Pie Success
Well, that’s it! You’ve made a pie so beautiful and delicious that your whole kitchen smells like pure comfort. That moment when you slice into that chocolate custard and see that perfectly set, fluffy meringue staring back at you? It’s magical, isn’t it?
Now that you’ve conquered this classic, I really, truly want to hear how it went for you! Did the meringue stay put? Did your family even let it cool for the full four hours (I’m betting not!)?
Please, don’t be shy! Come back here and drop a comment below telling me how you liked the recipe. Give it a star rating so I know it worked its magic for you, too. And if you took a picture of that showstopper—which I know you did—tag me on social media! I absolutely love seeing your versions of these old family recipes coming to life.
If you have any questions at all while you’re cleaning up the bowls, don’t hesitate to reach out through the Contact Page. Happy baking, and enjoy every single creamy slice!
PrintThe Ultimate Chocolate Meringue Pie Recipe with Perfectly Stable Meringue
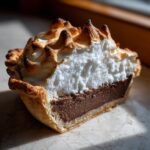
Make this classic American dessert featuring a rich, creamy chocolate custard filling in a buttery crust, topped with a tall, fluffy, and golden meringue that resists weeping. This is the showstopper dessert you need for any gathering.
- Prep Time: 30 min
- Cook Time: 35 min
- Total Time: 4 hours 5 minutes
- Yield: 8 servings 1x
- Category: Dessert
- Method: Baking
- Cuisine: American
- Diet: Vegetarian
Ingredients
- 1 unbaked 9-inch pie crust (buttery pie crust filling recommended)
- 1 1/2 cups granulated sugar, divided
- 1/2 cup cornstarch
- 1/4 teaspoon salt
- 1 1/2 cups cold water
- 3 large egg yolks, lightly beaten
- 1 1/2 cups whole milk
- 4 ounces unsweetened chocolate, chopped
- 2 tablespoons unsalted butter
- 1 teaspoon vanilla extract
- 4 large egg whites, room temperature
- 1/4 teaspoon cream of tartar
Instructions
- Bake the pie crust according to your favorite recipe until lightly golden. Let it cool completely.
- For the chocolate custard filling, whisk together 1 cup of the sugar, cornstarch, and salt in a medium saucepan. Gradually whisk in the cold water until smooth.
- Stir in the milk. Cook over medium heat, stirring constantly, until the mixture thickens and bubbles. Reduce heat to low and cook for 1 minute more. Remove from heat.
- In a separate bowl, whisk the egg yolks. Slowly temper the yolks by whisking about 1 cup of the hot milk mixture into the yolks. Then, pour the tempered yolk mixture back into the saucepan with the remaining hot mixture.
- Cook over medium-low heat, stirring constantly, until the custard thickens again and just begins to bubble. Do not boil. Remove from heat.
- Stir in the chopped chocolate, butter, and vanilla extract until smooth. Pour the hot chocolate filling into the cooled, baked pie crust.
- For the fluffy meringue topping, beat the egg whites and cream of tartar in a clean, dry bowl with an electric mixer until soft peaks form. Gradually add the remaining 1/2 cup of sugar, beating until stiff, glossy peaks form. This creates your no-fail meringue recipe.
- Spread the meringue over the hot chocolate filling, making sure the meringue touches the edges of the crust all around to seal it and prevent weeping.
- Bake at 350°F (175°C) for 12 to 15 minutes, or until the meringue is lightly golden brown.
- Cool the pie completely on a wire rack at room temperature for at least 4 hours before slicing. Do not refrigerate immediately to prevent condensation.
Notes
- To achieve a perfectly toasted meringue without baking, you can use a kitchen torch after spreading the meringue over the cooled filling.
- For a richer chocolate flavor in your creamy chocolate filling, use high-quality bittersweet chocolate.
- If you notice any weeping after cooling, it often means the meringue was not sealed completely to the crust edge.
Nutrition
- Serving Size: 1 slice
- Calories: 410
- Sugar: 45g
- Sodium: 250mg
- Fat: 20g
- Saturated Fat: 10g
- Unsaturated Fat: 10g
- Trans Fat: 0g
- Carbohydrates: 55g
- Fiber: 2g
- Protein: 7g
- Cholesterol: 110mg