
Is there anything better than walking into a party and seeing that glorious, vibrant platter sitting on the snack table? I swear, the smell of seasoned taco meat and cool sour cream just transports me right back to game nights at Sarah Jane Thompson’s house growing up. If you’re looking for that show-stopping centerpiece that requires zero oven time, you’ve found it. We’re making the Ultimate Seven Layer Taco Dip today, and trust me when I say this is the layer dip that sets the standard. Sarah Jane always relied on these tried-and-true, classic builds for every family gathering, ensuring the layers stay distinct and everyone leaves happy. You can learn more about that classic appetizer tradition in our full Seven Layer Dip Recipe here.
- Why This Ultimate Seven Layer Dip is the Best Layer Dip for Any Gathering
- Essential Ingredients for Your Seven Layer Dip Recipe
- Step-by-Step Instructions for Assembling the Perfect Layer Dip
- Tips for Success with This Crowd Pleasing Dip
- Make Ahead Dip Instructions and Storage
- Serving Suggestions for Your Layered Dip
- Variations on the Classic Taco Layer Dip
- Frequently Asked Questions About This Layer Dip
- Nutritional Data for the Ultimate Layered Dip Recipe
Why This Ultimate Seven Layer Dip is the Best Layer Dip for Any Gathering
You know me—if a recipe can save me time while looking totally gorgeous, I’m all in! This Ultimate Seven Layer Dip truly is the King of Party Dips because it hits every mark. It’s built to please a huge crowd, and honestly, you can’t mess it up!
- Quick Assembly for a Perfect Party Dip: We’re looking at maybe 20 minutes of work before chilling. Since there’s no baking involved, this is one of those gems that qualifies as a wonderful Quick Appetizers for a Party option when you’re short on time.
- Classic Taco Dip Flavors: Every single person loves this flavor profile. It’s reliable, familiar, and hits that savory, cheesy spot we all crave. This recipe delivers that perfect Classic Taco Dip experience without any guesswork.
Essential Ingredients for Your Seven Layer Dip Recipe
Okay, let’s talk ingredients! Because this is a layered dip, everything needs to be ready to go before you start piling things on. You don’t want to be grating cheese while your bean layer is getting lonely! We need the full lineup to get that wonderful Tex-Mex experience.
Having everything measured out beforehand is my biggest little secret for making this assembly process fly by. I always make sure my cream cheese has been sitting out for at least an hour so it’s perfectly soft—that makes mixing up the base so much easier. Also, a quick note on the salsa: be sure to drain off any watery bits! We want flavor, not soup, soaking into those lower layers! If you want to kick up the cheese factor, you can always make a batch of homemade nacho cheese to substitute the shredded blend, but honestly, the shredded Mexican blend works perfectly right out of the bag.
- 1 (16 ounce) package cream cheese, softened
- 1 cup sour cream
- 1 packet (1 ounce) taco seasoning mix
- 1 (16 ounce) can refried beans, not heated
- 1 cup prepared guacamole
- 1 cup salsa, drained slightly
- 2 cups shredded Mexican blend cheese
- 1 cup chopped tomatoes
- 1/2 cup sliced black olives
- 1/4 cup chopped green onions
Step-by-Step Instructions for Assembling the Perfect Layer Dip
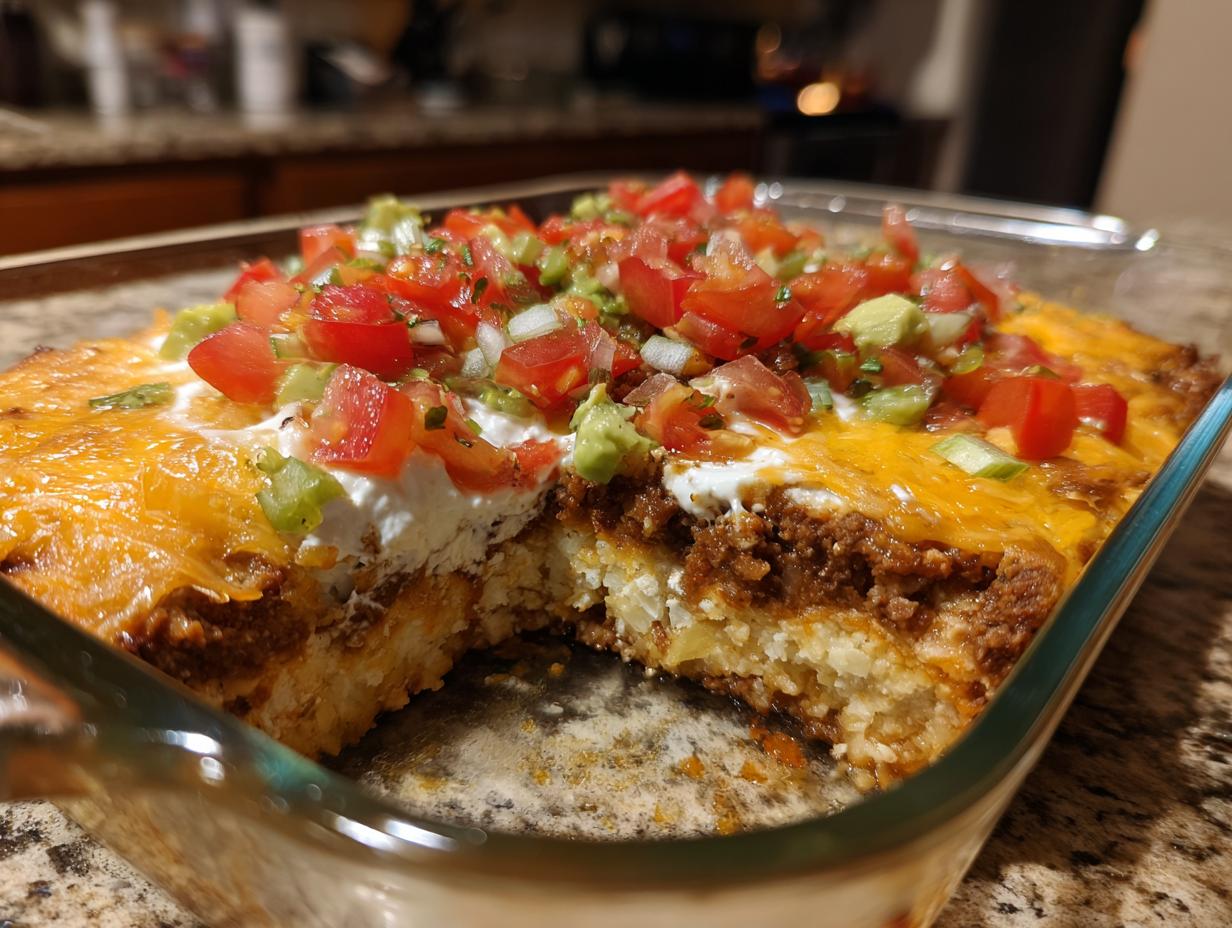
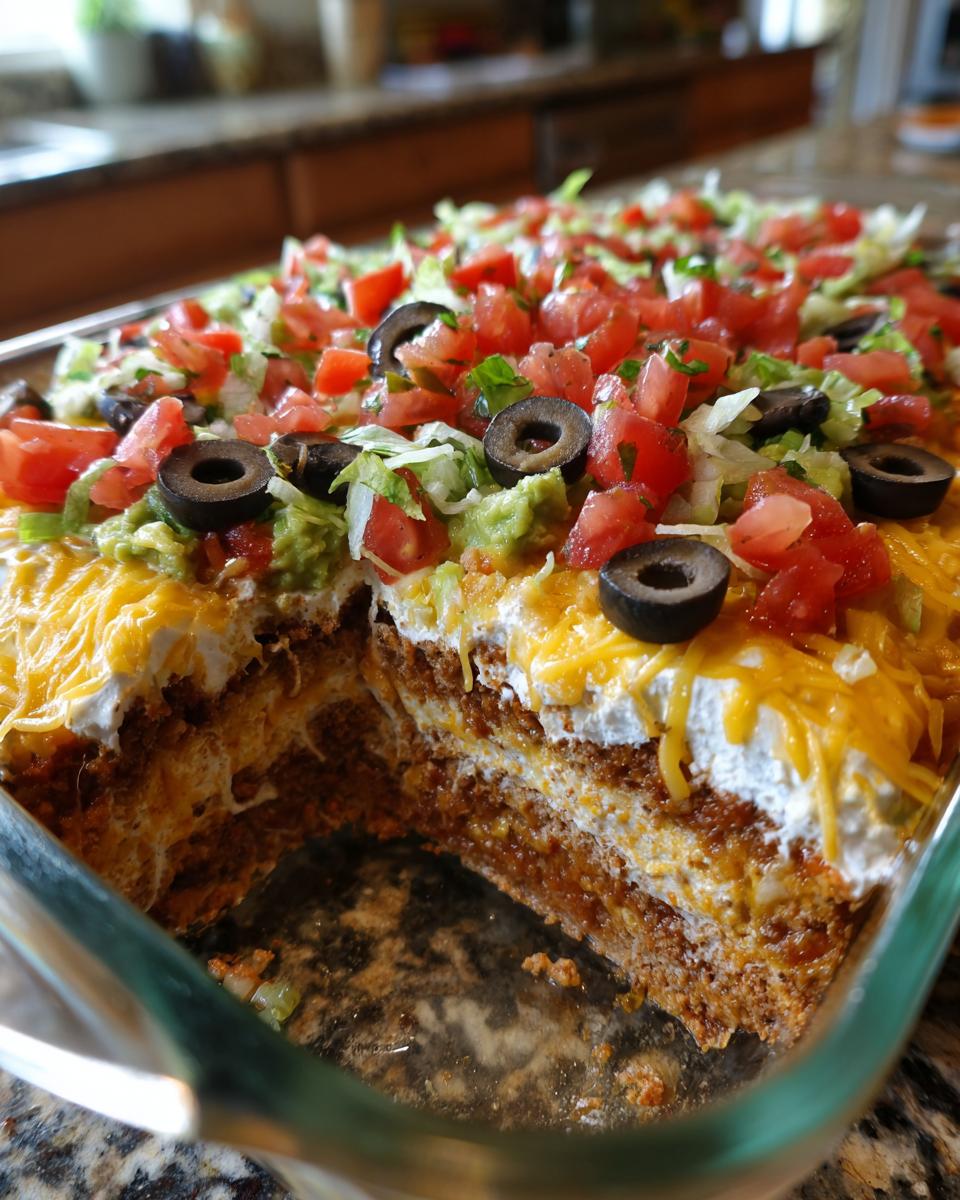
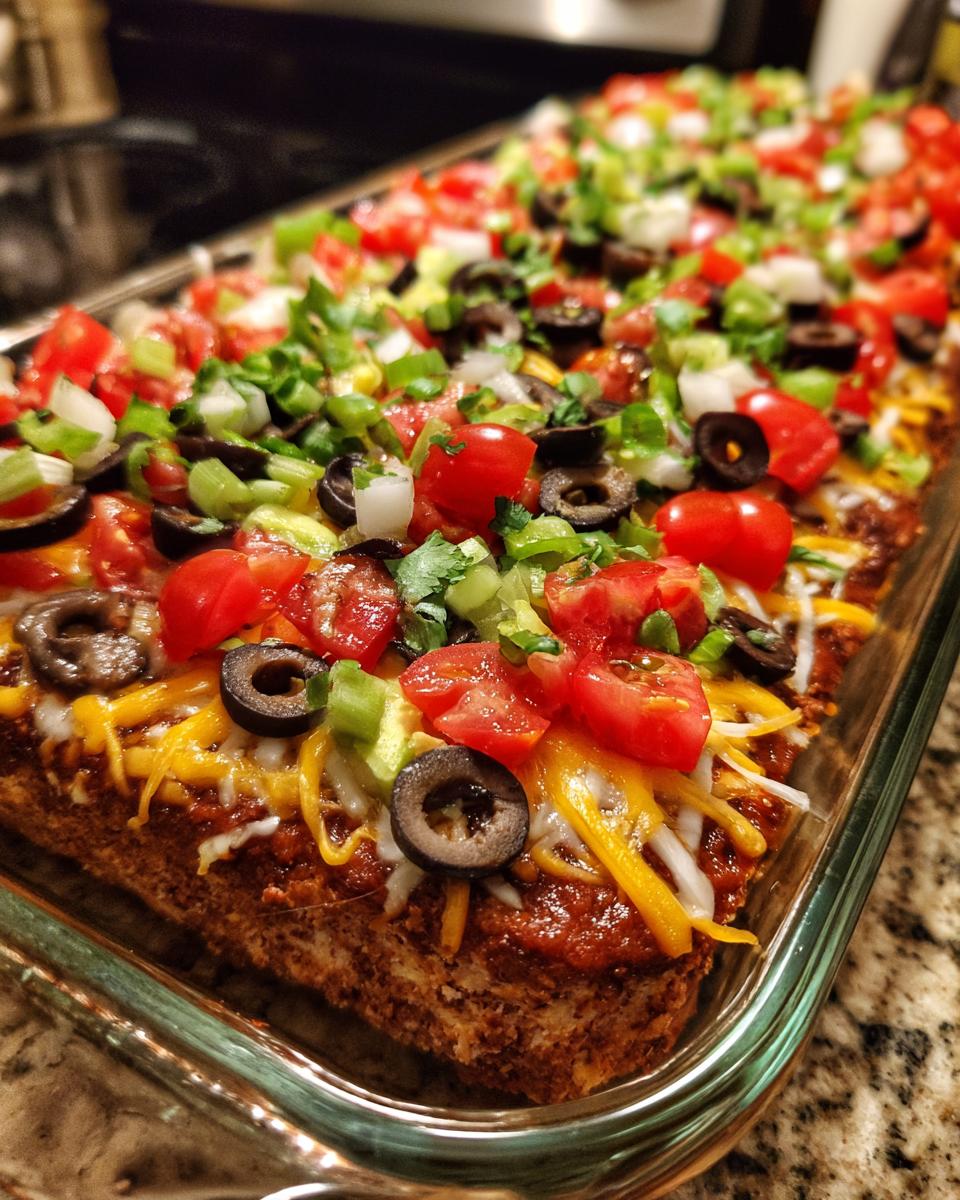
Alright, friend, this is the fun part! Assembling this layer dip is like building a tiny, delicious landscape in your 9×13 dish. The secret here is patience between layers so you don’t end up with a muddy mess. We want distinct stripes of color and flavor you can see!
Creating the Creamy Base Layer
First things first, let’s make that incredibly rich middle layer. Grab a medium bowl. You’re going to combine your softened, room-temperature cream cheese—this is important!—with the sour cream and the whole packet of taco seasoning. Whip this together until it’s perfectly smooth and creamy. No lumps allowed! This mixture is the heart of your Creamy Dip Recipe.
Building the Bean Dip Layers
Now, grab that 9×13 serving dish. First, spread your unheated refried beans evenly across the very bottom. This is your sturdy foundation! Next, take that glorious seasoned cream cheese mixture and lovingly spread it right over the beans. Use the back of a rubber spatula for this; go slow so you don’t drag the bean layer up into your white layer. We want those lines clean!
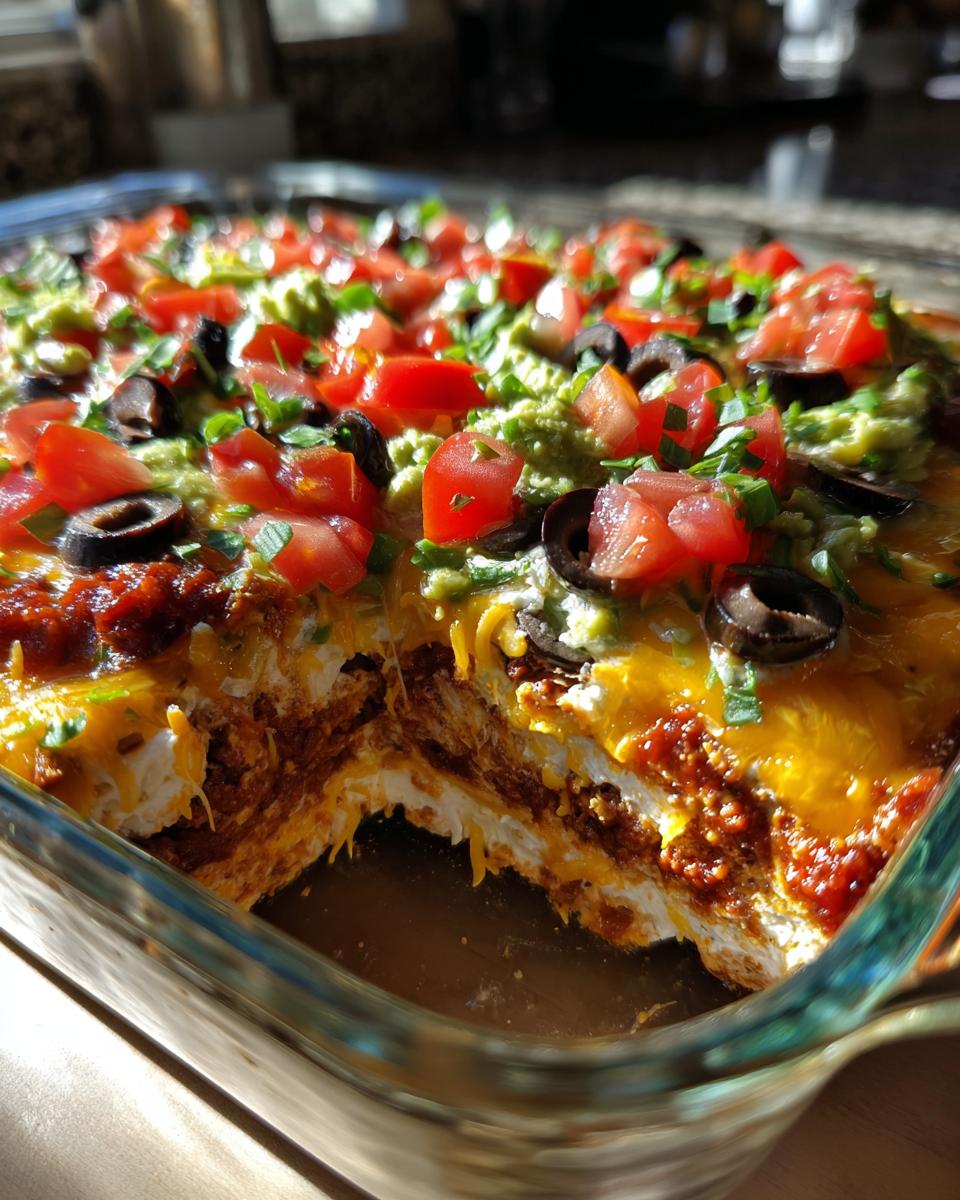
The Final Toppings for Your Layered Dip Recipe
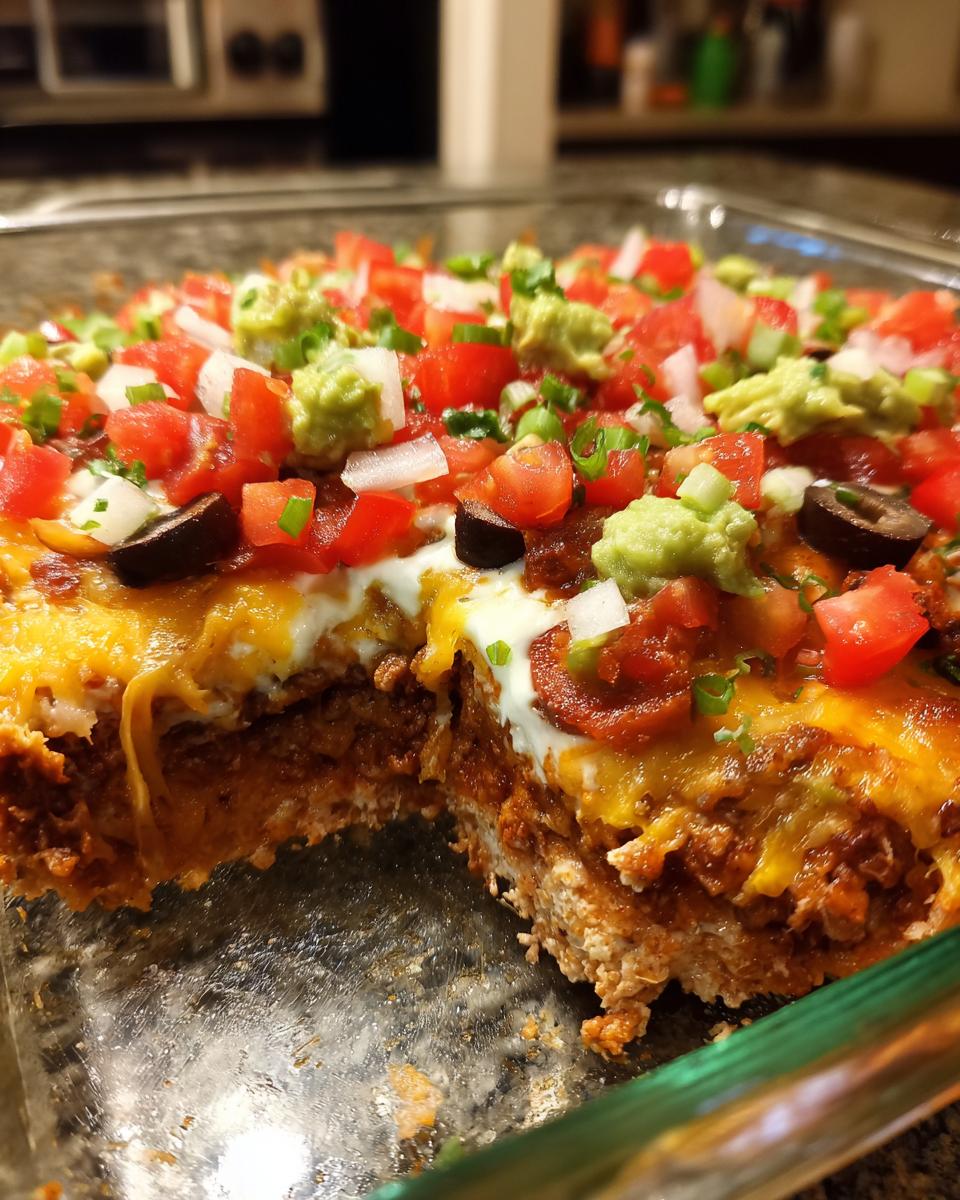
Time to stack! Spoon your slightly drained salsa over the cream cheese layer—remember, gentle spooning is better than spreading here. Next? That shredded cheese goes down evenly. After the cheese, you’ll scatter your chopped tomatoes and the sliced black olives. Finally, garnish the very top with those sharp, bright green onions. This is the final look of your amazing Layered Dip Recipe!
Don’t even think about serving this right away! Cover the whole dish tightly with plastic wrap and tuck it into the fridge for at least a full hour. This chilling time lets everything meld together nicely and makes scooping much cleaner.
Tips for Success with This Crowd Pleasing Dip
Getting those gorgeous, well-defined layers in your dip takes just a tiny bit of finesse, which is why this recipe always ends up being such a fantastic Crowd Pleasing Dip! My biggest piece of advice is to remember that soft layers need gentle handling over firm layers.
Achieving Perfect Layer Definition
When you get to the cream cheese mix or the guacamole—those nice, soft layers—don’t use a regular spoon to spread them! Instead, drop the dollop onto the layer below, and then use the back of a sturdy spoon or a small offset spatula to gently push the mixture outward toward the edges. Don’t *scrape*! Just a gentle push is all you need to make the layer even without scraping up the beans or seasoned cream mix underneath. This keeps everything looking sharp and pretty!
Oh, and if you decide to add that optional ground beef layer I mentioned? Make sure that meat is completely drained of all fat before you spread it over the beans. Nobody wants a greasy bottom layer!
Make Ahead Dip Instructions and Storage
Planning ahead is, like, my favorite thing to do when entertaining! And guess what? This layer dip is built to be a Make Ahead Dip champion. You can totally assemble the entire thing right up to the green onions the day before your party. I find that making it the day before actually helps the flavors meld and the layers set up even firmer—it’s wonderful!
Just cover the dish really tightly with plastic wrap, making sure the wrap doesn’t accidentally dip into your top layer of olives while it’s chilling. It stays fantastic in the fridge for up to two days, though honestly, it’s usually gone by day one! When you’re ready to serve, just pull it out (maybe give it 15 minutes on the counter so it’s not ice cold) and scatter those green onions on top right before the guests arrive.
If you happen to have leftovers, just cover it back up and stick it back in the fridge. See? Planning done! You can check out my tips for other make-ahead options if you need more freezer-friendly dishes!
Serving Suggestions for Your Layered Dip
Now that you have this gorgeous, sturdy dip waiting patiently in the fridge, what are we going to use to scoop up all that deliciousness? Since this is totally a Game Day Appetizer superstar, you need sturdy dippers! Tortilla chips are the absolute classic choice—go for the restaurant-style sturdy ones, not the thin, flimsy kind that break off halfway through.
If you want something lighter, pile slices of cucumber, bell pepper strips, or even celery sticks onto your serving platter. Remember, this dip is best served cold, straight from the refrigerator. If it gets too warm, the cream cheese and guacamole layers can start to lose their beautiful structure. Keep it chilled, keep it stocked, and watch it disappear!
Variations on the Classic Taco Layer Dip
While this classic seven-layer build is perfect as is, sometimes I like to switch things up depending on what I’m craving or what I have on hand! This No Bake Layered Dip is totally forgiving, which is why it remains my go-to among all my Tex Mex Dips.
If you want to skip the traditional vegetarian route, definitely brown a pound of ground beef with a little extra taco seasoning and spread that right over the refried beans. Make sure that beef is well-drained, though, because we still can’t have soupiness! You could also amp up the spice by mixing a dash of cayenne into the cream cheese layer—just a tiny pinch goes a long way! If you’re looking for something heartier, check out how I sometimes adapt the spice levels on my Chicken Tinga recipe for inspiration. You can also find some fun twists like the one over at Real Housemoms!
Frequently Asked Questions About This Layer Dip
I get so many questions about making sure this classic layer dip turns out just right. Since there are so many components, people always want reassurance on the order of operations! Here are a few things I hear most folks asking about before they make their masterpiece. Don’t worry, whether you are making this for a casual snack or a big celebration, we’re going to nail it!
Can I make this Seven Layer Dip without refried beans?
Oh, sure you can! While the refried beans are traditional and give you that lovely, thick bottom layer, you don’t absolutely need them. If you’re skipping them, I recommend adding a layer of seasoned ground beef mixed with a little extra taco seasoning—just ensure that meat is completely drained first! Or, you could use a layer of mashed avocado mixed with lime juice right on the bottom. Just remember, without the beans, the texture of the very bottom layer will be softer, so be extra gentle when you spread that seasoned sour cream on top of it, like those instructions for the Creamy Dip Recipe foundation!
How long does this dip last in the refrigerator?
Honestly, the best part about this dip—besides the taste—is that it’s built to be a Make Ahead Dip champion. You can absolutely keep the finished dip covered tightly in the fridge for about two days. After day two, the veggies might start to get a little soft, and the salsa might start weeping a tad into the cheese layer, so I always encourage everyone to try and finish it off within 48 hours for the absolute best flavor!
Nutritional Data for the Ultimate Layered Dip Recipe
Now, I know we’re usually focused on flavor and fun when we make a huge batch of Tex-Mex goodness like this, but I always like to give you the general idea of what’s in that serving bowl! Based on the ingredients for 12 servings, you’re looking at about 210 calories per scoop. Remember, these numbers are just estimates, since some brands of sour cream or cheese can change things up a bit! You can always check out my tips for healthier recipe swaps if you’re trying to lighten things up, but let’s be honest, this dip is made for celebrating!
- Serving Size: 1/12 of dip
- Calories: 210
- Fat: 16g
- Carbohydrates: 10g
- Protein: 8g
Ultimate Seven Layer Taco Dip Recipe

Make the best layer dip for your next gathering with this classic, crowd-pleasing Seven Layer Taco Dip. It is easy to assemble and perfect for game day.
- Prep Time: 20 min
- Cook Time: 0 min
- Total Time: 1 hr 20 min
- Yield: 12 servings 1x
- Category: Appetizer
- Method: No Bake Assembly
- Cuisine: Tex-Mex
- Diet: Vegetarian
Ingredients
- 1 (16 ounce) package cream cheese, softened
- 1 cup sour cream
- 1 packet (1 ounce) taco seasoning mix
- 1 (16 ounce) can refried beans, not heated
- 1 cup prepared guacamole
- 1 cup salsa, drained slightly
- 2 cups shredded Mexican blend cheese
- 1 cup chopped tomatoes
- 1/2 cup sliced black olives
- 1/4 cup chopped green onions
Instructions
- In a medium bowl, combine the softened cream cheese, sour cream, and taco seasoning mix. Mix until completely smooth. This is your seasoned cream cheese layer.
- Spread the refried beans evenly over the bottom of a 9×13 inch serving dish.
- Carefully spread the seasoned cream cheese mixture over the bean layer.
- Spread the prepared guacamole evenly over the cream cheese layer.
- Spoon the salsa over the guacamole layer. Try not to disturb the layers beneath.
- Sprinkle the shredded cheese evenly over the salsa.
- Top the cheese with chopped tomatoes and sliced black olives.
- Garnish the top with chopped green onions.
- Cover the dip and chill in the refrigerator for at least one hour before serving. This allows the layers to set.
- Serve your ultimate layer dip cold with tortilla chips or vegetable sticks.
Notes
- For the best flavor, prepare this make ahead dip the day before serving.
- If you want a meat layer, brown 1 pound of ground beef with extra taco seasoning and spread it over the refried beans before adding the cream cheese layer.
- Drain excess liquid from the salsa before adding it to prevent the dip from becoming watery.
Nutrition
- Serving Size: 1/12 of dip
- Calories: 210
- Sugar: 3
- Sodium: 450
- Fat: 16
- Saturated Fat: 8
- Unsaturated Fat: 8
- Trans Fat: 0
- Carbohydrates: 10
- Fiber: 2
- Protein: 8
- Cholesterol: 35