
There is just nothing in the world like the smell of fresh breakfast bread baking, is there? It wraps the whole house up in warmth! If you’ve ever dreamt of taking a toasted, butter-slathered slice and watching the melted butter sink deep into those amazing little holes, then you’ve come to the right place. I’m Sarah Jane Thompson, and though my lessons came from a Midwest kitchen, not a fancy culinary school, I know that good food is about trustworthy recipes. We’re going to master the art of achieving perfect bakery-quality texture right now, because I promise you, making amazing homemade english muffins is simpler than you think!
Forget the stuffy, flavorless store-bought discs you settle for during the week. We’re aiming for the plush, chewy interior and those signature ‘nooks and crannies’ that truly make the experience. This heritage recipe is one I’ve tested, tweaked, and relied on because, here at Cookin’ Corner, our promise is that if it’s in our book, it works flawlessly for you, too. I have a whole section of easy dinner ideas recipes, but right now, let’s focus on turning your mornings around by making the best english muffin recipe. Are you ready to elevate your weekend brunch?
- Why Our Homemade English Muffins Recipe Works Every Time
- Essential Ingredients for Perfect Homemade English Muffins
- Step-by-Step Instructions for Easy Homemade English Muffins
- Tips for Making Traditional English Muffins Like a Bakery
- Serving Suggestions for Your Homemade English Muffins
- Storage and Reheating Instructions for Homemade English Muffins
- Frequently Asked Questions About Homemade English Muffins
- Estimated Nutritional Data for Homemade English Muffins
- Share Your Homemade English Muffins Creations
Why Our Homemade English Muffins Recipe Works Every Time
I know why you’re really here—you want those holes! We aren’t looking for dense, pale discs; we want that beautiful, fluffy interior that grabs onto melting butter like a sponge. Trust me, this yeast structure is foolproof when you follow my method. It creates soft, chewy muffins with that perfect golden exterior you usually only find at the bakery.
- Guaranteed soft and delightfully chewy interior.
- Achieves the iconic, delicious “nooks and crannies muffins” structure.
- Relies on the proven, gentle stovetop cooking method—no oven needed until the very end for a few versions, but ours stays right on the skillet!
- It’s genuinely an easy homemade english muffins experience because we skip the heavy kneading.
This recipe is built around gentle handling and proper heat management. If you want to see my quick and easy recipes later, you’ll notice I always focus on technique over fussiness!
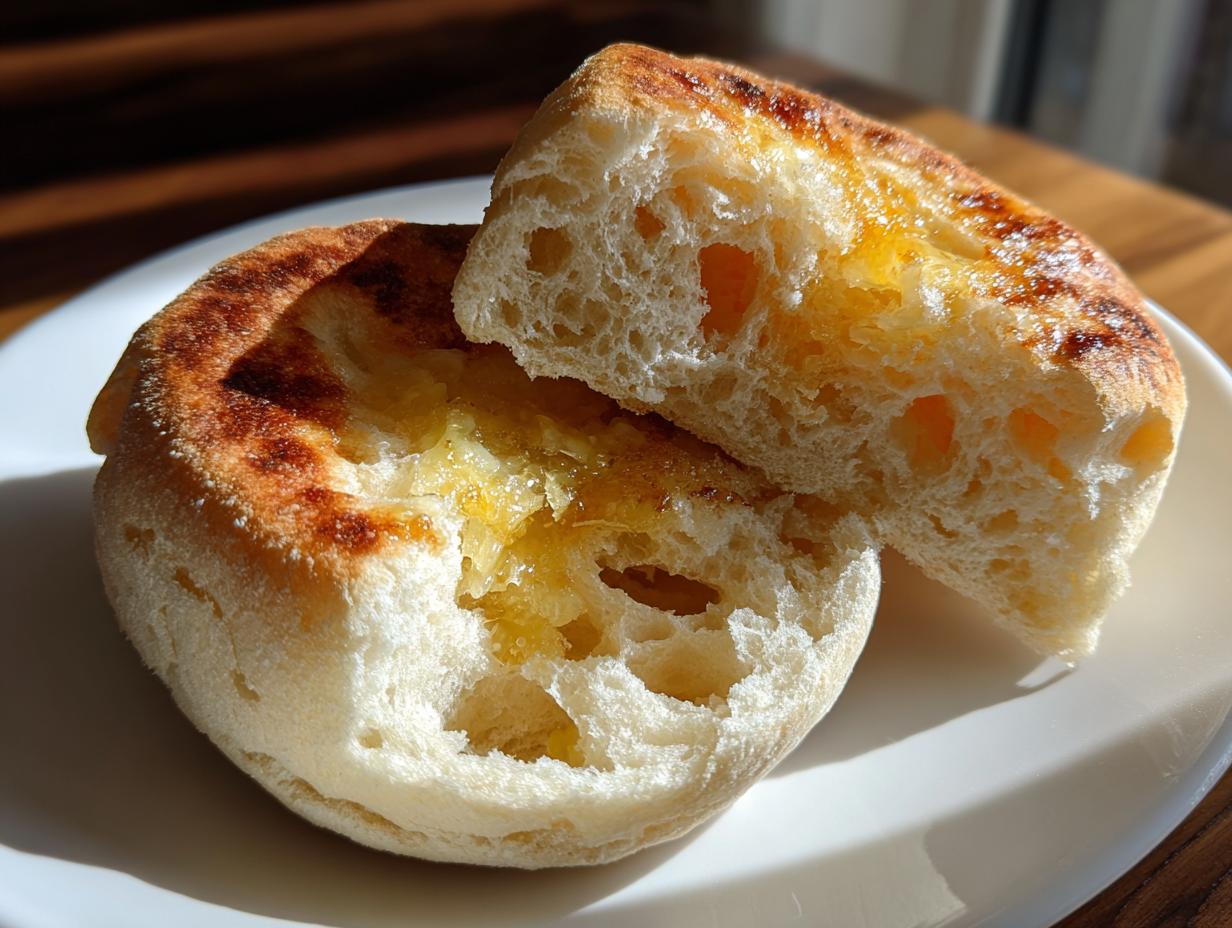
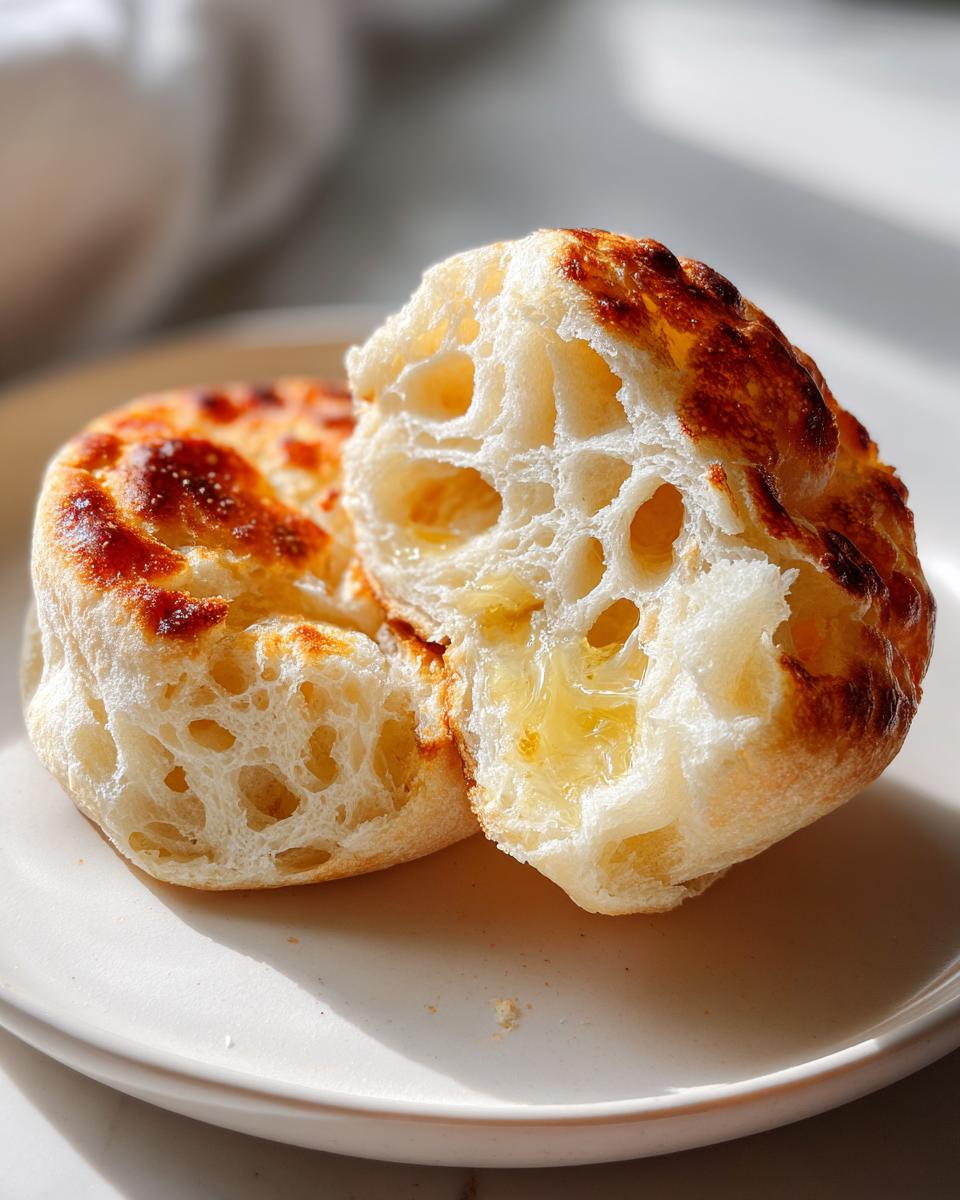
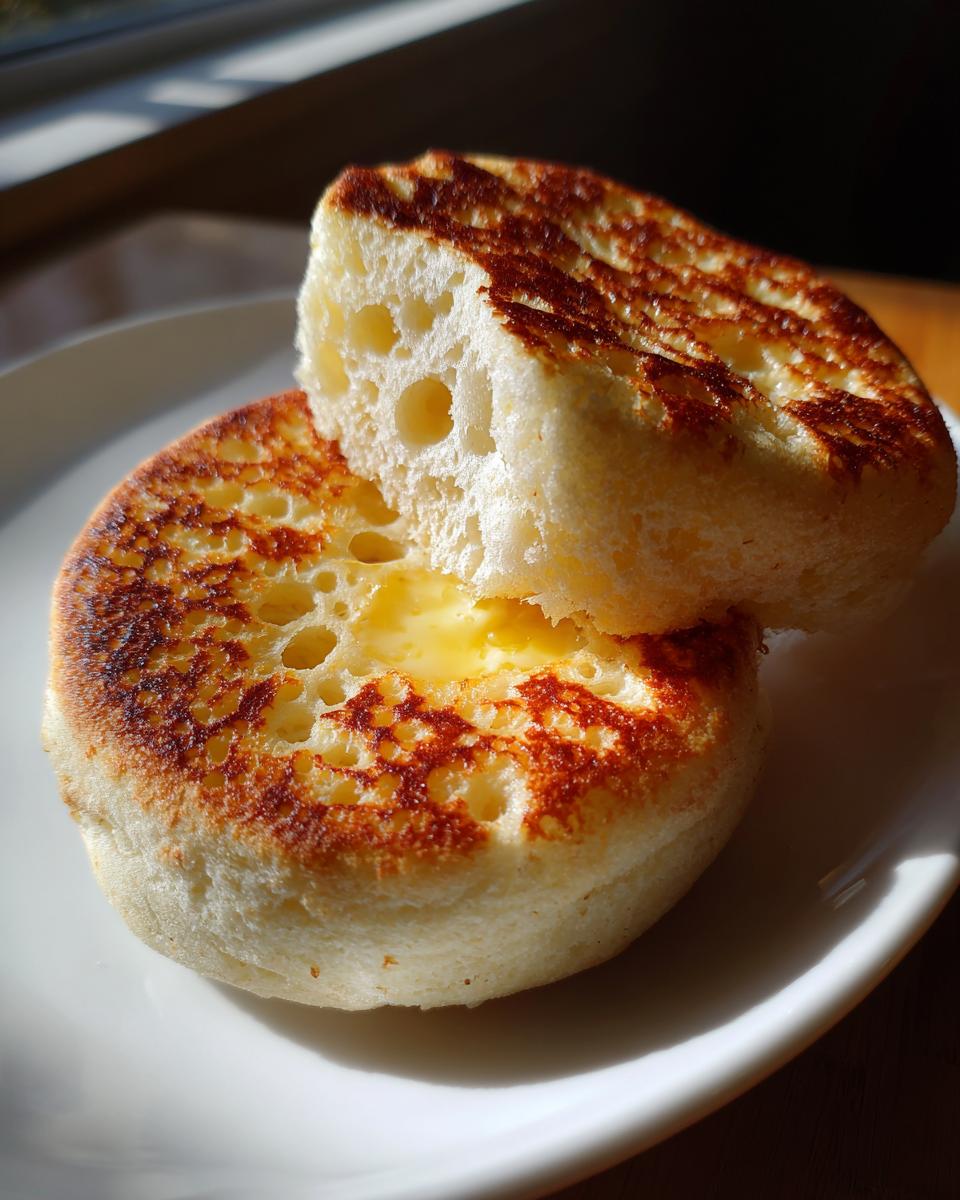
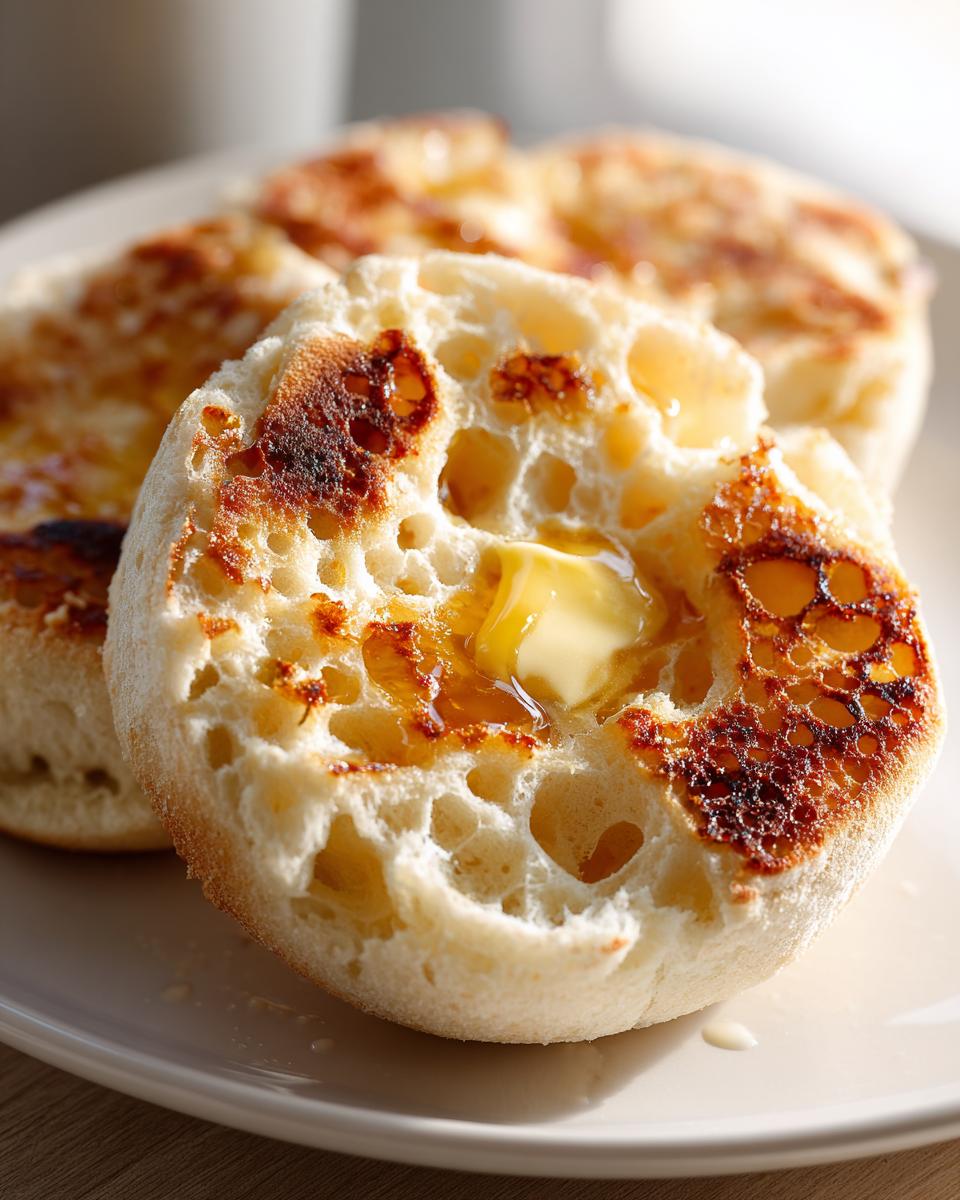
Achieving Authentic Nooks and Crannies Muffins Texture
The secret to those amazing tunnels where butter disappears is cooking them low and slow, and keeping the pan completely dry! We’re dry frying these beauties over medium-low heat for a long time—like eight full minutes per side—on a cast-iron skillet. Rushing this step seals the outside before the inside has time to fully rise and get those internal tunnels. It’s patience that creates the perfect texture for your homemade english muffins, every single time.
Essential Ingredients for Perfect Homemade English Muffins
When you’re making something from scratch, the quality of your starting materials really matters, even for a quick english muffin recipe like this one. These ingredients are tried-and-true basics that guarantee a soft, fluffy result that tastes so much better than anything pre-packaged. We aren’t using any strange fillers here, just pure, honest baking goodness!
- 1 cup warm milk (about 105-115°F)
- 2 1/4 teaspoons active dry yeast
- 1 tablespoon granulated sugar
- 3 cups all-purpose flour, plus more for dusting
- 1 teaspoon salt
- 1/2 teaspoon baking soda
- 1/4 cup unsalted butter, melted
- Cornmeal, for dusting
Making homemade english muffins is a rewarding experience, and you can find even more of my favorite breakfast and brunch recipes on my dedicated page!
Ingredient Notes and Substitutions for Your Homemade English Muffins
Pay attention to that milk temperature—it needs to be warm, about 105°F to 115°F. Too cold and your active dry yeast won’t wake up and get foamy; too hot and you’ll kill it off! You absolutely need that yeast to do its job to get the rise we want in these soft english muffins. This recipe relies on yeast for that classic texture, but I often get questions about the easy dinner ideas crowd wanting alternatives. If you’re dabbling in sourdough, you can certainly substitute about half a cup of the flour with active sourdough discard for a slight tang, but remember that will change the rise time significantly!
Step-by-Step Instructions for Easy Homemade English Muffins
Alright, let’s get our hands a little dusty! This is where the magic of baking homemade bread starts to take shape, and I really want to highlight one thing right away: we are skipping the heavy kneading. Seriously, don’t work that dough too hard; it gives you the dense texture we absolutely don’t want in these wonderfully fluffy homemade bread rolls!
Mixing and First Rise for Fluffy Homemade Bread
First, we wake up the yeast! Get that warm milk, yeast, and sugar together in your bowl. Five to ten minutes should be plenty for a nice, bubbly foam—that means your yeast is happy and ready to work its wonders. Separately, whisk your flour, salt, and baking soda together. Then we introduce the dry ingredients to the wet ones, along with that melted butter. Just mix until everything looks shaggy and sticky. Stop right there! We are aiming for a cohesive mass, not a smooth, tight ball. Cover it up and let it chill out (or rather, rise!) in a warm spot for about an hour to an hour and a half until it’s totally doubled up. Isn’t that an easy yeast bread recipe so far?
Cutting and Second Proofing for Stovetop English Muffins
Once doubled, turn that dough gently onto a floured surface. Don’t punch it down aggressively; just pat it or roll it out gently to about half an inch thick. Now, grab your 3-inch cutter—a biscuit cutter works perfectly! Cut out your rounds. This is important: you need to dust your sheet generously with cornmeal before laying them down. This cornmeal is what gives us that classic, slightly crispy bottom crust. Let these beauties rest again, covered loosely, for 30 minutes. That’s the second proof, and it really helps them puff up nicely when they hit the heat.
The Crucial Dry Griddle Cooking Method
This is the move that truly separates the great homemade english muffins from the mediocre ones! Get your cast-iron skillet—or any heavy-bottomed pan—hot over medium-low heat. You need *no* oil or butter in the pan; we’re dry frying them! Place the rounds on the hot surface, leaving space between them. Now, set a timer and walk away for 8 to 10 minutes per side. If you see them browning too fast, turn the heat down! This gentle, slow cook is the absolute secret to getting those deep, perfect tunnels inside, meaning you’ve mastered the art of stovetop english muffins. If you want more tips on my favorite quick recipes, check out my guide to easy stuffed mushrooms!

Tips for Making Traditional English Muffins Like a Bakery
Even though this recipe is designed to be easy—we’re not even kneading much!—getting that authentic, craggy texture requires attention to a couple of small but mighty details. Think of these as the final secrets I learned watching Grandma in the kitchen before she’d let me have the first warm muffin. These little habits are what make the difference between bread that *resembles* an English muffin and one that truly tastes like it came from the best bakery in town.
First, and this is non-negotiable if you want the absolute best flavor and structure for your traditional english muffins: you must split them with a fork! I know, I know, it feels wrong when you’re used to slicing bread with a knife. But when you use a knife, you seal up those beautiful internal edges we worked so hard to create with the slow cook. Using a fork creates little jagged breaks along the seam, which opens up those air pockets ready for toasting.
Also, remember that slow cooking we talked about? Sometimes people get impatient when the tops look golden and they crank the heat up. Don’t do it! If you rush that cooking time on the griddle, the outside will look done while the middle is still raw dough. That’s when you get a dense texture instead of those signature, hole-riddled nooks and crannies muffins. Stick to medium-low heat and let them toast gently until they sound hollow when tapped lightly.
Finally, if you have any leftovers after enjoying your first batch of make muffins like bakery delights, handle them carefully. Store them in an airtight container at room temperature for a couple of days or freeze them right away. If you’re looking for other comfort recipes that demand similar care, you absolutely have to try my easy creamy tortilla soup recipe next week!
Serving Suggestions for Your Homemade English Muffins
Now that you have these incredible, almost unbelievably fluffy homemade english muffins, what are you going to do with them? Sure, they are heaven simple with just a slab of melting butter or tart jam, making them a classic of buttery breakfast bread. But I urge you to try them savory!
Those nooks and crannies are just waiting to soak up egg yolk and cheese. Honestly, they create the absolute best breakfast sandwiches you’ll ever make at home. Think creamy chicken salad filling or even sharp cheddar and bacon. I have a wonderful recipe for a bacon cheeseburger casserole, but imagine that flavor profile tucked inside one of these toasted rounds instead! For lunch ideas, my creamy chicken salad filling spooned generously onto a split muffin is just unbeatable.
Don’t stop at breakfast! These are perfectly chewy from scratch breakfast rolls that work anytime your craving hits.
Storage and Reheating Instructions for Homemade English Muffins
Okay, the hardest part is over—you successfully made these fantastic homemade english muffins! Now we need to keep them perfect until you get through the whole batch. Good news: since this recipe has a slightly higher moisture content because we didn’t overwork the dough, they stay fluffy for a little while longer than some other bread recipes!
If you know you’re going to eat them all within two days, just keeping them in an airtight container on the counter is fine. Just make sure they are completely cooled before sealing them up! Nobody wants soggy muffin bottoms! I’ve made that mistake before, trust me; it’s just not good.
For longer storage, freezing is your best friend. I always cool them completely, split them in half (using that fork, remember!), and then wrap each individual muffin half tightly in plastic wrap before tossing them into a large freezer bag. They keep great this way for up to three months. Make sure they are defrosted first, or you can actually toast them straight from frozen for a slightly longer toasting time.
Now, let’s talk reheating. This is crucial if you want that beautiful, crisp exterior back without drying out the inside. Don’t use the microwave for reheating unless you plan to eat them immediately, as they get rubbery fast! The best way to bring back the magic is to toast them! Either use a toaster or, even better, place the split muffins cut-side down in a dry skillet over medium heat for just a minute or two until they start to sizzle gently. This reactivates that little bit of surface moisture we want while crisping up that exterior just enough.
If you end up with a few leftovers that you plan to serve with something saucy or creamy, like a filling for those easy creamy white chicken enchiladas (Kidding! But seriously, they are versatile), consider warming them up gently in a low oven for about five minutes before putting your toppings on. It keeps the surface texture intact!
Frequently Asked Questions About Homemade English Muffins
I always get the same questions when people first try to make english muffins at home, so let me just clear a few things up right here before you jump into that dough! Knowing these little answers beforehand can save you a ton of confusion when you’re deep into your first batch of what will soon become your favorite quick english muffin recipe.
Can I make these homemade english muffins without a griddle?
Oh, absolutely! Don’t let equipment stop you. While I swear by my cast-iron skillet because it holds heat so evenly—which is essential for those nooks and crannies!—you can definitely use a heavy-bottomed non-stick frying pan. The trick is just making sure whatever you use is large enough that the heat doesn’t fluctuate wildly when you drop the cool dough onto it. Keep that heat medium-low and be patient! That’s the key to successful stovetop english muffins, skillet or not.
How long do I need to let the dough rise for the best homemade english muffins?
This is where the magic happens, so don’t rush it! We have two crucial rise times here. For that first rise, you want the dough to sit in a warm spot until it has doubled in size, which usually takes between 1 hour to an hour and a half. You can look at the dough and see it’s billowy and puffed up—that’s the visual clue! Then, after you cut out your rounds and dust them with cornmeal, they need a short second proof for about 30 minutes. This little nap ensures they are light enough for those tunnels to form when they cook. If you’re short on time, you can sometimes shorten that second rest just a little, but never skip the first one!
Can I freeze my homemade english muffins?
Yes, yes, a thousand times yes! Freezing is the best way to make sure you always have a batch of soft english muffins ready for spontaneous weekend breakfasts. My favorite way to do it is to cool them completely—this is super important, otherwise they steam in the bag and get gummy—then split them in half using a fork. Wrap each half tightly in plastic wrap, tuck those wrapped halves into a big freezer bag, and they’re good for months! When you want one, just take that frozen half and pop it straight into your toaster. It might take an extra minute or two, but the texture comes back beautifully.
If you are planning ahead and want to try another fantastic recipe that freezes well, my easy chicken rice casserole recipe is a weeknight lifesaver!
Estimated Nutritional Data for Homemade English Muffins
I always feel like talking nutrition facts takes the fun out of baking, but since we’re making something truly special here, it pays to know what you’re eating! Remember, these numbers are just estimates based on the ingredients called for in this classic homemade english muffins recipe. Things like the exact brand of flour you choose or how much cornmeal you dust on your pan really make a difference in the final count, so take these figures as a general guide, okay?
We’ve managed to keep these remarkably pleasant for a buttery breakfast bread, especially considering how fluffy they turn out! If you’re looking for other meals that sneak in more wholesome goodness, you can always check out my large collection of healthy recipes.
- Serving Size: 1 muffin
- Calories: 180
- Fat: 4g
- Carbohydrates: 32g
- Protein: 5g
- Sugar: 2g
- Sodium: 250mg
Just keep in mind that when you toast one of these and slather it with real butter, those numbers—especially the fat and calories—are going to climb joyfully! That’s what makes a toasted, split muffin so delicious, right?
Share Your Homemade English Muffins Creations
Now that you’ve mastered the secret to those glorious, hole-filled homemade english muffins, I truly want to see what you’ve made! Baking is so much more fun when we can share the results, isn’t it? This recipe came from my family’s heritage, and seeing you recreate that same sense of accomplishment in your own kitchen means the world to me.
If you tried these out, please come back and leave a rating! Five stars tells me I’ve delivered on the promise of the best english muffin recipe, and your feedback helps other home cooks feel confident trying it out. Knowing you achieved those soft, fluffy results is just the best validation!
Did you use them for a massive breakfast sandwich? Were they perfectly toasted slathered in jam? Drop a comment below and tell me how they tasted! Or, if you snapped a picture of your beautiful golden rounds, I encourage you to send it over through my contact page—I love putting reader photos up on our social feeds when I can!
Happy baking, and here’s to many more delicious breakfasts made entirely from scratch!
PrintThe Ultimate Homemade English Muffins: Soft, Fluffy, with Perfect Nooks and Crannies

Make bakery-style English muffins at home. This easy, yeast-based recipe yields soft, chewy muffins with the classic golden crust and internal holes perfect for holding butter.
- Prep Time: 20 min
- Cook Time: 25 min
- Total Time: 2 hours 15 min
- Yield: 10 muffins 1x
- Category: Breakfast
- Method: Stovetop Griddling
- Cuisine: American
- Diet: Vegetarian
Ingredients
- 1 cup warm milk (about 105-115°F)
- 2 1/4 teaspoons active dry yeast
- 1 tablespoon granulated sugar
- 3 cups all-purpose flour, plus more for dusting
- 1 teaspoon salt
- 1/2 teaspoon baking soda
- 1/4 cup unsalted butter, melted
- Cornmeal, for dusting
Instructions
- Combine the warm milk, yeast, and sugar in a large bowl. Let stand for 5 to 10 minutes until foamy. This shows the yeast is active.
- In a separate bowl, whisk together the flour, salt, and baking soda.
- Add the melted butter to the yeast mixture. Gradually add the dry ingredients to the wet ingredients, mixing until a shaggy, slightly sticky dough forms. You do not need to knead this dough extensively; mixing until just combined is enough for soft muffins.
- Cover the bowl with plastic wrap or a clean kitchen towel. Let the dough rise in a warm place for 1 to 1.5 hours, or until doubled in size.
- Lightly dust a clean work surface with flour. Gently turn the dough out onto the surface. Pat or lightly roll the dough to about 1/2 inch thickness.
- Use a 3-inch round cutter to cut out the English muffins. Gather the scraps, gently re-pat, and cut out any remaining rounds.
- Generously dust a baking sheet or large platter with cornmeal. Place the cut rounds on the cornmeal, leaving space between them.
- Cover the rounds loosely and let them rest for a second proof for 30 minutes.
- Heat a large, dry cast-iron skillet or griddle over medium-low heat. You are dry frying these, so add no oil or butter.
- Carefully place the dough rounds onto the hot, dry skillet. Cook for 8 to 10 minutes per side, until golden brown. The key to the nooks and crannies is cooking them slowly over low heat.
- Once browned on both sides, transfer the muffins to a wire rack to cool completely.
- To serve, split the cooled muffins using a fork, not a knife, to preserve the internal texture. Toast before serving with butter and jam or use for breakfast sandwiches.
Notes
- To achieve the best ‘nooks and crannies,’ cook the muffins slowly over medium-low heat. Rushing the cooking process will result in a dense interior.
- Always split your English muffins with a fork. Cutting them with a knife seals the edges and prevents the classic hole structure from opening up when toasted.
- If you prefer a slightly tangier flavor, you can substitute 1/2 cup of the flour with active sourdough discard, though this recipe is designed as a quick yeast bread.
Nutrition
- Serving Size: 1 muffin
- Calories: 180
- Sugar: 2
- Sodium: 250
- Fat: 4
- Saturated Fat: 2
- Unsaturated Fat: 2
- Trans Fat: 0
- Carbohydrates: 32
- Fiber: 1
- Protein: 5
- Cholesterol: 15