Ultimate No-Bake Brownie Refrigerator Cake with Cream Cheese and Chocolate Pudding Layers
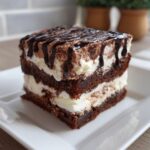
Make this decadent Brownie Refrigerator Cake for an easy, make-ahead dessert. It features rich, fudgy brownie layers alternating with creamy chocolate pudding and a tangy cream cheese filling, all set perfectly in the refrigerator.
- Prep Time: 25 min
- Cook Time: 35 min
- Total Time: 4 hours 60 min
- Yield: 12 servings 1x
- Category: Dessert
- Method: Chilling/No-Bake Assembly
- Cuisine: American
- Diet: Vegetarian
Ingredients
Scale
- 1 (18.25 ounce) box fudge brownie mix (plus ingredients listed on box for baking)
- 1 cup cold milk
- 1 (3.9 ounce) package instant chocolate pudding mix
- 8 ounces cream cheese, softened
- 1 cup powdered sugar
- 1 teaspoon vanilla extract
- 1 (8 ounce) container frozen whipped topping, thawed
- 1/4 cup chocolate syrup (for drizzling)
Instructions
- Prepare and bake the brownies according to the package directions using a 9×13 inch pan. Let the brownies cool completely in the pan.
- Once cool, cut the brownies into uniform squares or rectangles that will fit snugly in the bottom of your serving dish (a 9×13 inch dish works well for layering). Set aside.
- Prepare the chocolate pudding: Whisk the cold milk and instant chocolate pudding mix together in a bowl until thickened, about 2 minutes. Let it stand for 5 minutes.
- Prepare the cream cheese layer: In a separate bowl, beat the softened cream cheese, powdered sugar, and vanilla extract until smooth and creamy. Fold in half of the thawed whipped topping until just combined.
- Assemble the cake: Place a single layer of the cooled brownie pieces in the bottom of your serving dish, fitting them tightly together.
- Spread the cream cheese mixture evenly over the first brownie layer.
- Spoon the prepared chocolate pudding over the cream cheese layer and spread gently.
- Top the pudding layer with the remaining half of the whipped topping.
- Arrange the remaining brownie pieces on top of the whipped topping layer.
- Drizzle the top evenly with chocolate syrup.
- Cover the dish tightly with plastic wrap. Refrigerate for at least 4 hours, or preferably overnight, to allow the layers to set firmly.
- When ready to serve, cut into squares and serve cold. This is a perfect potluck chocolate dessert.
Notes
- You can use store-bought fudgy brownies to save time when assembling this no oven chocolate cake.
- For a richer flavor, use heavy cream and whip it yourself instead of using frozen whipped topping.
- If you want a more decadent chocolate dessert, use a chocolate ganache instead of chocolate syrup for the topping.
Nutrition
- Serving Size: 1 square
- Calories: 380
- Sugar: 35
- Sodium: 250
- Fat: 20
- Saturated Fat: 10
- Unsaturated Fat: 10
- Trans Fat: 0.5
- Carbohydrates: 48
- Fiber: 2
- Protein: 5
- Cholesterol: 35
Find it online: https://cookincorner.com/brownie-refrigerator-cake/