
Some flavors just whisper ‘childhood,’ don’t they? For me, standing in my grandma’s kitchen, a pan full of crushed Oreos and creamy pudding meant pure, unadulterated joy was coming. Forget fancy layer cakes; when I needed a comforting, guaranteed crowd-pleaser, only a real, rich **dirt cake** would do the trick. That’s why I’m thrilled to share this specific version with you today.
This isn’t some complicated, oven-required dessert. Nope! This is the easiest, no-bake Oreo dirt cake you will ever make. It’s creamy, it’s crunchy, and it comes together so fast you’ll look around wondering where the time went. Seriously, I whip this up when I need a quick make ahead dessert for a family gathering, and it vanishes every single time. Following this recipe means you get that perfect nostalgic taste without breaking a sweat. Trust me, this easy recipe is pure comfort in a dish.
- Why This Easy No-Bake Oreo Dirt Cake is a Nostalgic Party Treat
- Gathering Ingredients for Your Ultimate Dirt Cake Layers
- How to Prepare the Creamy Chocolate Pudding Dessert
- Assembling Your Layered Pudding Cake: The Dirt Cake Method
- Chilling and Final Touches for Perfect Dirt Cake
- Tips for Success When Making Dirt Cake
- Variations: Making Your Own Unique Oreo Dirt Dessert
- Storage and Final Touches for Perfect Dirt Cake
- Frequently Asked Questions About Making Dirt Cake
Why This Easy No-Bake Oreo Dirt Cake is a Nostalgic Party Treat
I’m telling you, this **dirt cake** is my secret weapon for any event where I need everyone to instantly relax and smile. It’s the kind of dessert that brings back memories of summer cookouts or kids’ birthday parties from way back when. You simply can’t beat something this easy that looks this fun!
Why does this recipe keep earning rave reviews every time I bring it somewhere? Well, just peek at the benefits:
- It’s genuinely quick—prep time is less than thirty minutes!
- It’s a guaranteed winner for the kids (hello, gummy worms!).
- The texture is unbelievably creamy thanks to that special filling.
- It’s famous as the ultimate easy potluck dessert because it travels well and serves a crowd!
If you need a simple dessert that tastes like a million bucks but costs next to nothing? This is the one you want in your recipe rotation, period.
Gathering Ingredients for Your Ultimate Dirt Cake Layers
Okay, the beauty of a truly sensational **crushed oreo dessert** like this is that you probably have most of this stuff hanging out in your pantry right now. Since there’s no baking involved, the quality of what you *do* use really shines through, so make sure those key components are ready to go!
When setting things up, keep in mind that for the best results, your butter and cream cheese need to be nice and soft. I always leave mine out on the counter for a good hour before I even think about mixing. Here’s what you’ll need for those glorious ultimate dirt cake layers:
- One full package of those classic Oreo cookies (14.3 ounces is what I use). Don’t you dare skimp!
- 8 ounces of cream cheese, softened—and I mean properly soft!
- One cup of unsalted butter, also softened, because we need everything creamy.
- One cup of confectioners’ sugar—no substitutes here, please.
- A big carton (12 ounces) of frozen whipped topping, make sure it’s fully thawed.
- Two boxes of the instant chocolate pudding mix (the 3.9-ounce size).
- Three cups of cold milk to get that pudding just right.
- And the fun part: a 10-ounce bag of gummy worms if you want to make it extra silly!
Grab everything, give it a once-over, and check out the full ingredient list to make sure you’re ready to roll. It really is that simple!
How to Prepare the Creamy Chocolate Pudding Dessert
Wow, we’re finally at the mixing stage! Before we start building those beautiful layers of our **layered pudding cake**, we need to make sure our two main components are absolutely perfect. Remember, this is a no-bake dessert, so the texture of your fillings is everything. We tackle that rich cream base first, and then we get the pudding going. It’s best to get these prepped before you start crushing those Oreos!
Making the Fluffy No Bake Cream Cheese Dessert Base
This is where the magic happens that makes this different from just sad, soupy pudding. You absolutely have to beat your softened butter and cream cheese together until they look like one perfectly smooth entity. If you use cold cream cheese, you’ll end up poking lumps out of your finished dessert—and nobody wants that! Once that’s silky smooth, gently fold in your thawed whipped topping. You want to do this slowly so you don’t deflate all that air. Fold, fold, fold, until it looks light, fluffy, and cloud-like.
Preparing the Instant Chocolate Pudding Mix
Next up is the chocolate pudding. This part is so quick, it’s almost silly! You’re just going to take those two boxes of instant pudding mix and whisk them vigorously with the three cups of nice, cold milk. I usually whisk non-stop for about two full minutes. What you’re looking for is that moment when it starts getting visibly thick and sludgy—that means it’s setting up! Set that bowl aside while you maybe crush more cookies or grab your serving dish. You can find some other great dessert recipes on the site if you’re ever looking for something different!
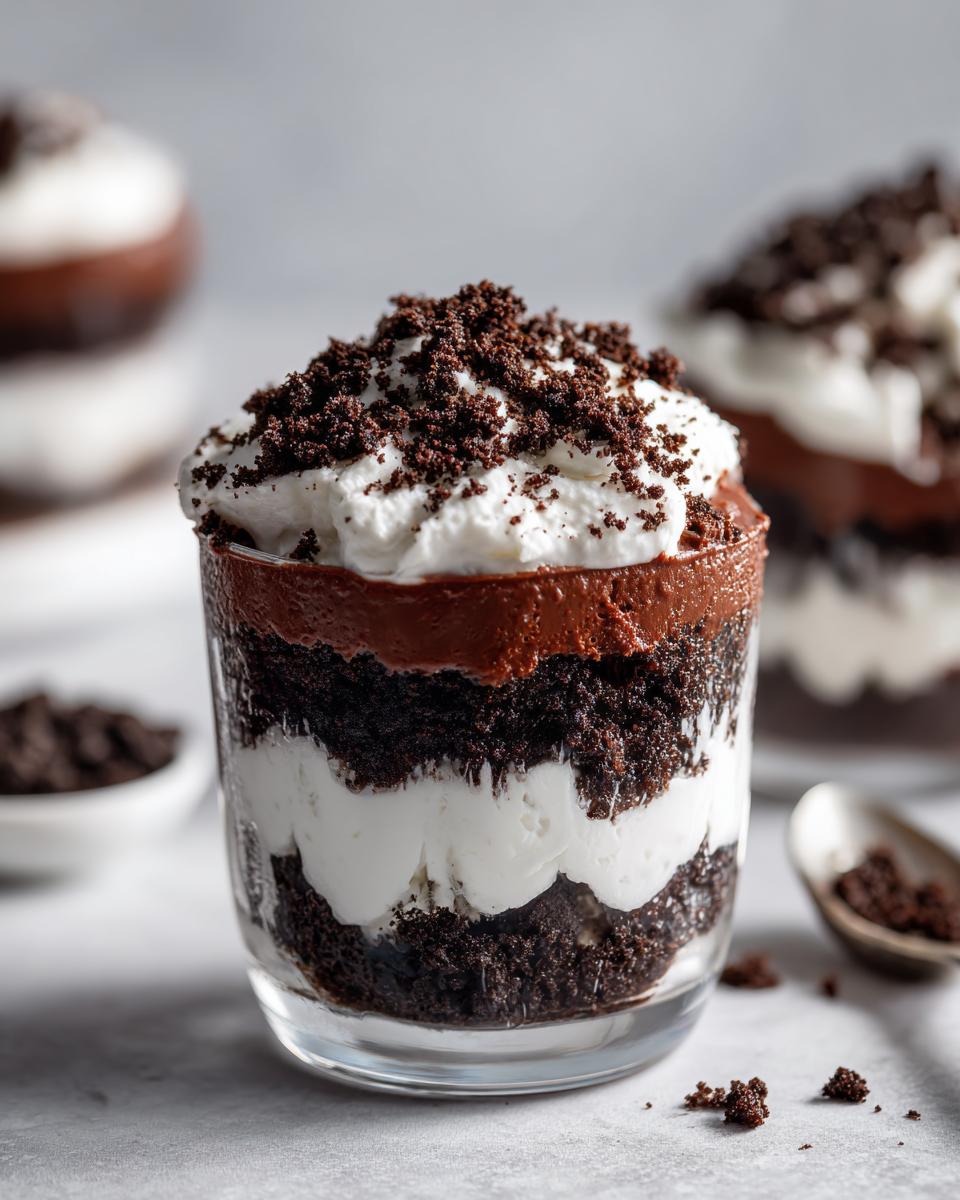
Assembling Your Layered Pudding Cake: The Dirt Cake Method
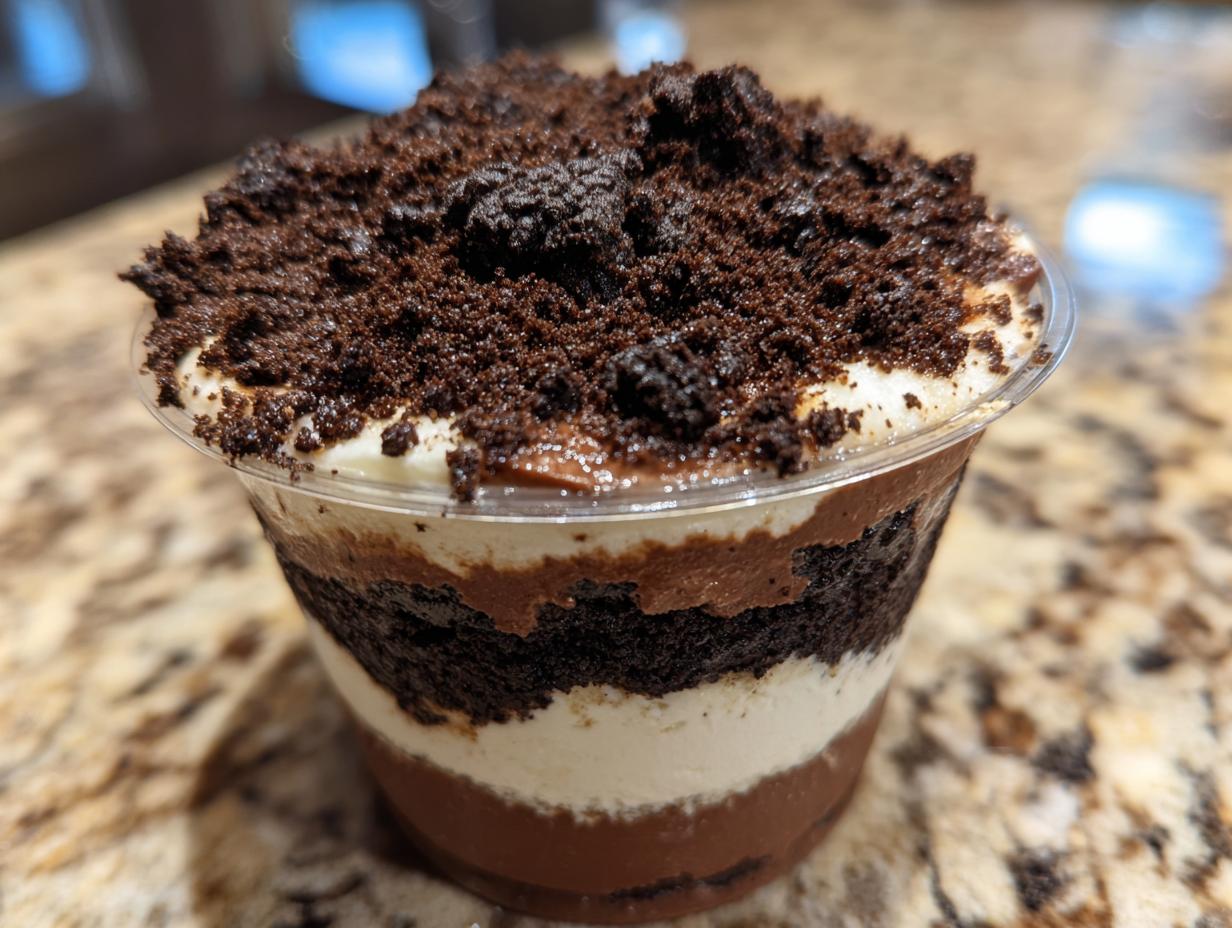
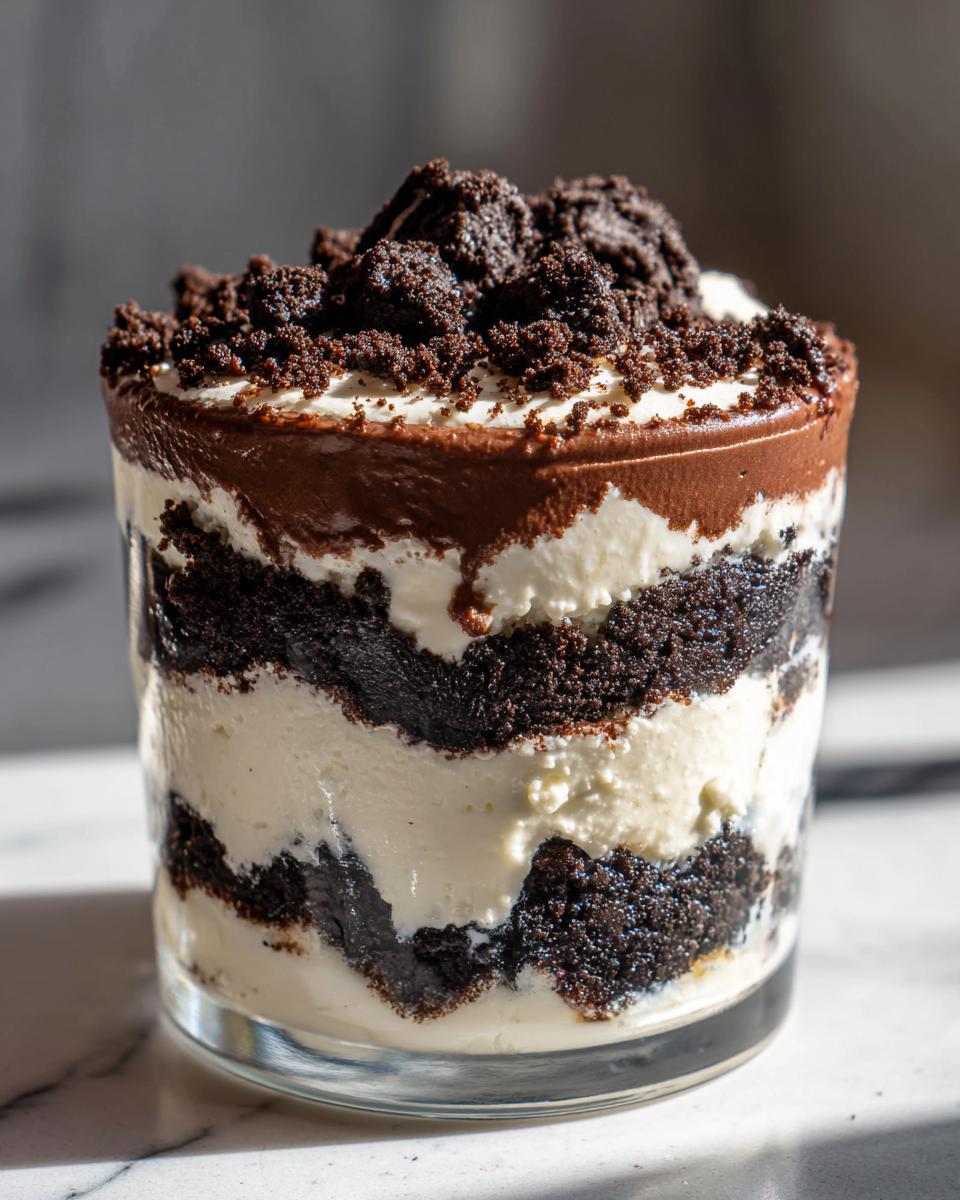
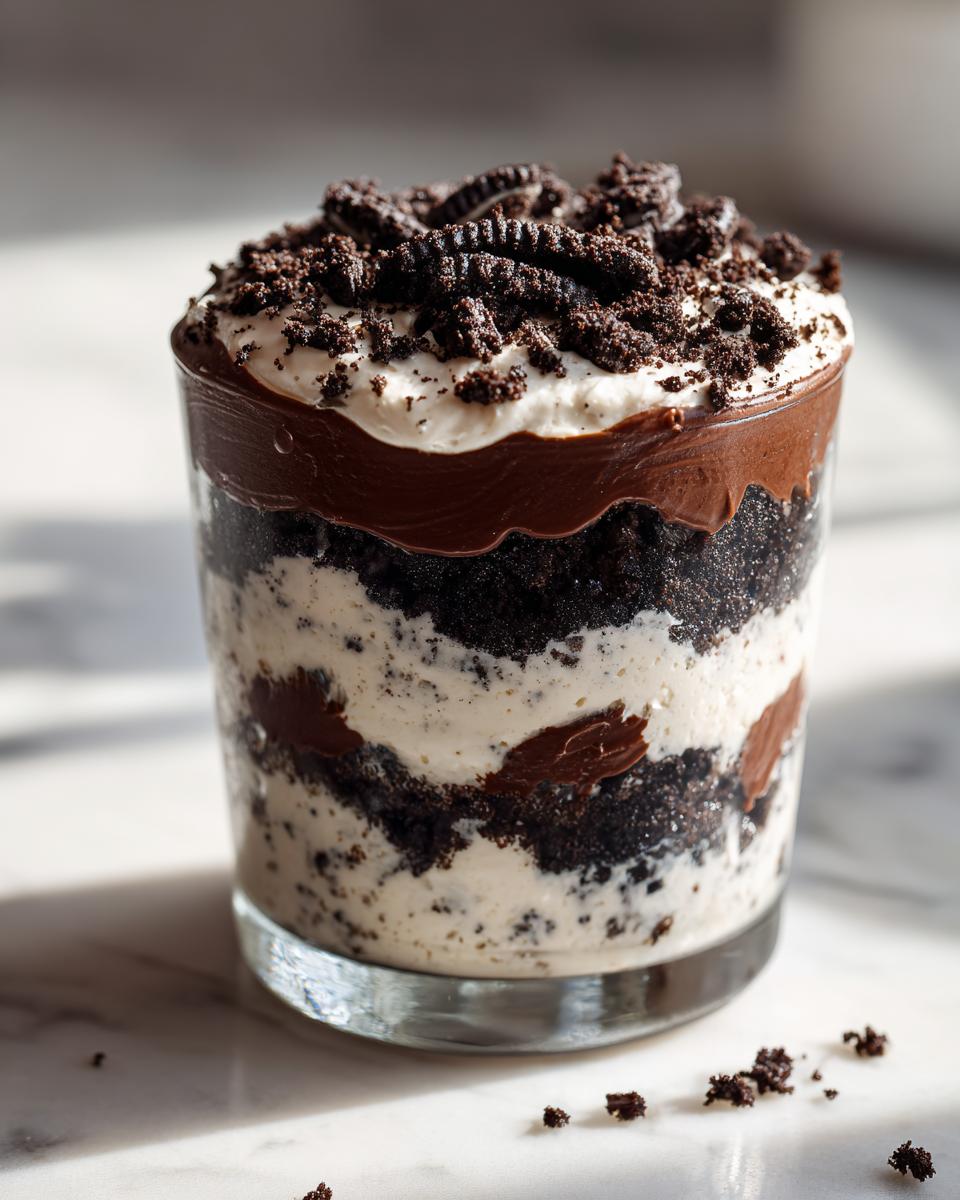
Okay, now that our fluffy cream base and our slightly thickened pudding are ready, it’s time for the fun part: building this amazing **dirt cake**! This is where it starts looking like a real, messy, wonderful dessert ready for digging into. I usually use a big, clear trifle dish because I just love seeing those layers peeking through, but honestly? If you’re making this for a kid’s birthday, you absolutely must make individual dirt cups with gummy worms.
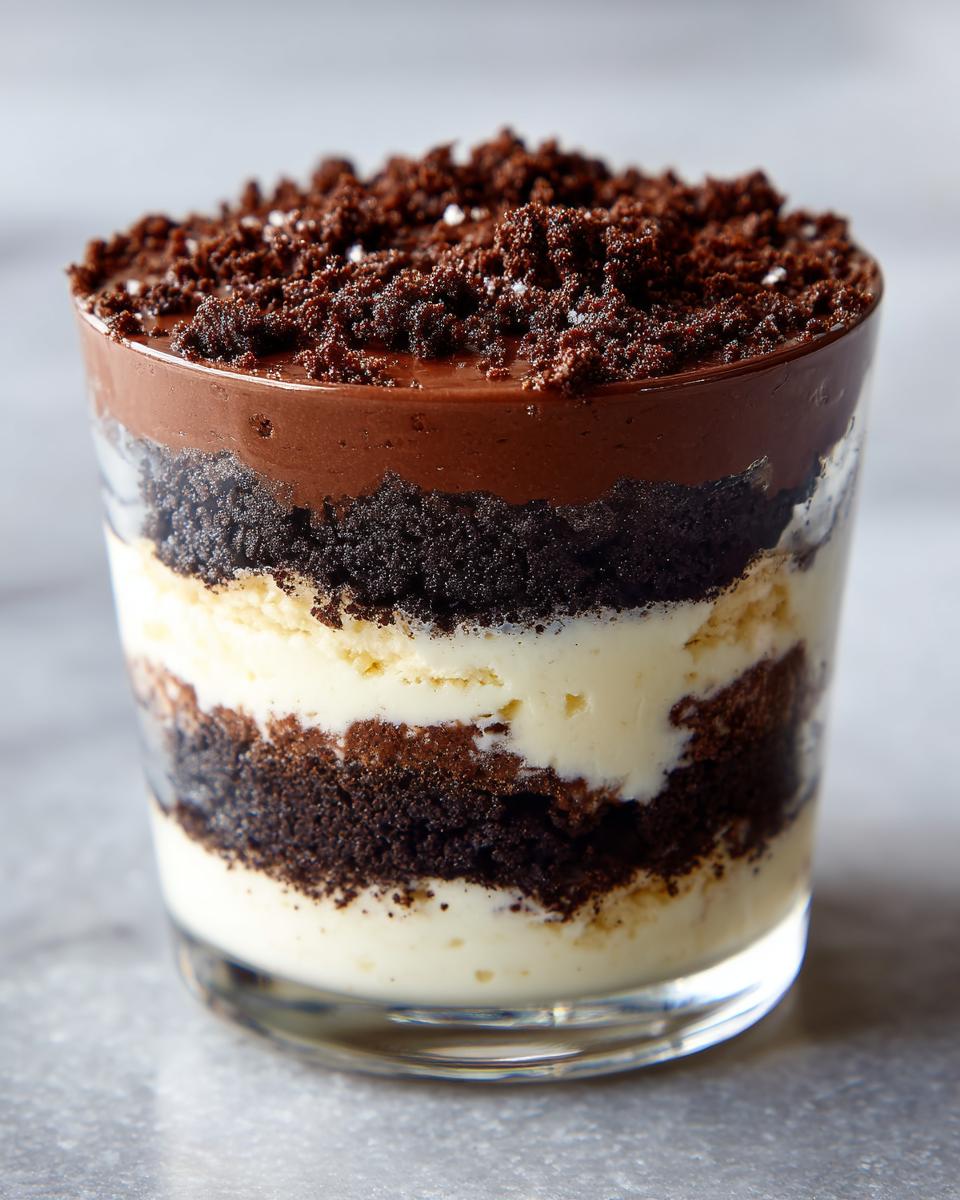
Remember how we set aside about a cup of crushed Oreos? We need that for the very top layer later, so don’t use it yet! We’re going to layer everything in the same order, repeating until we run out of filling. It takes a little focus to not smudge the sides, but trust me, the final look is worth it.
- Start by taking half of your remaining crushed Oreos and sprinkle them evenly across the bottom of your chosen dish. This is the first layer of “dirt.”
- Next comes half of that beautiful cream cheese mixture we whisked up. Spread it carefully over those cookies so you don’t disturb the layer underneath.
- Now, spoon half of your chocolate pudding right over the cream layer. Try to dollop it gently rather than pouring it all in one spot!
- Time to repeat! Layer on the rest of the crushed Oreos.
- Follow that with the remaining cream cheese mixture.
- And finally, top it off with the last of that rich chocolate pudding.
That’s it for the main structure of your **layered pudding cake**! See? It’s just a beautiful, creamy, chocolatey stack waiting for its finishing dirt coat. Cover that dish up tightly—plastic wrap works great—and move it straight into the fridge. It needs time to firm up, or things will get messy when you serve it!
Chilling and Final Touches for Perfect Dirt Cake
After all that layering work—you deserve a break! But hear me out: this chilling time is non-negotiable if you want a perfect slice of **no bake dirt cake**. If you cut into it even slightly early, that lovely cream layer will try to escape, and you’ll have filling oozing everywhere. We aren’t making mud pits; we are aiming for distinct, gorgeous layers!
You need this dessert to chill in the refrigerator for a minimum of four hours. I highly recommend making this a quick make ahead dessert and letting it hang out overnight in the fridge. When it rests that long, the pudding gets super firm, and the cream cheese mixture truly stabilizes. It just tastes better when everything has had time to mingle and set up properly, I swear.
Once your time is up, pull that dish out! Time for the visual trick that makes this dessert famous. Remember that little cup of crushed Oreos you saved? Now is when you sprinkle those crumbs evenly all over the top. Make it look like freshly tilled earth—don’t be shy with the coverage!
And finally, if you are feeling fun, which you absolutely should be when making this treat, stick those gummy worms right into the top layer. I always make sure one worm is halfway sticking out, looking like it’s trying to wriggle away! It’s silly, but kids—and honestly, half the adults—absolutely go wild for this presentation detail.
Serve this chilled straight from the fridge. If you want to check out other quick and easy recipes for parties while this sets, now is the perfect time to browse!
Tips for Success When Making Dirt Cake
Even though this is an easy dessert, I’ve learned a few things through trial and error over the years that guarantee spectacular results every time you make this chocolate dirt pudding recipe. I want your experience to be stress-free, so here are the key takeaways from my kitchen that really make a difference when you are layering everything up.
First things first, let’s talk about those Oreos. If you just toss them into a food processor and buzz them until they look like fine flour, you miss out on texture! That soft, slightly varied crumb is what makes this dessert so addictive. I actually prefer putting the whole cookies (filling and all!) into a sturdy zip-top bag and then just pounding them gently with a rolling pin or the bottom of a heavy pan. You want fine crumbs, sure, but keep a little variation so you get that delightful crunch in every spoonful.
My biggest piece of advice, which I mentioned briefly before, is about temperature: your cream cheese and butter must be genuinely soft, not just slightly cool. If you rush this step, your filling will be riddled with little cheese chunks. That’s the opposite of the creamy chocolate pudding dessert experience we are aiming for! If your kitchen is cold, try microwaving the cream cheese and butter together for just 10-second bursts, mixing in between, until they give easily to gentle pressure.
Also, never underestimate the chilling time! Serious bakers know that a no bake cream cheese dessert needs time to breathe and solidify. I always plan to make this the day before I plan to serve it. It becomes a true quick make ahead dessert, and letting it rest overnight ensures that when you finally dig your spoon in, the layers stay perfectly separate and the texture is exactly right.
Finally, remember that the pudding thickens as it sits—even in the fridge. If you find your pudding mixture seems a little too thin right before assembly, don’t panic! It will firm up beautifully once it’s layered with the cream cheese mixture and chilled. Just trust the process, and you’ll have the best dessert for your next gathering!
Variations: Making Your Own Unique Oreo Dirt Dessert
While I absolutely stand by the classic recipe—because honestly, why mess with perfection?
—sometimes it’s fun to jazz things up a bit for a change of pace! If you’ve made this **oreo dirt dessert** a few times and want to surprise your family, there are some super easy little tweaks that make a big impact without sacrificing that gorgeous, creamy texture.
First, let’s talk cookies for a minute. While the classic Oreo is the backbone of this dessert, if you’re feeling adventurous, try swapping out half the Oreos for a different chocolate sandwich cookie. Maybe something with mint filling? Or, if you really want to get wild, use the chocolate wafer cookies that don’t have any filling at all; they crush down even finer, making for a softer middle layer.
My favorite simple upgrade, though, involves the pudding. If you’re making this for the adults, or maybe you just love a little depth in your chocolate flavor, try this trick: when you mix your instant chocolate pudding with the cold milk, swap out about half a cup of the milk for strong, cold-brewed coffee! It won’t taste like coffee, I promise; it just deepens that chocolate flavor to something ridiculously rich. Instant mocha!
And then there’s presentation! If you’re serving this for a big family gathering, the big dish is great, but if you are looking for something a little tidier for individual servings, you must try making individual little layers. Grab some small plastic cups or even small mason jars. You layer the exact same way—cookie crumbs, cream base, pudding—but you can easily tuck a couple of those gummy worms right into the sides of the jars. It’s the same wonderful flavor but looks so cute!
If you ever need more inspiration for fun, easy sweets, take a peek at some of my other dessert recipes on the site. But for now, enjoy playing around with this wonderful, easy recipe!
Storage and Final Touches for Perfect Dirt Cake
Once you’ve managed to wrangle the last of your delicious **dirt cake** into serving size—which is always the hardest part, right?—you’ll probably have some leftovers, or maybe you planned ahead and made this the day before! That’s the beauty of a great **simple dirt cake recipe**; it holds up wonderfully!
Because this is a no-bake, refrigerated dessert, there’s absolutely no need to reheat it. In fact, putting it anywhere near heat would be a total disaster since that lovely cream cheese and whipped topping filling would just melt into a sad puddle. We want to keep things cool and firm!
The best way to keep your leftovers looking as good as the day you made them is simple: cover that dish tightly. If you used a large 9×13 pan, grab some plastic wrap that can drape right over the whole thing without squishing your beautiful top layer of “dirt.” If you made individual dirt cups with gummy worms, just put lids on them or cover them each with a small piece of foil.
How long does it last? Honestly, this **creamy chocolate pudding dessert** holds up beautifully in the fridge for about three to four days. After that, the Oreo crumbs start to absorb too much moisture from the pudding and cream layers and lose that essential crunch. For the *best* texture—where you still get that great contrast between the creamy filling and the chocolate cookie bits—I always try to serve it within 48 hours of assembling. If you are making it ahead, give those gummy worms until just before serving to put them in, or they might start looking a little sad and sticky after a day or two in the cold!
If you’re looking for other great creamy delights, feel free to check out my collection of dessert recipes! But for now, make sure this wonderful chocolate dirt pudding recipe stays covered and chilled.
Frequently Asked Questions About Making Dirt Cake
I know you might have a few lingering questions bouncing around—that’s totally normal whenever you try a new, fun recipe! Every time I share this **dirt cake** with friends, they ask almost the same things. I’ve gathered up the most common ones right here so you can feel totally confident before you even reach for the cookie bag. We want this to be your go-to, reliable dessert!
Can I use homemade chocolate pudding instead of instant?
Oh, I love that you’re thinking of making your own pastry cream! That would certainly make this an even richer, though heavier, dessert. The short answer is yes, you *can* substitute homemade pudding for the instant mix. BUT, and this is important, if you use homemade, you need to make sure it cools down completely to room temperature before you mix it with the cream cheese layer. If it’s warm, it will melt your beautiful whipped topping base, and you’ll lose all that glorious fluffiness we worked so hard to achieve in the cream layer. Stick to the instant pudding for the classic, airy **no bake dirt cake** texture that sets up reliably in the fridge.
How far in advance can I make this easy potluck dessert?
That’s the best part about this being a wonderful **quick make ahead dessert**! I often assemble the entire thing, including the top crumb layer, the night before I plan to serve it. It needs that minimum of four hours to really set up, but honestly, overnight is best for the ultimate texture. If you make it more than 24 hours ahead, the bottom layer of Oreos might start getting a little too soft. For the absolute crunchiest crumbs on top, I actually prefer to wait until about an hour before serving to sprinkle on that final layer of “dirt”—and then stick the gummy worms in!
What do I do if I really don’t like or can’t find cream cheese?
I totally understand; sometimes, a specific ingredient just isn’t available, or maybe you just don’t love that subtle tang that cream cheese provides in a **creamy chocolate pudding dessert**. If you can’t use cream cheese, you have two great options. Option one: Substitute the cream cheese and the confectioners’ sugar with an extra 8 ounces of softened butter and perhaps a half-cup more of powdered sugar to balance it out, though it won’t be quite as sturdy. Option two, which I think is better for maintaining the structure: use an equal amount of mascarpone cheese or even good quality full-fat ricotta—just make sure the ricotta is well-drained first! It gives a similar richness without the sharp tang. This keeps it safely in the **no bake cream cheese dessert** family while swapping out the main ingredient.
Can I make individual dirt cups with gummy worms in the fridge?
Absolutely! In fact, making individual **dirt cups with gummy worms** is often easier and makes for super cute serving portions! Use small clear plastic tumblers or those little mason jars. Just follow the exact same layering technique we discussed for the big dish. Since the layers are thinner in the cups, they actually set up faster, too, sometimes only needing about three hours in the fridge. They are a fantastic option if you’re taking this to a gathering and hate dealing with cutting and serving wedges of cake!
If you’re looking for other quick meals for your busy week, make sure you check out my collection of easy dinner ideas!
PrintEasy No-Bake Oreo Dirt Cake Recipe

Make this fun, layered Oreo dirt cake. It is a simple, no-bake dessert featuring creamy chocolate pudding and crushed Oreos, perfect for potlucks and family gatherings.
- Prep Time: 25 min
- Cook Time: 0 min
- Total Time: 4 hr 25 min
- Yield: 12 servings 1x
- Category: Dessert
- Method: No Bake
- Cuisine: American
- Diet: Vegetarian
Ingredients
- 1 package (14.3 ounces) Oreo cookies
- 1 package (8 ounces) cream cheese, softened
- 1 cup unsalted butter, softened
- 1 cup confectioners’ sugar
- 1 container (12 ounces) frozen whipped topping, thawed
- 2 packages (3.9 ounces each) instant chocolate pudding mix
- 3 cups cold milk
- 1 package (10 ounces) gummy worms (optional for decoration)
Instructions
- Crush all the Oreo cookies until they resemble fine dirt. Set aside about 1 cup of the crumbs for the top layer.
- In a large bowl, beat the softened cream cheese and softened butter together until smooth. Gradually add the confectioners’ sugar and mix until fully combined.
- Fold in the thawed whipped topping until the mixture is light and fluffy. This creates your creamy filling layer.
- In a separate bowl, whisk together the instant chocolate pudding mix and cold milk for about two minutes, or until the mixture begins to thicken.
- Assemble the dirt cake in a large trifle dish or 9×13 inch pan. Create the first layer using half of the remaining crushed Oreos.
- Spread half of the cream cheese mixture evenly over the Oreo layer.
- Spoon half of the prepared chocolate pudding over the cream cheese layer.
- Repeat the layers: remaining crushed Oreos, remaining cream cheese mixture, and remaining chocolate pudding.
- Cover the dish and chill in the refrigerator for at least four hours, or until firm.
- Before serving, sprinkle the reserved 1 cup of crushed Oreos over the top layer to resemble fresh dirt.
- If using, press gummy worms into the top layer for decoration. Serve this easy dessert recipe no oven treat cold.
Notes
- For individual servings, layer the ingredients in small plastic cups to make dirt cups with gummy worms.
- You can substitute the instant pudding with homemade chocolate pastry cream for a richer flavor.
- Make this quick make ahead dessert the day before serving for the best texture.
Nutrition
- Serving Size: 1 serving
- Calories: 450
- Sugar: 45g
- Sodium: 350mg
- Fat: 25g
- Saturated Fat: 14g
- Unsaturated Fat: 11g
- Trans Fat: 0.5g
- Carbohydrates: 55g
- Fiber: 2g
- Protein: 5g
- Cholesterol: 45mg