
Oh friends, I know the feeling! You spend hours getting those sugar cookies cut into perfect little stars and gingerbread men, and then comes the icing battle. You whip up a batch of what looks like sweet magic, you decorate them beautifully, and then… disaster! It’s either runny goo that smears everywhere, or it never quite sets up right, leaving your gorgeous holiday cookies looking sad and sticky by morning. Trust me, I’ve been there, especially when I was learning to decorate for those early family Christmas trays. That’s why I spent ages experimenting—my kitchen counter looked like a sugary crime scene for a while! But I finally nailed it. This is the sugar cookie icing recipe you need, the one that dries hard and glossy, giving you that beautiful, smooth finish, perfect for stacking and gifting. If you need the perfect base for this icing, make sure you check out my favorite cookie recipe here. It’s a total game-changer for anyone decorating cut-out favorites!
- Why This Easy Sugar Cookie Icing Recipe Works So Well
- Ingredients for Your Perfect Sugar Cookie Icing Recipe
- Step-by-Step Instructions for This Sugar Cookie Icing Recipe
- Tips for Customizing Your Vanilla Cookie Icing Recipe
- Storage and Keeping Your Sugar Cookie Icing Recipe Fresh
- Frequently Asked Questions About This Cookie Icing Dries Hard
- Serving Suggestions for Your Decorated Sugar Cookies
- Recipe Snapshot: Details and Yield for This Sugar Cookie Icing Recipe
- Sharing Your Beautifully Iced Creations
Why This Easy Sugar Cookie Icing Recipe Works So Well
If you’ve ever tried to stack cookies only to find the icing smearing onto the one above, you understand the struggle. This isn’t just a sweet topping; it’s a functional one—and that’s the secret weapon in this sugar cookie icing recipe.
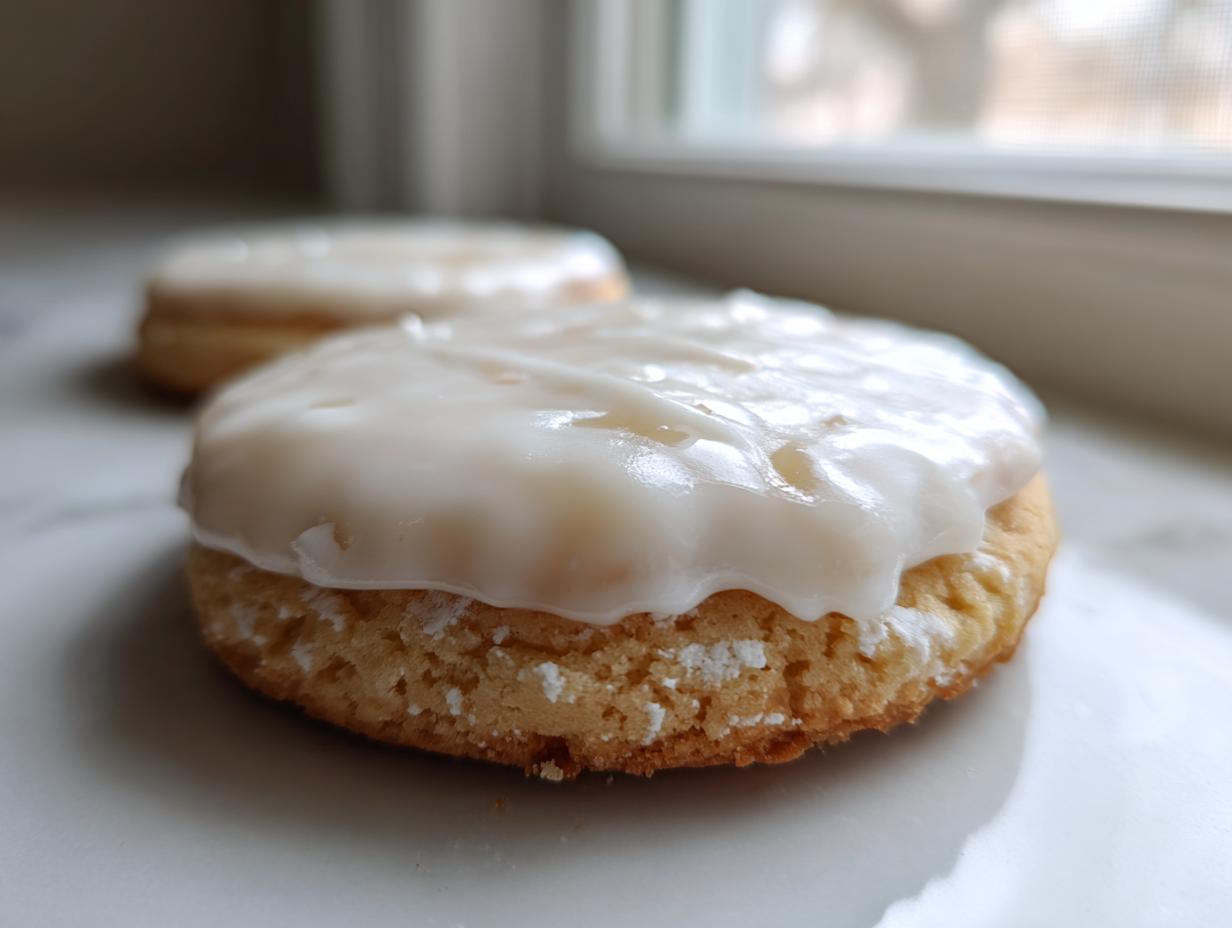
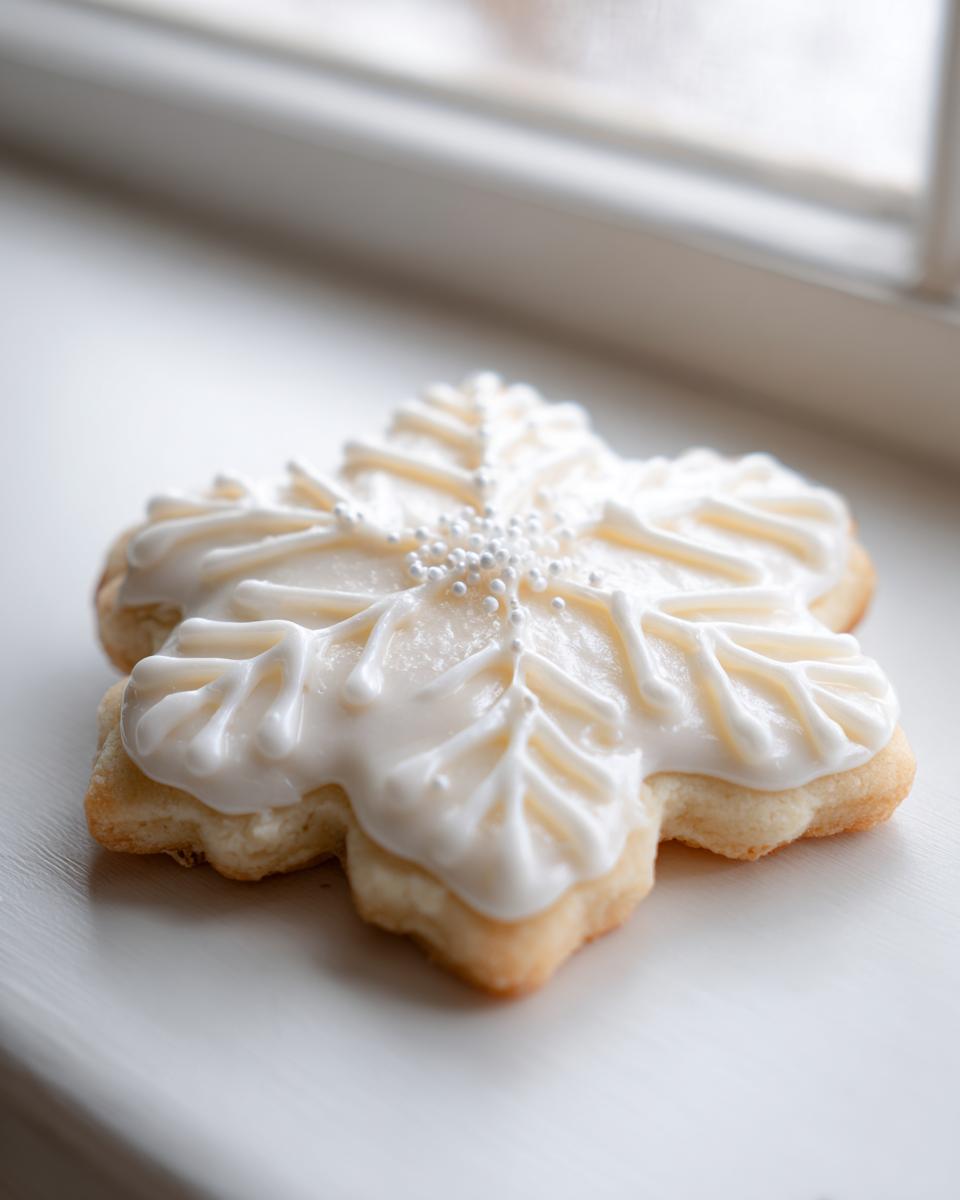
What sets this glaze apart from a fluffy buttercream frosting is its reliability. We are aiming for that beautiful, smooth, glossy cookie icing look that stays put. This makes your cookies look professional, even if you’re just pulling them out of the oven for the first time! For more beautiful bases, you shouldn’t miss my fruit pizza cookie recipe, which handles a glaze beautifully.
Achieving a Stackable Sugar Cookie Icing Finish
The real magic that makes this cookie icing dries hard comes down to one ingredient: light corn syrup. Don’t skip it! Corn syrup acts like a binder that prevents the sugar from only setting into a softer crust. Instead, it pulls everything together into a firm, glass-like finish when it fully cures. This means you can gently stack your beautiful holiday cut-outs without worrying they’ll turn into a colorful, sticky mess.
The Best Cookie Decorating Icing for Beginners
We want beautiful cookies without the headache, right? True royal icing uses egg whites, cooks, and can be intimidating with its complex mixing ratios. This recipe offers most of the structural benefits of royal icing—that wonderfully hard set—but it uses simple pantry staples and requires just a quick mix. That’s why I call it the no-fail cookie icing for beginners. You get that professional look without needing a degree in pastry arts!
Ingredients for Your Perfect Sugar Cookie Icing Recipe
When you’re aiming for that smooth, shiny finish, using the right components is everything. Seriously, don’t try to eyeball these measurements! Every bit of this sugar cookie icing recipe is important for getting that hard, professional set. I always have everything measured and ready before I even turn on the mixer. This makes the quick whipping process so much easier, especially when you’re trying to get the consistency perfect right away.
Here is exactly what you need for a batch that coats about two dozen cookies:
- 4 cups powdered sugar, sifted (Sifting is non-negotiable for smoothness!)
- 1/2 cup light corn syrup (This provides that hard-setting magic.)
- 1/4 cup milk or water (Water works great, but milk adds a touch of richness.)
- 1 teaspoon vanilla extract
- 1/4 teaspoon almond extract (Optional, but highly recommended for that classic bakery flavor!)
Step-by-Step Instructions for This Sugar Cookie Icing Recipe
Alright, this is where the fun really starts! I want you to feel confident when you make this easy sugar cookie icing recipe, because knowing how to adjust it on the fly is what makes decorating less stressful. We are moving straight from dry ingredients to wet ingredients, so keep your mixer handy or a sturdy whisk if you are mixing by hand. This entire process is so fast—you’ll be ready to decorate faster than you think! I always have my cooled cookies lined up on a baking rack, ready to go, before I even start mixing step one. Ready to learn how to decorate sugar cookies easily? Let’s go!
Here is the simple sequence to follow:
- First, grab your medium bowl and whisk together that sifted powdered sugar with the light corn syrup until the mixture looks mostly combined—it will be thick and a bit rough.
- Next, pour in your milk or water, the vanilla, and that optional almond extract. Now, mix it slowly, maybe starting by hand, until everything comes together into one smooth mass.
- Use this icing immediately on your cookies. This is the most important part: checking the consistency for what you want to do next!
- Let that first layer firm up for about an hour before you try adding any fine details or a second layer of color.
- Finally, let everything dry completely at room temperature. Patience pays off!
If you want to see how I use this icing on something sweet and festive, you have to check out my maraschino cherry cookie recipe. They come out stunning with this topping!
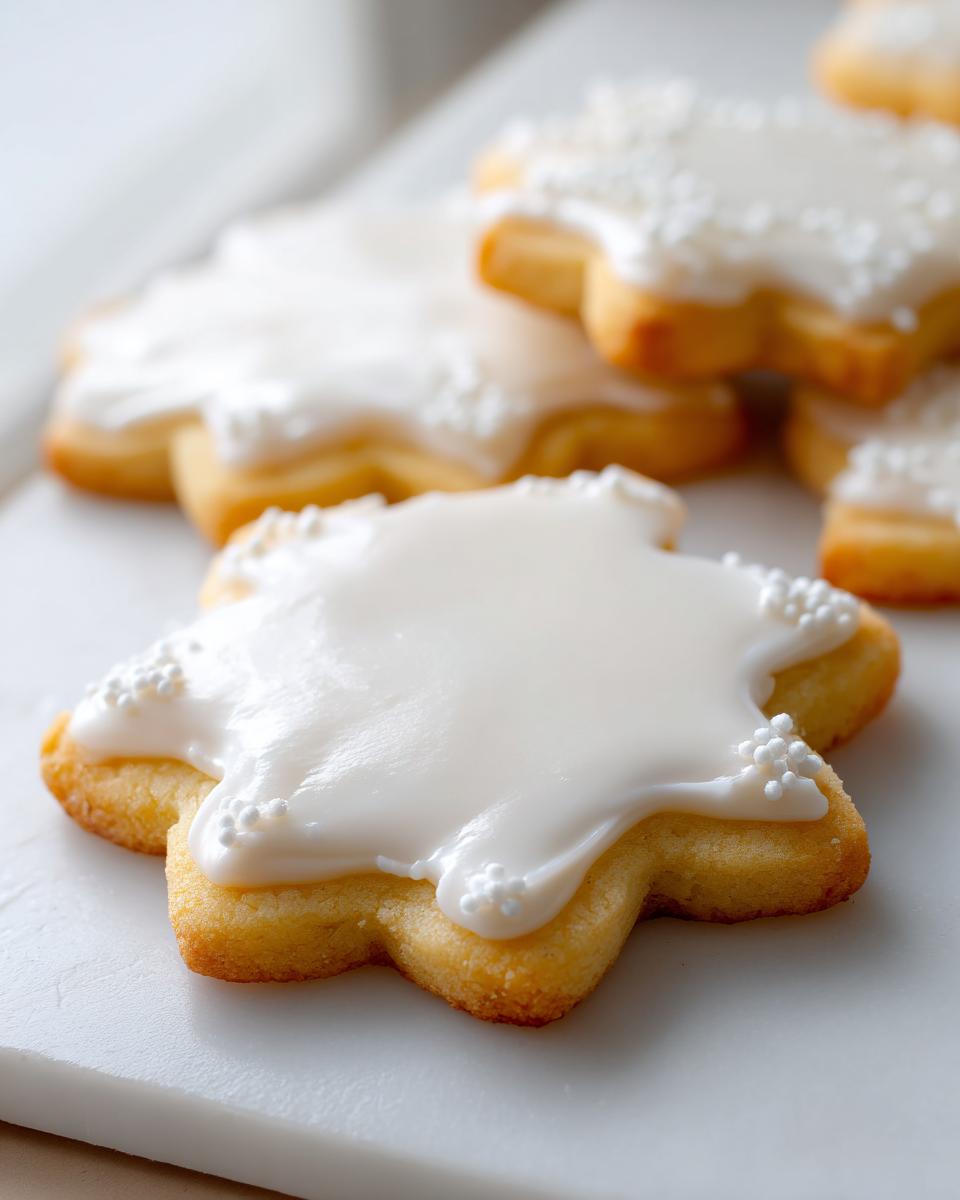
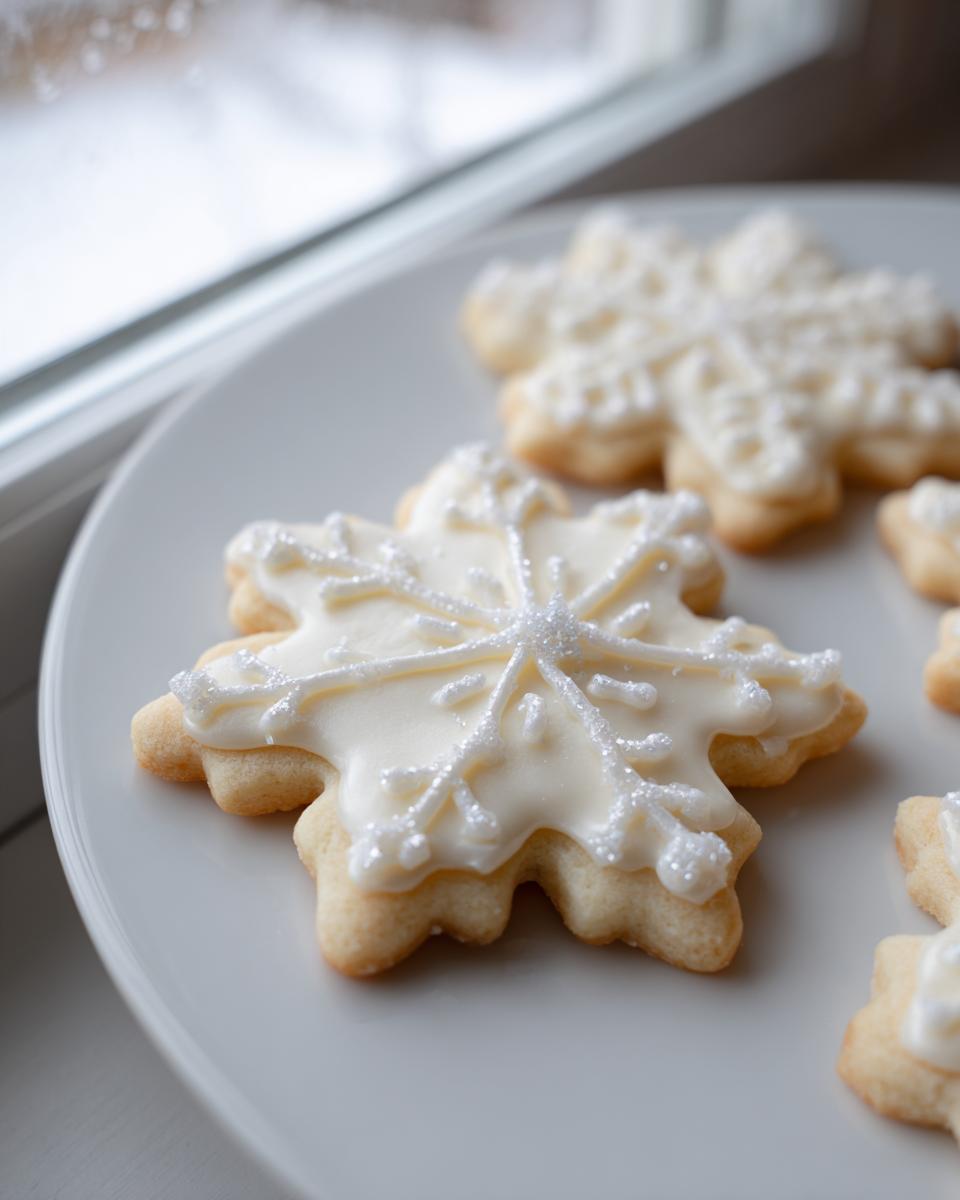
Mixing for Perfect Consistency: Outlining vs. Flooding
This is the secret handshake for achieving flawless decoration! When you test the flow, you’re aiming for two different textures. If you want to build borders or write letters, you need thick icing that barely moves off the spoon—this is your ‘outlining’ consistency. Keep adding powdered sugar, one tablespoon at a time, if it seems too runny. For ‘flooding’—filling in those outlined areas—it should be thinner. You want it to flow smoothly off the spoon and, when drizzled back in, disappear back into the surface in about ten seconds. If it flows too fast, add liquid just a teaspoon at a time.
Drying Time for Cookie Icing Dries Hard
Once your design is done, the waiting game begins, but this icing sets up beautifully. You absolutely need that one hour of setting time between layers for detailed work, but for a full, hard dry, plan on leaving your cookies untouched for a solid four to eight hours. I always tell people that high humidity is the enemy of a hard set—it will take longer if your kitchen is damp. Don’t rush it, or they won’t be stackable yet!
Tips for Customizing Your Vanilla Cookie Icing Recipe
For me, this base is the perfect canvas. Since we are using vanilla extract, this is naturally your best vanilla cookie icing recipe, but you know how I love to play around with flavors! If you’re aiming for bright holiday colors, always use gel food coloring, never the liquid drops. Gel colors are intensely pigmented, so you only need a tiny bit, and they won’t thin out your beautiful, hard-setting consistency. Divide your batch before coloring so you can easily make red, green, yellow, or whatever shades you need for your designs. It’s so satisfying to see those vibrant colors pop against the cookie!
I always keep extra flavoring extracts on hand, too. A bit of peppermint extract mixed in really screams Christmas, or maybe a lemon zest if you’re making spring cookies. If you’re curious about piping something different, check out how I make my swirl pinwheel cookies—the dough is fantastic.
Making a Corn Syrup Free Cookie Icing Alternative
Now, I know some folks prefer to skip corn syrup, even though it’s the secret to that rock-hard professional finish. If you absolutely must have a corn syrup free cookie icing, you have a substitute option. The easiest way is to swap the corn syrup measure with an equal amount of a commercial light corn syrup substitute. If you don’t have one of those, try replacing it with an extra 1/4 cup of milk, but you absolutely must compensate! You’ll need to add a bit more powdered sugar, maybe an extra half-cup, until it feels thick enough to outline again. It might not be quite as glossy or as hard, but it will still work well for decorating!
Storage and Keeping Your Sugar Cookie Icing Recipe Fresh
Once you’ve mixed up a batch of this dependable sugar cookie icing recipe, you need to keep it happy! If you’re not using it all immediately—maybe you’re just working on one color at a time for your holiday decorating—you need to treat it right. The key here is to keep it covered tightly. I use plastic wrap pressed right down onto the surface of any unused icing in the bowl to make sure no air gets in.
Now, here is the biggest warning: Do NOT put this in the refrigerator! Cold temperatures make the sugar unhappy, and when you bring it back out, it starts to “weep”—that’s when tiny beads of moisture form on the surface of your beautiful icing. Keep any leftovers sealed up at room temperature for about two days. It truly holds up wonderfully!
Frequently Asked Questions About This Cookie Icing Dries Hard
I get so many questions when people start decorating, and honestly, it’s usually about consistency or color. Don’t worry if you run into trouble; we just need a little tweak! Here are the things I hear most often when folks are trying to get that perfect cookie icing dries hard finish on their holiday cookies.
Why is my sugar cookie icing runny even after adding powdered sugar?
If your icing is still running all over the place after adding sugar, it usually means you added too much liquid to start, or maybe your powdered sugar wasn’t packed down tightly when you measured. If you’re aiming for decoration, you need that stiff, outlining consistency! Just keep adding a tablespoon of powdered sugar slowly until it mounds up on a spoon before slowly dripping off. Don’t panic; just keep adding that sugar!
Can I use this icing on soft, chewy sugar cookies?
That’s a tricky one! This hard-setting sugar cookie glaze recipe is truly designed for cut-out cookies that hold a firm shape, ones that are sturdy enough for stacking and gifting. If you put it on a very soft, chewy cookie, the weight of the icing might actually cause a delicate cookie to crack or lose its shape as it dries. For soft cookies, you might prefer a simple spreadable frosting. If you need a delicious soft cookie recipe, you should check out my Italian ricotta cookies; they use a much softer glaze!
Why does my icing look slightly yellow instead of pure white?
This happens sometimes, and it usually comes down to two things: the vanilla extract or the corn syrup. If you used imitation vanilla, it can sometimes cast a yellow tint. Also, corn syrup is naturally not totally clear. If you want a shockingly bright white for your smooth glossy cookie icing, you can add just a tiny pinch of bright white food coloring, or if you’re dealing with just a slight off-white, try using water instead of milk in the recipe base.
How long does it take for this icing to be totally stackable?
While it sets up enough to handle in a few hours, for truly stackable goodies—especially if they are going into a tin for gifting—wait a full 24 hours if you can! Humidity plays a huge role here. In dry, cool weather, they might be rock hard in 6 hours. On a rainy day? Give them overnight. The longer they sit out undisturbed at room temperature, the better that hard shell gets.
Serving Suggestions for Your Decorated Sugar Cookies
Now that you have this fantastic, easy-to-use holiday cookie decorating icing, you need to put those beautiful cookies to good use! Since this icing dries hard and allows for neat stacking, these are perfect for making edible gifts. Think little cellophane bags tied with ribbon—they look so professional!
This topping is wonderful for cut-out shapes year-round, but it truly shines during celebrations. Try them for Christmas cookie exchanges or as edible toppers for birthday party favors. If you’re looking for excellent things to pair with your cookies, you have to check out my recipe for canning homemade Christmas jams. Sharing homegrown treats alongside your perfectly iced cookies is just the best feeling!
Recipe Snapshot: Details and Yield for This Sugar Cookie Icing Recipe
Sometimes you just need the quick facts without wading through stories, and I totally get that! When you are in the middle of a big batch of holiday baking, you just need to know exactly what you’re dealing with. Is this sugar cookie icing recipe going to cover the whole double batch of cookies? How long until it’s usable? Here is a quick reference for everything you need to know about the yield and prep time for this versatile glaze.
I always aim to have my ingredients prepped before I start, so the mixing time is super fast. This recipe really shines because the prep time is minimal—no waiting around for things to soften or chill! Remember, this batch is usually enough to frost a couple of dozen medium-sized cut-outs.
- Prep Time: 10 minutes (That’s how fast it is!)
- Cook Time: 0 minutes (We’re just mixing, thank goodness!)
- Prep Time: 10 minutes
- Total Time: 10 minutes (Plus drying time, of course!)
- Yield: Coats approximately 2 dozen medium cookies
- Category: Dessert Topping
- Method: Mixing
- Cuisine: American
Sharing Your Beautifully Iced Creations
Now that you have this fantastic, easy-to-use sugar cookie icing recipe that dries hard, I just can’t wait to hear about what you’ve made! Decorating cookies is such a wonderful, creative outlet, especially when the icing behaves itself. Did you go for bright classic reds and greens? Did you try your hand at piping fine details?
Please, don’t be shy! If this recipe saved your holiday baking day, I would be so grateful if you could leave a star rating right here on the recipe card at the bottom of the page. If you have a spectacular decorating tip that worked for you—maybe a special color shading technique—feel free to drop it in the comments below so we can all learn from each other! And trust me, if you have any questions at all while you are coloring or thinning your icing, remember you can always reach out to me directly through the contact page. Happy decorating, and I hope your cookies bring joy to everyone who sees (and eats!) them!
PrintEasy Sugar Cookie Icing Recipe That Dries Hard

This is the best sugar cookie icing recipe for decorating cut-out cookies. It creates a smooth, glossy finish that dries hard, making it perfect for stacking and gifting.
- Prep Time: 10 min
- Cook Time: 0 min
- Total Time: 10 min
- Yield: Coats approximately 2 dozen medium cookies 1x
- Category: Dessert Topping
- Method: Mixing
- Cuisine: American
- Diet: Vegetarian
Ingredients
- 4 cups powdered sugar, sifted
- 1/2 cup light corn syrup
- 1/4 cup milk or water
- 1 teaspoon vanilla extract
- 1/4 teaspoon almond extract (optional, for flavor)
Instructions
- In a medium bowl, whisk together the sifted powdered sugar and corn syrup until mostly combined.
- Add the milk or water, vanilla extract, and almond extract (if using). Mix on low speed with an electric mixer or by hand until smooth.
- Check the consistency. For outlining, the icing should be thick. If it is too thin, add powdered sugar one tablespoon at a time.
- For flooding, the icing should flow slowly. If it is too thick, add liquid (milk or water) one teaspoon at a time until you reach the desired consistency.
- Use this icing immediately for outlining and flooding your sugar cookies.
- Allow the first layer to set for at least one hour before adding detail work or a second layer.
- Let the decorated cookies dry completely at room temperature until the icing is hard to the touch, usually 4 to 8 hours depending on humidity.
Notes
- To achieve a truly hard, stackable sugar cookie icing, ensure you use corn syrup. This ingredient helps the icing set firm and glossy.
- If you need to color the icing, divide the batch and mix in gel food coloring now. Gel colors work best as they do not thin the icing consistency.
- For a corn syrup free cookie icing, substitute the corn syrup with an equal amount of light corn syrup substitute or use an extra 1/4 cup of milk and slightly increase the powdered sugar until thick.
- Store unused icing covered tightly at room temperature for up to two days. Do not refrigerate, as this can cause the icing to weep.
Nutrition
- Serving Size: 1/4 cup
- Calories: 180
- Sugar: 45
- Sodium: 5
- Fat: 0
- Saturated Fat: 0
- Unsaturated Fat: 0
- Trans Fat: 0
- Carbohydrates: 45
- Fiber: 0
- Protein: 0
- Cholesterol: 0