
Oh, there’s truly nothing quite like the smell of bread baking, especially when that bread promises gooey, melted cheese. Here at Cookin’ Corner, we know that comfort food should never feel complicated. That’s why I’m sharing my absolute favorite secret weapon: the Easy No-Knead Cheddar Cheese Bread. This recipe makes the most incredible loaf of cheese bread you’ve ever tasted, and I promise you, it requires almost zero effort from you! As someone who learned to bake by watching my grandmother, I believe the best dishes are the ones made with care, but without fuss. This loaf proves you can have rustic, artisan texture with that satisfying cheesy pull, all while barely breaking a sweat.
We’re pairing simple ingredients with a long rest time, which is the magic right there. You’ll get an unbelievably soft interior and a crust that sings. This is the kind of bake that reminds you why home cooking is the best kind of medicine. If you’re looking for more simple meals that bring big comfort, take a peek at my easy dinner ideas collection!
- Why This Easy No-Knead Cheddar Cheese Bread is Your New Go-To
- Gathering Ingredients for Your Homemade Cheese Bread
- Step-by-Step Instructions for No Knead Cheese Bread
- Expert Tips for Perfect Homemade Cheese Bread
- Storage and Reheating for Your Cheesy Bread Side Dish
- Variations on Classic Cheese Bread
- Frequently Asked Questions About This Cheese Bread Recipe
- Nutritional Estimates for Cheddar Cheese Bread
- Share Your Comfort Food Baking Creations
Why This Easy No-Knead Cheddar Cheese Bread is Your New Go-To
Honestly, why would you buy the stuff from the store when you can get results this amazing with practically no work? This is what baking should feel like—joyful, simple, and totally rewarding. If you love that satisfying pull when you tear a slice open, this is your recipe.
- Minimal Effort, Maximum Flavor
Minimal Effort, Maximum Flavor
If you’ve always been scared of yeast or kneading, stop right there! This method is my definition of a magic trick. You just mix up a shaggy dough, let time do all the heavy lifting overnight, and wake up to bread that’s ready to bake. This is hands-down the best cheese bread for anyone who thinks they aren’t a baker yet. Seriously, I think it’s one of the best quick easy recipes I have!
- The Perfect Cheesy Bread Side Dish
The Perfect Cheesy Bread Side Dish
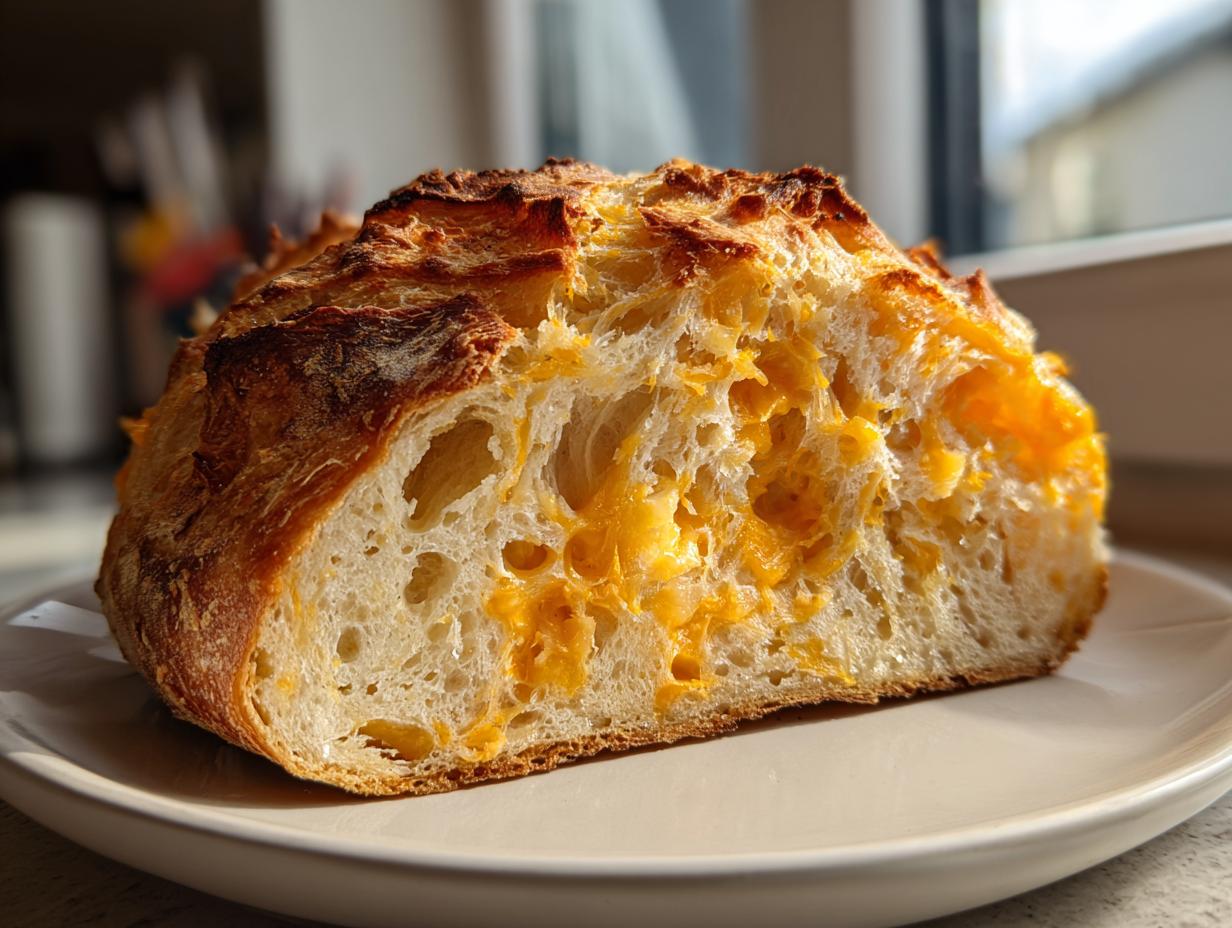
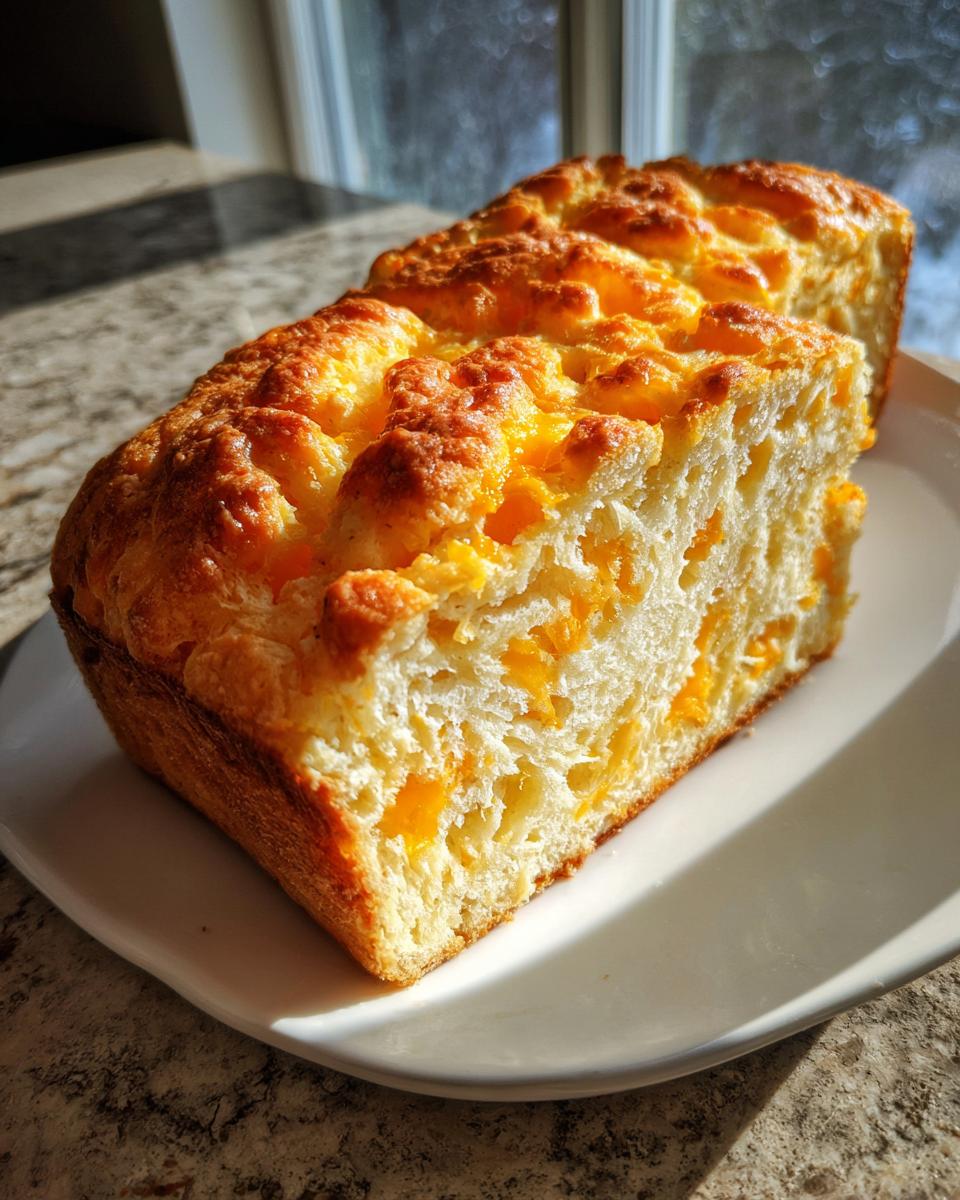
The texture is exactly what you want—crusty on the outside, but with all that cheddar melting inside. Because it’s a sturdy loaf, it makes the ultimate cheesy bread side dish. It’s perfect for soaking up soup broth, or just serving warm with butter next to a big pot of chili. Nobody will ever turn down a slice of this!
Gathering Ingredients for Your Homemade Cheese Bread
The thing about good bread is that it doesn’t need a thousand fancy ingredients. For this loaf, we are keeping it simple, but we are being specific about what we use to make sure that cheese melts perfectly and the texture is divine. You’ll notice I split the sharp cheddar into two parts—that’s important for how we layer the flavor. Think of this as setting up your station before the magic starts!
Dry Ingredients for the Cheese Bread Dough
First up, let’s get the core dry elements together in a big bowl. You are going to need 3 cups of all-purpose flour. Then, for the lift, we use 1 teaspoon of instant dry yeast—we are not blooming this yeast, just whisking it right in! Don’t forget 1 teaspoon of salt to balance everything out, and 1 teaspoon of sugar to give that little yeast of yours something to munch on while it works its long magic.
Wet Ingredients and Cheese for the Dough
Now for moisture! You’ll need 1 1/2 cups of warm water. And here is a super key thing: the water needs to be between 105°F and 115°F. If it’s too cold, the yeast sleeps; if it’s too hot, you kill it. We can’t have that! You also need a whole 1 1/2 cups of shredded sharp cheddar cheese, but make sure to keep 1/2 cup of that set aside for later—I’ll show you why in the steps.
Finishing Touches for the Artisan Cheese Bread Loaf
Once the bread is baked and it’s screaming hot right out of that Dutch oven, we give it a little TLC. You only need 1 tablespoon of melted butter. Brushing this over the top right away gives you that beautiful, soft, shiny crust on your artisan cheese bread loaf that makes it impossible to wait the full hour to slice into it!
Step-by-Step Instructions for No Knead Cheese Bread
Okay, this is where some people get nervous, but trust me, the hardest part of this whole process is just remembering to mix it the night before! Once you get the mixing done, it’s pure magic while you sleep. Make sure you have your Dutch oven clean and ready for preheating later!
Mixing the Shaggy Dough and Long Rest
First, grab that big bowl where you mixed your dry ingredients together. Now, pour in that warm water and mix it all up with a wooden spoon—don’t use an electric mixer for this part! You only want to mix until you can’t see any more dry flour bits floating around. This is what we call a “shaggy dough.” It looks messy, and that’s perfect! Cover that bowl up tight with plastic wrap and just leave it alone for 12 to 18 hours at room temperature. When you come back, it’ll be bubbly and puffy, ready for action.
Incorporating the Cheddar Cheese Bread Flavor
After the long rest, gently scrape that dough out onto a lightly floured counter. Don’t punch it down or wrestle with it; we want to keep those gases we made! Take that first cup of shredded cheddar and gently fold it into the dough—just fold it over itself a few times until it’s somewhat mixed in. Now, shape it into a rough ball and sprinkle that remaining 1/2 cup of cheese right over the top, folding that surface layer in gently. Place the dough seam-side down onto parchment paper, cover it, and let it sit for a final 30 minutes. That second bit of cheese on top is critical for that delicious crust!
Baking Your Gooey Cheese Bread in a Dutch Oven
About 20 minutes before that second rest is up, pop your Dutch oven and lid into the oven and preheat everything to 450°F (232°C). It needs to be scorching hot! Once heated, carefully pull the oven out. Lift that dough using the parchment paper sling and gently lower it into the hot pot. Put the lid on and bake it for a solid 30 minutes. Then, take the lid off! Continue baking for another 10 to 15 minutes. This second stage lets the bread brown up nicely and form that amazing crust on your gooey cheese bread. Once it’s deep golden brown, you’re done baking! You can find some great tips for pairing this bread with soups over in my post about the French Onion Potato Bake!
Expert Tips for Perfect Homemade Cheese Bread
Even though this is a no-knead recipe, baking great bread always involves a few little secrets that separate the good from the truly spectacular. Since we aren’t handling the dough much, we need to ensure the ingredients we use are top-notch, especially the cheese. If you follow these few extra steps, you’ll have a bakery-worthy loaf that beats anything store-bought.
Choosing the Right Cheese for Your Cheese Bread
I mentioned using sharp cheddar, and I stand by that for its flavor punch! But please, if you can, grate the cheese yourself. Those bags of pre-shredded cheese are coated in things like potato starch or cellulose to stop them from sticking together in the bag. Guess what? Those anti-caking agents stop your cheese from achieving that beautiful, gooey cheese bread melt we are after. If you want next-level flavor for your artisan cheese bread loaf, grab a block and grate it fresh.
For my ultimate version, I like to mix 1 cup of sharp cheddar with 1/2 cup of Gruyère. Gruyère melts like a dream and adds a lovely nuttiness that really elevates the whole loaf.
Achieving the Ultimate Crusty Exterior
This is the one step you absolutely cannot skip, especially if you want that satisfying crusty exterior that makes this bread so fantastic for dipping—a perfect result for a great savory quick bread!
The Dutch oven has to be screaming hot when the dough goes in. We preheat it to 450°F for a good 20 minutes. Why? Because when the cold dough hits that super hot cast iron pot, it creates an instant burst of steam trapped under that lid. That steam is what gives your bread that incredible oven spring and sets that wonderful, brittle crust we love. Don’t rush the heating time, okay?
If you’re looking for a fantastic way to use up any leftovers (once you’ve cooled it!), I sometimes crumble this bread over my creamy garlic mashed potatoes for extra texture! Seriously good stuff.
Storage and Reheating for Your Cheesy Bread Side Dish
Now that you have this incredible loaf of homemade cheese bread, the next big question is: how do I keep it tasting great tomorrow? Since this is a yeasted loaf, it stays softer than many quick breads, but we all know that bread the next day can sometimes lose that magical fresh-out-of-the-oven moisture.
The best way to store leftovers is to let the loaf cool completely—I mean totally cool—and then wrap it tightly. I use two layers: first, plastic wrap right against the crust, and then a layer of aluminum foil over that. This double-wrap traps any remaining moisture inside and keeps it from going stale on you. Stored this way at room temperature, it should stay perfectly fine for up to two days. Don’t even think about putting it in the fridge unless you absolutely have to; the cold air ruins bread texture fast!
When you’re ready to enjoy that amazing cheesy bread side dish again, you absolutely must reheat it to bring back that gooey factor. Forget the microwave unless you want rubbery cheese!
- For slices: Pop the slices directly onto a baking sheet and warm them in a 350°F oven for about 5 to 7 minutes. This crisps up the crust just a bit and melts the cheese again.
- If you have half a loaf: Wrap the loaf loosely in foil and heat it at 350°F for about 15 minutes. This steams the inside just enough to soften the crumb while warming that cheddar right through.
It’s wonderful reheated alongside a fresh salad, perhaps one tossed with my lemon parmesan kale salad. Enjoy those leftovers!
Variations on Classic Cheese Bread
Once you master the basic loaf—and trust me, you will nail this no-knead version—your culinary imagination is going to start running wild! That’s the beauty of a good base recipe; it’s just waiting for you to personalize it. If you are craving something a little brighter or punchier than just cheddar, don’t worry, we can easily adapt this loaf into something new and exciting. I often use the exact same technique but swap out the flavor profile entirely.
It’s so fun to see how a simple add-in changes the whole vibe of the bake. You might even find your new favorite iteration for your next potluck! Speaking of fun flavor twists, have you ever tried moving beyond bread and stuffing those flavors into egg rolls? My recipe for cheeseburger egg rolls uses similar comfort food vibes!
Adding Herbs to Your Cheese Bread
This is probably the easiest way to transform this loaf into something that feels a bit more sophisticated or maybe leans toward a specific cuisine. If you wanted to make an incredible Italian herb cheese bread, I would suggest adding about 1 1/2 teaspoons of dried Italian seasoning blend right into your dry ingredients when you mix the flour, yeast, salt, and sugar. That way, the herbs are distributed perfectly throughout the entire dough before it even starts its resting period.
If you want a fresh, bright note, wait until you shape the dough (Step 6 in the instructions). Right before you fold over that final 1/2 cup of cheese, sprinkle in about 2 tablespoons of freshly chopped chives or even flat-leaf parsley. Fold gently so the herbs stick to the outside of the cheese as you shape the final ball. It looks gorgeous when you slice it!
Making a Quick Garlic Cheese Bread Version
Ah, garlic. Is there anything better? You have two great options here depending on whether you want the flavor baked deep inside or layered on top for that super aromatic finish.
Option One, for flavor throughout the whole crumb: Add 1 teaspoon of garlic powder along with your dry ingredients at the very beginning. This ensures the garlic flavor permeates the whole loaf as it rests and bakes. It’s subtle but delicious.
Option Two, perfect for that classic, savory presentation: Stick strictly to the original recipe for the dough itself. Once the bread comes out of the oven—immediately after brushing with that melted butter mentioned in the instructions—you whip up a quick garlic butter. Just melt 2 tablespoons of butter and whisk in 1 teaspoon of minced garlic (or 1/2 teaspoon of garlic powder) and a pinch of dried parsley. Brush this flavorful mixture right over the entire crust while it is still steaming hot. That melts down into the little nooks and crannies, giving you an instant garlic cheese bread experience.
Frequently Asked Questions About This Cheese Bread Recipe
I know when you’re tackling a new recipe, especially a no-knead loaf, you end up with a few questions floating around. It’s totally normal! I didn’t get these great results right away, but after testing and tweaking this cheese bread so many times, I’ve figured out all the little quirks. Here are some things folks usually ask me when they are getting ready to bake.
Can I use active dry yeast instead of instant yeast in this no knead cheese bread?
Yes, you absolutely can swap them, but you can’t treat them exactly the same! Instant yeast is super cooperative and happily mixes right in with the dry ingredients like we did in the main recipe. If you’re using active dry yeast, you have to wake it up first. Take about a half cup of that 1 1/2 cups of warm water—make sure it’s only about 110°F—and stir in your active dry yeast along with the teaspoon of sugar. Let that sit for about 5 to 10 minutes until it looks foamy and bubbly on top. That means your yeast is happy! Once it’s foamy, use that yeast mixture along with the rest of your water when you mix your dough. It might start rising a little faster, so keep an eye on it!
Can this be made as a quick cheese bread without yeast?
Oh, I totally get the need for a super fast quick cheese bread sometimes—you just need that cheesy hug *now*! This specific recipe, though, really depends on the long, slow fermentation that yeast gives us to create that beautifully open, chewy crumb structure when we bake it in the Dutch oven. If you skip the yeast entirely for a true quick bread, you’d need to swap out the yeast and the long rest time for about 2 teaspoons of baking powder and maybe a little extra salt.
However, if you make that substitution, you drastically change the outcome! You’ll get a much denser, almost cake or biscuit-like texture—more like a true savory quick bread rather than this stretchy, artisan loaf. I have other quick bread recipes if you need speed, but for this particular loaf meant to be that artisan style, you really need that yeast to get the texture everyone loves.
What is the best way to freeze homemade cheese bread?
This is a great question because nobody wants to waste a perfect loaf! If you want to freeze the baked bread, the key is keeping the air out so it doesn’t get freezer burn and dry out. Make sure the whole loaf is completely cool—don’t even try wrapping it while it’s warm, or you’ll trap steam and make it gummy! Once it’s room temperature, slice it up like you mean to eat it later. Wrap the slices tightly in plastic wrap, then wrap that whole package again in aluminum foil, or pop it into a sturdy freezer bag, squeezing all that air out. It’ll be great for up to three months!
When you’re ready to eat it, take out just what you need, unwrap it, and pop it into a 350°F oven for about 10 minutes until the cheese is soft. It really brings it back to life!
I’ve got a recipe for Cheesy Taco Pasta that is fantastic for using up leftover bread as a topping, too, just saying!
Nutritional Estimates for Cheddar Cheese Bread
Now, I always like to give a rough idea of what you are looking at nutrition-wise, because let’s be real, this is ultimate comfort food—it usually involves butter and cheese, which is why it tastes so amazing! However, you have to remember this bread is an artisan cheese bread loaf, not a salad, so enjoy it! These numbers are just estimates based on the ingredients list, and if you go heavy on the sharp cheddar (which, honestly, who wouldn’t?), your numbers might change a bit.
We always aim for transparency here at Cookin’ Corner, so please see these as general guidelines for one slice. If you substitute cheeses or add herbs, the totals will shift slightly, so consider these your starting point for what I call a reasonable serving size for this delicious baked good.
- Serving Size: 1 slice
- Calories: 285
- Fat: 8g
- Saturated Fat: 5g
- Carbohydrates: 45g
- Protein: 10g
- Sugar: 1g
- Sodium: 350mg
- Fiber: 2g
I try to keep things balanced in my kitchen, even with my favorite bakes. If you are whipping up a batch, maybe serve this incredible homemade cheese bread alongside something lighter, like my peanut butter protein balls for a different kind of treat later in the day! Bake happy, friends!
Share Your Comfort Food Baking Creations
Well, that is it! You’ve made yourself a beautiful, glorious, ridiculously cheesy loaf of cheese bread. Doesn’t that smell like home? I really hope this Easy No-Knead Cheddar Cheese Bread brings you that same warm, comforting feeling it brings my kitchen.
I truly hope this recipe works its magic for your family dinners or your mid-week snack cravings. This is the kind of dish that deserves to be bragged about, so please don’t keep the gooey goodness to yourself!
Take a minute to leave me a star rating right below—I’m dying to know how the crust turned out on your loaf! And if you have a story about someone in your family who inspired your love of comfort food baking, drop it in the comments below. I absolutely love reading about your kitchen traditions, just like I love sharing mine. If you are looking for another great classic to add to your rotation, you have to try my Classic Easy Cottage Pie Recipe next!
Happy baking, and thank you for letting Cookin’ Corner be a part of your table!
PrintEasy No-Knead Cheddar Cheese Bread
This recipe delivers a comforting, homemade cheese bread loaf with a crusty exterior and a soft, gooey center. It uses a simple no-knead method, making it perfect for beginner bakers seeking delicious results.
- Prep Time: 15 min
- Cook Time: 45 min
- Total Time: 13 hours 0 min
- Yield: 8 servings 1x
- Category: Dinner
- Method: Baking
- Cuisine: American
- Diet: Vegetarian
Ingredients
- 3 cups all-purpose flour
- 1 teaspoon instant dry yeast
- 1 teaspoon salt
- 1 teaspoon sugar
- 1 1/2 cups warm water (about 105-115°F)
- 1 1/2 cups shredded sharp cheddar cheese, divided
- 1 tablespoon melted butter (for brushing)
Instructions
- In a large bowl, whisk together the flour, yeast, salt, and sugar.
- Pour in the warm water and mix with a wooden spoon until a shaggy dough forms. Do not overmix.
- Fold in 1 cup of the shredded cheddar cheese until it is evenly distributed throughout the dough.
- Cover the bowl tightly with plastic wrap and let the dough rest at room temperature for 12 to 18 hours. The dough will become bubbly and increase in volume.
- After the long rise, lightly flour a work surface. Gently scrape the dough out of the bowl.
- Shape the dough into a rough ball. Sprinkle the remaining 1/2 cup of cheddar cheese over the top and gently fold it into the surface of the dough.
- Place the dough seam-side down on a sheet of parchment paper. Cover loosely with plastic wrap or a clean kitchen towel and let it rest for 30 minutes.
- About 20 minutes before baking, place a Dutch oven (with the lid on) into your oven and preheat to 450°F (232°C).
- Carefully remove the hot Dutch oven from the oven. Lift the dough using the parchment paper and gently place it inside the Dutch oven.
- Cover the Dutch oven with the lid and bake for 30 minutes.
- Remove the lid and continue baking for another 10 to 15 minutes, until the crust is deep golden brown.
- Carefully remove the bread from the Dutch oven. Brush the top immediately with melted butter.
- Let the bread cool on a wire rack for at least 1 hour before slicing and serving your homemade cheese bread loaf.
Notes
- For a richer flavor, use a mix of cheddar and Gruyère cheese.
- This bread is excellent served warm alongside chili or soup.
- Store leftovers tightly wrapped at room temperature for up to two days.
Nutrition
- Serving Size: 1 slice
- Calories: 285
- Sugar: 1
- Sodium: 350
- Fat: 8
- Saturated Fat: 5
- Unsaturated Fat: 3
- Trans Fat: 0
- Carbohydrates: 45
- Fiber: 2
- Protein: 10
- Cholesterol: 25