
Am I right? Some nights, the mere thought of rolling up eight individual burritos feels like a marathon you just don’t have the energy for after a long day. We all crave that satisfying, cheesy Tex-Mex flavor, but sometimes we need comfort food to move a little faster. That’s where this amazing burrito bake comes in! It takes everything you adore about a great burrito—the seasoned meat, the creamy beans, the huge blanket of cheese—and stacks it all into one glorious, scoopable casserole dish. Here at Cookin’ Corner, Sarah Jane Thompson is always focused on developing recipes that are absolutely reliable and tested in a real home kitchen, and this dish is proof. Forget rolling; this is the weeknight solution you’ve been searching for!
- Why This Easy Burrito Bake is Your New Weeknight Hero
- Gathering Ingredients for Your Cheesy Burrito Bake Casserole
- Step-by-Step Instructions for the Perfect Burrito Bake
- Tips for Success with Your Easy Burrito Bake Recipe
- Make-Ahead and Freezer Friendly Burrito Bake Options
- Ingredient Swaps and Variations for Your Burrito Bake
- Serving Suggestions for This Tex Mex Bake
- Frequently Asked Questions About the Burrito Bake Recipe
- Nutritional Estimates for Your Comfort Food Casserole
Why This Easy Burrito Bake is Your New Weeknight Hero
Honestly, this burrito bake casserole is total magic for busy evenings. It gives you all that huge Tex-Mex flavor without the headache of individual assembly. It’s built from the ground up to be a winner for everyone at the table.
- It’s truly a quick dinner bake—prep takes only about 15 minutes, seriously!
- The layering technique makes this dish fantastically family friendly, so everyone gets a taste of home.
- It comes together in one dish, meaning cleanup is a breeze. Who doesn’t love that for a weeknight?
Speed and Simplicity in One Pan Burrito Bake
We’re talking minimal chopping here, folks. You brown your ground meat, mix it vigorously with the sauce and beans, and then you layer. That’s it! This truly is a one pan burrito bake situation once you get it into the oven. Active time is done before you even start hearing the kids complain about homework!
Comfort Food Casserole Flavor
When this gorgeous bake comes out of the oven, your whole kitchen smells incredible—savory meat, warm spices, and that signature blanket of melted, bubbly cheese. It’s satisfying, hearty, and hits that craving for classic comfort food casserole every single time. It’s simple Tex-Mex perfection!
Gathering Ingredients for Your Cheesy Burrito Bake Casserole
Okay, so this is the part where we transform simple pantry staples into that amazing, layered delight. Remember, this recipe works perfectly whether you grab ground chicken for a lighter touch or stick with ground beef to really lean into that hearty, classic Tex-Mex experience. Make sure you have your main components ready to go before you even preheat the oven!
Here’s what you need to gather for this fantastic cheesy burrito bake:
- One tablespoon of olive oil—just a splash to get things started.
- One pound of ground meat (either chicken or beef, your choice!).
- One packet (that’s about an ounce) of your favorite taco seasoning mix.
- One can of black beans, and this is important, you need to rinse them well and drain off all that liquid.
- One can (10 ounces) of mild enchilada sauce.
- One cup of cooked white rice—leftovers work great here!
- One cup of sour cream, and we will be dividing this later, so keep that in mind.
- One cup of salsa, divided too, for mixing *in* and topping *on* at the end.
- Eight medium flour tortillas—these get cut up into quarters.
- Two cups of shredded Mexican cheese blend.
- And finally, one cup of plain old shredded cheddar cheese.
Ingredient Clarity and Preparation Notes
Because we are layering, the ‘divided’ ingredients are crucial for balance! When you see ‘1 cup sour cream, divided,’ that means you’ll stir half (1/2 cup) into the meat mixture, and save the other half to dollop on top when it cools down a touch. We do the exact same thing with the salsa. This guarantees every layer has flavor, and you have those perfect cool, creamy toppings ready to go right when it comes out of the oven. Trust me, paying attention to those little divisions makes the final burrito bake casserole so much better!
Step-by-Step Instructions for the Perfect Burrito Bake
Getting this easy casserole recipe together is lightning fast once you have your ingredients prepped. We go right from the skillet to the oven, so get everything out and ready to dump! Make sure your oven is set to 375 degrees Fahrenheit and you’ve lightly greased that 9×13 dish. Don’t skip the preheating step; we want that heat ready to go!
Preparing the Meat and Filling Base
First up, heat that olive oil in a big, deep skillet over medium heat. Toss in your ground chicken or beef. You need to cook this until it’s nicely browned all the way through. Once it’s done, you absolutely must drain off any extra grease. If you leave too much fat in there, your final burrito bake ends up swimming instead of setting up beautifully. After draining, stir in that taco seasoning packet according to the instructions—usually just a splash of water while you cook it down. That’s your flavor powerhouse!
Now, combine everything in a big bowl! Mix that seasoned meat with your rinsed black beans, the creamy enchilada sauce, your cooked rice, half of the sour cream, and half of the salsa. Get it all mixed up until it’s one happy, savory mess.
Layering the Burrito Bake Casserole
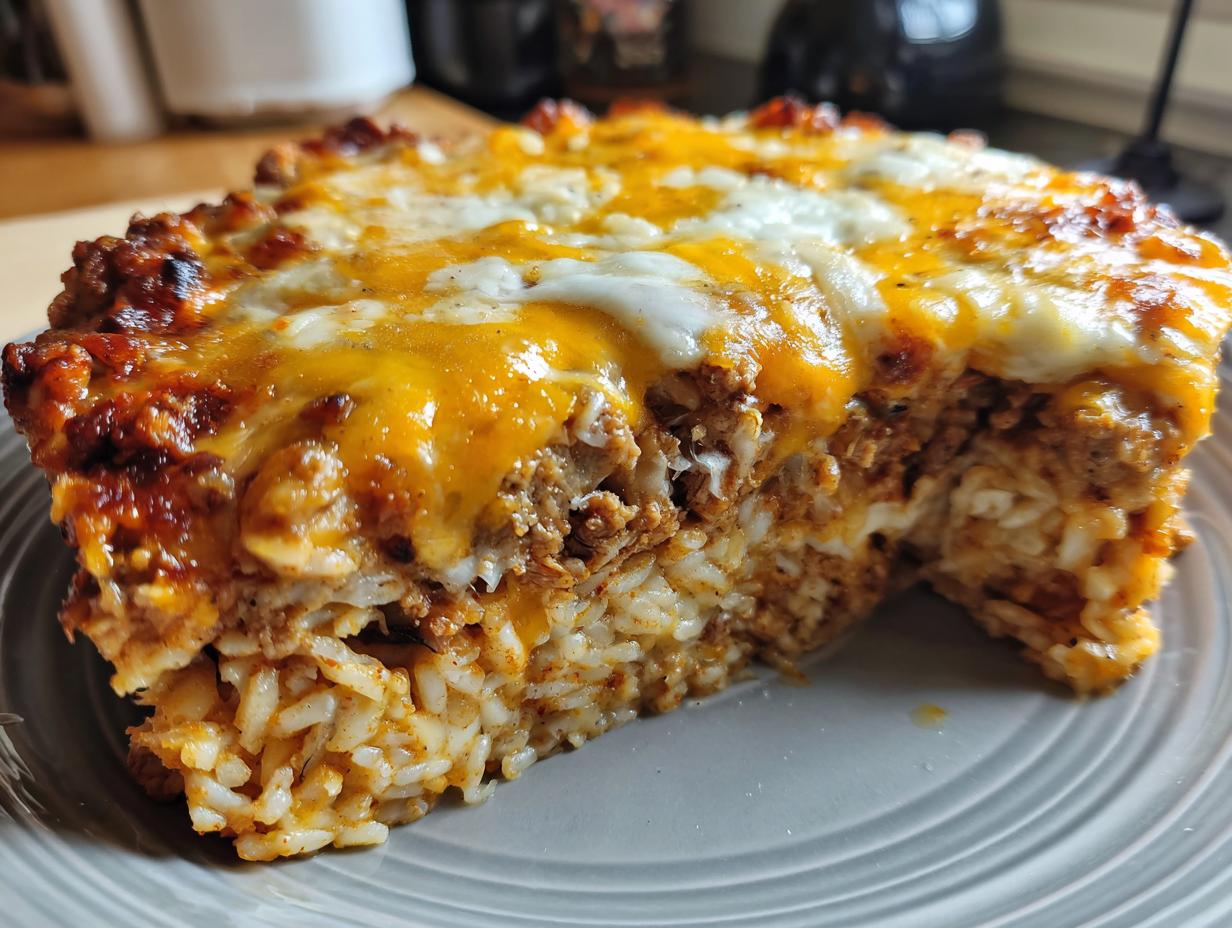
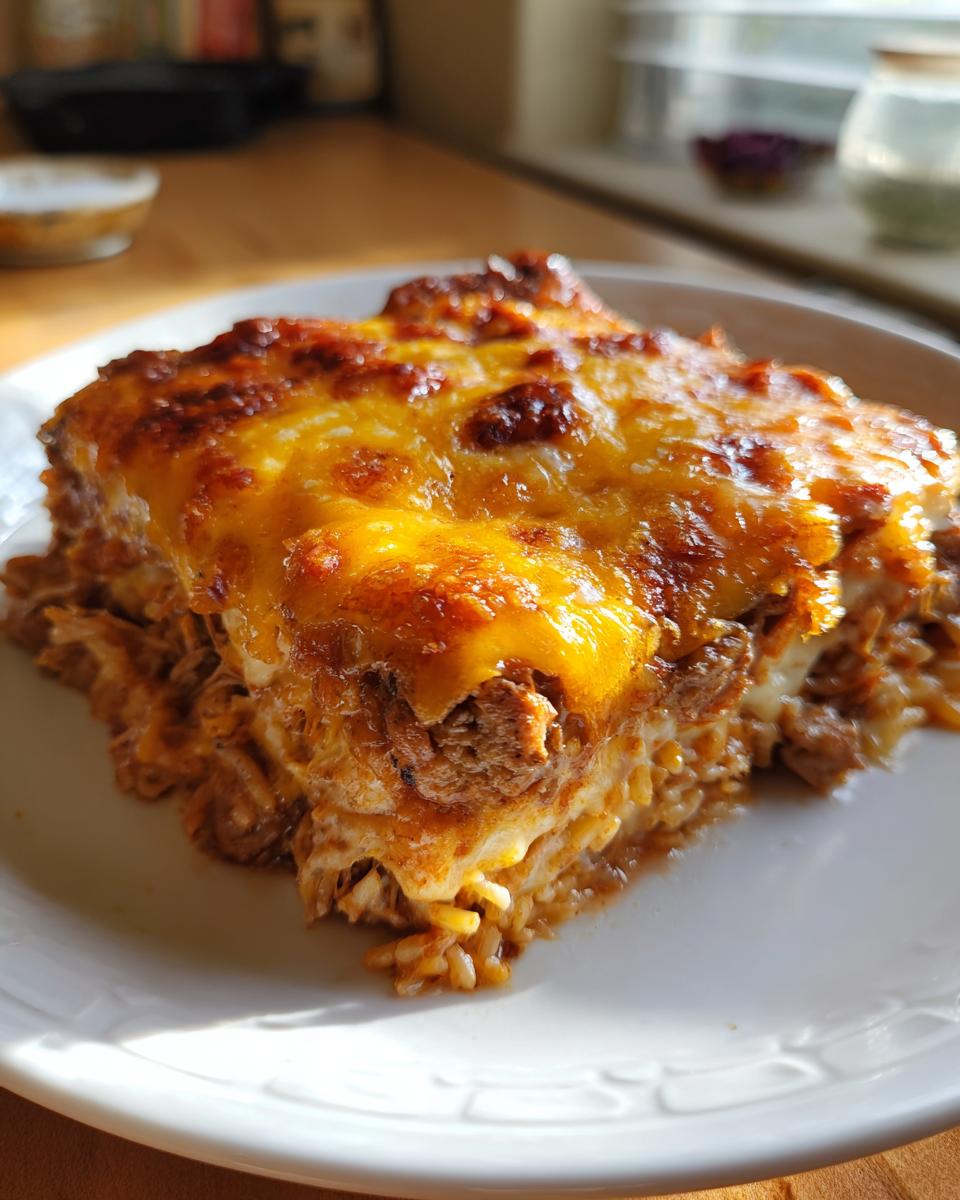
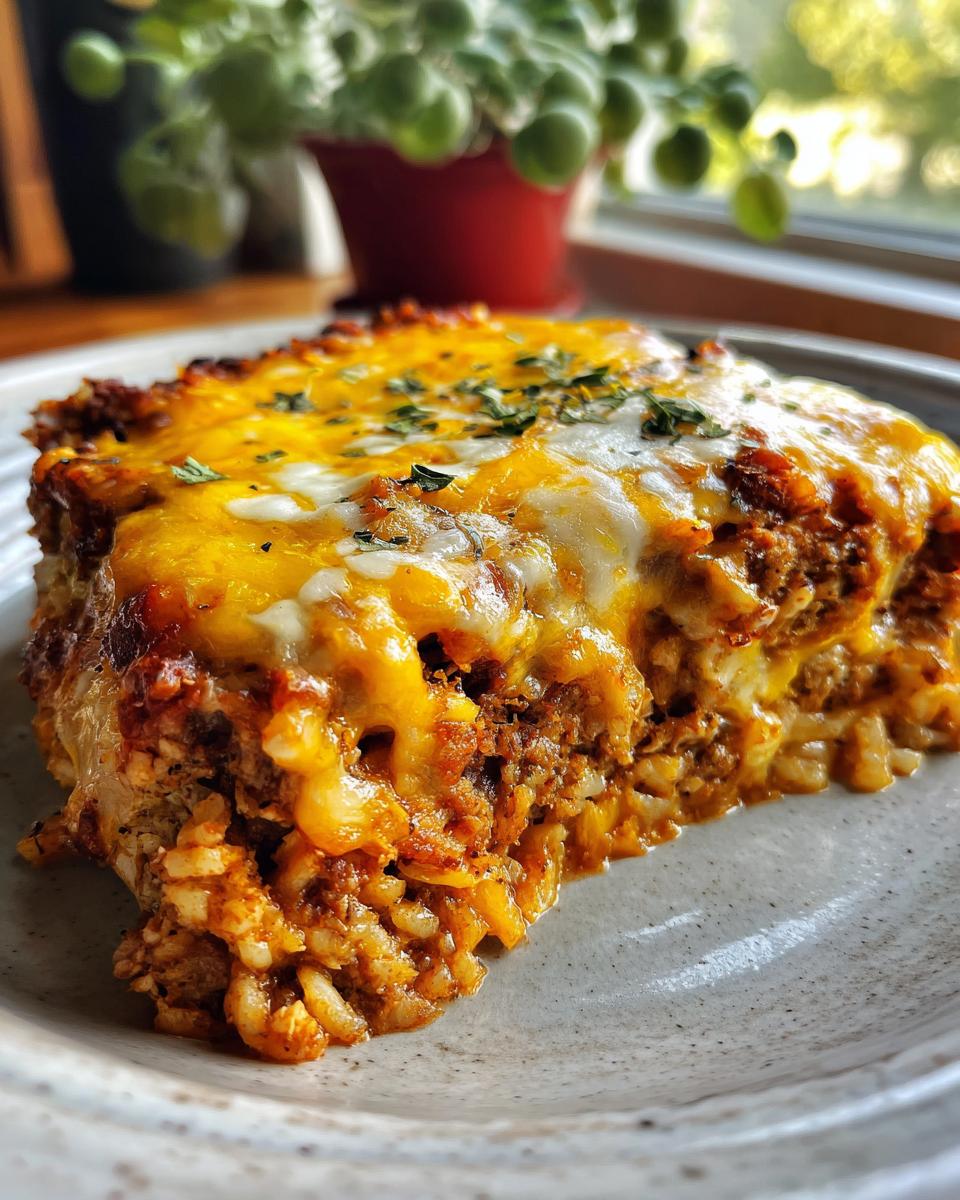
This is where the magic of the layered burrito bake structure comes in. Start simple: spread just a thin layer of that meat mixture onto the bottom of your prepared dish. This prevents the bottom tortillas from sticking or drying out. Next, lay down half of your cut-up tortilla pieces in an even layer. Top those tortillas with half of the remaining meat mixture, and then sprinkle on half of the Mexican cheese blend and half of the cheddar.
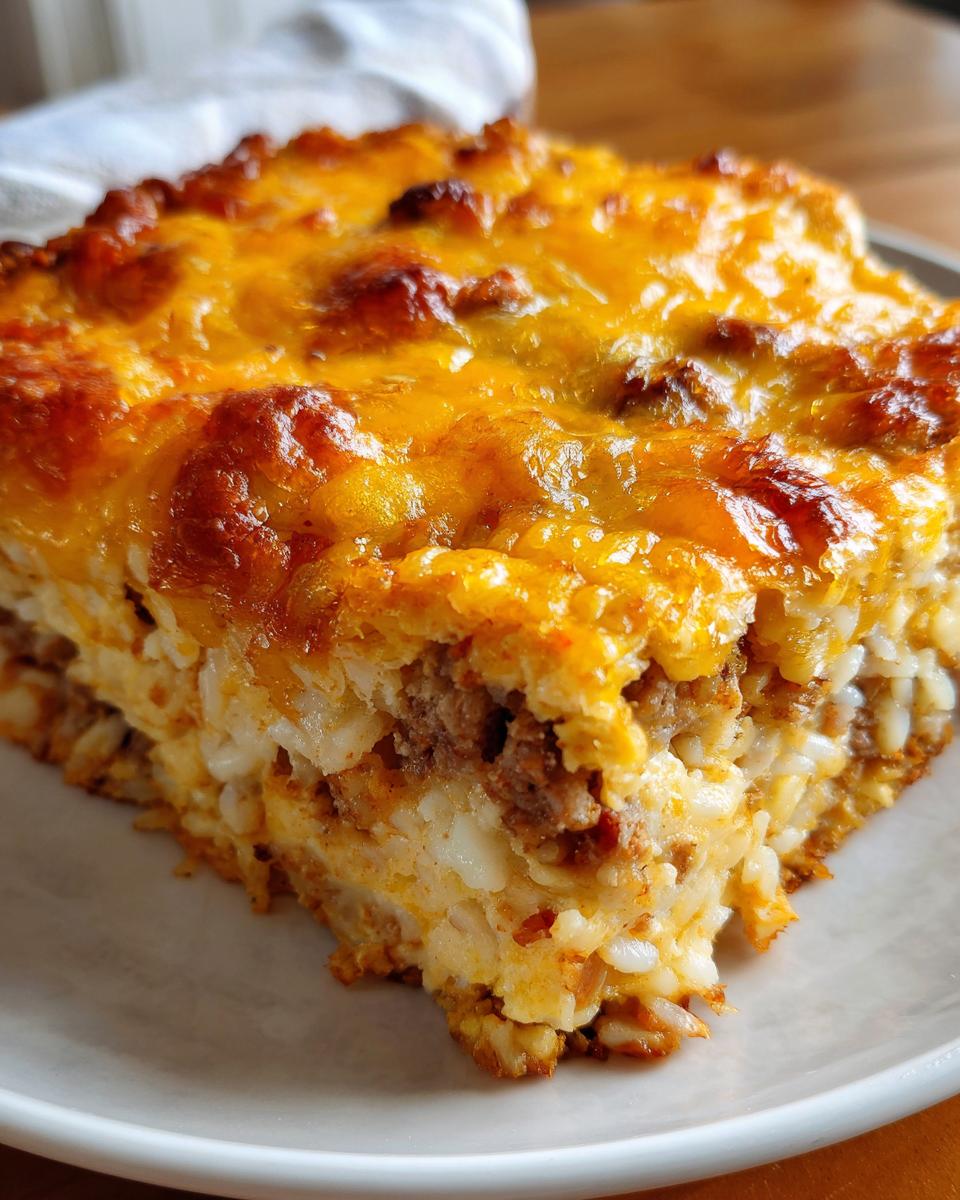
You just repeat the structure! Add the rest of your tortillas, the rest of the filling, and then top it all off with the remaining cheese blends. It should look beautifully packed and ready for the heat.
Baking and Finishing Touches for Your Burrito Bake
Pop that cheesy creation into the hot oven for about 20 to 25 minutes. You’re specifically looking for the moment when the edges are bubbling happily and that cheese on top is completely melted and golden brown. Seriously, don’t rush it!
Once it’s done, pull it out, but listen to me: you have to let it rest for five whole minutes. This lets the layers set up so it doesn’t turn into soup on your plate. After resting, you can dollop the rest of your sour cream and salsa right on top before slicing into this incredible burrito bake!
Tips for Success with Your Easy Burrito Bake Recipe
Even though this comfort food casserole is super simple, a few tricks can take it from good to absolutely unforgettable. We want it set up beautifully, not mushy, right? That means watching the moisture levels closely. Trust me, these little things I’ve learned over the years make all the difference when you’re making a burrito bake.
First, about those tortillas: If you happen to be using fresh-from-the-bag tortillas, they can sometimes absorb too much liquid and get a little gooey during baking. If you’re worried about sogginess in your cheesy baked dinner, here’s a little hack I use: Just leave those eight quarters out on the counter for about an hour before you start assembling. Letting them air dry just a bit helps them maintain their shape beautifully when layered.
Also, don’t be shy with the cheese layers! You’re using two different kinds for a reason—the Mexican blend melts beautifully, and that cheddar gives you that lovely golden-brown color we all look for in a casserole. Make sure you spread those two cheeses evenly over the tortilla layer before you add the next round of filling. That ensures you get that perfect cheese pull in every single scoop.
Finally, about the flavor base: If you use ground beef instead of chicken, make sure you drain off every last bit of fat really well after browning. Excess fat renders out during the 25 minutes in the oven, and it can pool at the bottom, making that bottom layer of tortillas greasy rather than flavorful. A quick, thorough drain is key for the best texture in your Tex Mex bake!
Make-Ahead and Freezer Friendly Burrito Bake Options
I know how it is when life gets crazy, and you just can’t find 40 minutes to stand at the stove, even for something as delicious as this main dish! That’s why I absolutely love that this burrito bake is so incredibly versatile. It really is built to be a lifesaver for busy weeks, so you can throw it together when you have a moment and bake it when time allows. It excels as a meal prep casserole!
You have two great options here, depending on when you plan to eat it. Both methods keep that comforting flavor intact, but the timing is different!
Refrigerating for Next-Day Baking
If you just need it done sooner than the next day—say, for tomorrow’s dinner—refrigeration is your friend. You can assemble this entire burrito bake just like normal, layers and all. Make sure you cover your 9×13 dish tightly with plastic wrap or aluminum foil before popping it in the fridge. You can keep it safely assembled like this for up to 24 hours. Just remember, since it goes into the oven cold, you need to give it extra time to heat through. I always add about 10 extra minutes to the regular baking time when I cook it straight from the fridge.
Assembling a Freezer Friendly Bake
This is my secret weapon for surviving marathon weeks! If you want to make a batch for a month from now, assemble the whole thing in a disposable foil pan. Foil pans are the best for the freezer because you can just pop them right in the oven later. Once assembled, cover it super tightly—I mean, wrap it well—and pop it into the freezer for up to three months. It holds up beautifully!
When you’re ready to eat your freezer friendly bake, the trick is thawing time. For the best result, pull it out the night before and let it thaw slowly in the refrigerator. Then you bake it normally (around 20–25 minutes). If you’re staring at a rock-solid frozen casserole and decide you need it *now*, don’t panic! You can bake it directly from frozen, but you need to drop the oven temperature slightly to 350 degrees Fahrenheit. It will take longer—plan on about an hour—and you absolutely must check that the center is piping hot before you take it out.
Ingredient Swaps and Variations for Your Burrito Bake
One of the best things about a big, hearty casserole like this rice and beans bake crossover is how forgiving it is! You don’t need every single item on my ingredient list to make a winner. I always encourage people to look in their pantry first, because these kinds of dishes are perfect for clean-out-the-fridge moments. You can easily customize the flavor profile of your burrito bake without losing that satisfying, cheesy structure.
Want to make it vegetarian? Easy! Just skip the ground meat entirely. You can boost the heartiness by adding an extra can of rinsed beans (like pinto or kidney beans!) and maybe a cup of frozen corn or some diced bell peppers right in with the sauce. It turns into a phenomenal Tex Mex bake centerpiece!
If you want to add a little extra crunch or texture, try tossing in a cup of mild Rotel tomatoes (diced tomatoes with green chilies) when you add the enchilada sauce. It brings a little acidity and dimension that I love, especially when I need something that feels a little bolder than just standard comfort food.
Making a Beef Burrito Bake Casserole
A lot of folks prefer the richness of ground beef, and swapping it out for the ground chicken is absolutely no problem at all. When you’re making a beef burrito bake, you follow the exact same process! Brown the pound of ground beef just like you would the chicken in that hot skillet. The only thing you need to be slightly more vigilant about is draining the fat afterward. Beef tends to render out a bit more grease, so make sure you drain it thoroughly before you stir in your taco seasoning.

If you leave that beef fat in there, the final casserole can separate and look oily, which nobody wants! As long as you drain it well, the meat will absorb the seasoning and sauce beautifully, and the end result is a wonderfully rich, hearty burrito bake casserole layer that is just as sturdy and delicious as the chicken version.
Serving Suggestions for This Tex Mex Bake
Now that you have pulled that gorgeous, bubbly, cheesy burrito bake out of the oven, the last step is customizing those individual servings! This is where you really amp up the freshness and take this from a simple weeknight casserole to a total feast. Since this is a rich, comforting bake, I always like to balance it out with toppings that add a bit of crunch, coolness, or brightness.
Remember those remaining sour cream and salsa portions you saved? Those are for drizzling right on top—don’t skip that! The cool tang of the sour cream cuts through the richness of the cheese perfectly, and the salsa brings a necessary little zip.
But we can do more! Think about what you’d put on a giant, fully loaded burrito and translate that here. Sliced avocado or a scoop of creamy guacamole is non-negotiable for me; the healthy fat smooths out all those savory spices. Shredded crisp lettuce on top adds a great textural contrast. It’s amazing how a little bit of green stops the dish from feeling too heavy.
If you want something with a little sweet tang, sometimes I whip up a batch of my easy peach salsa to serve alongside it. It sounds strange, but the sweetness with the savory beef/chicken mix is just dreamy. Or, if you’re keeping it classic, you might just need some crunchy tortilla chips on the side for scooping up any cheesy bits that fall over the edge of your plate. Enjoy every bite of your delicious Tex Mex bake!
Frequently Asked Questions About the Burrito Bake Recipe
I know sometimes when you look at a recipe, your brain immediately jumps to all the things that *could* go wrong, or what you might need to change based on what’s in your pantry. That’s totally normal! Having this easy casserole recipe in your back pocket means you should feel confident tweaking it just a little bit. Here are the questions I always get about making sure this burrito bake turns out perfectly creamy and not too dry.
Can I use corn tortillas instead of flour in this burrito bake?
That’s a great question! You absolutely can use corn tortillas, especially if you want that stronger corn flavor, but you have to treat them a little differently than the flour ones. Corn tortillas tend to get a bit drier or even break down more easily when they are layered and soaked in sauce for a long time. If you decide to go with corn, here’s my little expert tip: add an extra splash of enchilada sauce—maybe just a quarter cup extra—when you mix up your filling. This extra moisture helps compensate for the corn tortillas soaking up liquid, keeping your final burrito bake pleasantly moist instead of crumbly.
How do I make this a truly ‘one pan burrito bake’ experience?
Who doesn’t want less cleanup, right? I totally get why you’re asking about the ‘one pan burrito bake‘ dream! With this recipe, the reality is that you do use two vessels initially: the skillet to brown your meat and season the filling, and then the 9×13 baking dish for assembly and baking. That’s the bare minimum unless you use pre-cooked meat!
However, to get as close to one-pan as possible, you should mix everything else—the beans, rice, sour cream, and salsa—directly into that skillet *after* you’ve finished cooking and draining the meat. Once that filling is mixed, use paper towels to quickly wipe out that skillet and set it aside. Then, you bring the filling over to the baking dish for layering. You’ve only dirtied the skillet and the one casserole dish. Trust me, compared to rolling eight individual burritos, that’s practically spotless!
Nutritional Estimates for Your Comfort Food Casserole
I always feel a little bit nerdy sharing the estimated numbers because, let’s face it, when you’re making the best comfort food casserole known to mankind, you aren’t usually counting calories! But I know some of you are mindful of what you’re feeding your family, so I’ve run the numbers based on the ingredients listed for this classic burrito bake.
Here is the general breakdown based on 6 generous servings. Please keep in mind this is just an estimate, kind of like a fun ballpark figure. The actual numbers will change depending on the brand of taco seasoning you use, whether you used ground chicken versus beef, or how many toppings sneak their way onto your slice!
- Serving Size: 1 serving
- Calories: Approximately 580
- Fat: Around 28g (with 14g being saturated fat—that’s the delicious cheese talking!)
- Carbohydrates: Roughly 55g
- Protein: A whopping 32g! See? It’s hearty!
- Fiber: About 7g
- Sugar: A low 6g
- Sodium: This comes in around 850mg, which is something to watch if you are sensitive, so maybe use a low-sodium version of the enchilada sauce if needed!
I like knowing this easy burrito bake recipe packs such a good punch of protein. It keeps us full and satisfied long after we finish the last cheesy bite. Just remember that the toppings (like extra sour cream or salsa) are calculated separately, so factor those yummy additions in if you load them high!
PrintEasy Cheesy Chicken and Bean Burrito Bake Casserole

You can make this easy burrito bake casserole for a comforting, family-friendly dinner. It uses simple ingredients like seasoned chicken, beans, rice, and lots of cheese, delivering the flavors of a burrito in one simple baked dish.
- Prep Time: 15 min
- Cook Time: 25 min
- Total Time: 40 min
- Yield: 6 servings 1x
- Category: Dinner
- Method: Baking
- Cuisine: Tex-Mex
- Diet: Vegetarian
Ingredients
- 1 tablespoon olive oil
- 1 pound ground chicken or ground beef
- 1 packet (1 ounce) taco seasoning mix
- 1 can (15 ounces) black beans, rinsed and drained
- 1 can (10 ounces) mild enchilada sauce
- 1 cup cooked white rice
- 1 cup sour cream, divided
- 1 cup salsa, divided
- 8 medium flour tortillas, cut into quarters
- 2 cups shredded Mexican cheese blend
- 1 cup shredded cheddar cheese
Instructions
- Preheat your oven to 375 degrees Fahrenheit. Lightly grease a 9×13 inch baking dish.
- Heat the olive oil in a large skillet over medium heat. Add the ground chicken or beef and cook until browned. Drain any excess fat.
- Stir the taco seasoning into the meat, following the packet directions for preparation, usually adding a small amount of water.
- In a large bowl, combine the cooked meat, black beans, enchilada sauce, cooked rice, half of the sour cream (1/2 cup), and half of the salsa (1/2 cup). Mix well.
- Spread a thin layer of the meat mixture on the bottom of the prepared baking dish.
- Arrange half of the cut tortilla pieces over the meat mixture in a single layer.
- Top the tortillas with half of the remaining meat mixture. Sprinkle with half of the Mexican cheese blend and half of the cheddar cheese.
- Repeat the layers: remaining tortillas, remaining meat mixture, remaining Mexican cheese blend, and remaining cheddar cheese.
- Bake for 20 to 25 minutes, or until the casserole is hot and the cheese is fully melted and bubbly.
- Let the burrito bake rest for 5 minutes before serving. Top individual servings with the remaining sour cream and salsa.
Notes
- You can prepare this casserole completely ahead of time. Assemble all layers, cover the dish, and refrigerate for up to 24 hours before baking. Add 10 minutes to the baking time if baking straight from the refrigerator.
- For a freezer friendly bake, assemble the casserole in a foil pan, cover tightly with foil, and freeze for up to 3 months. Thaw overnight in the refrigerator before baking, or bake from frozen at 350 degrees Fahrenheit for about 60 minutes, checking for doneness.
- If you prefer a spicier flavor, use hot enchilada sauce or add a diced jalapeño to the meat mixture while cooking.
Nutrition
- Serving Size: 1 serving
- Calories: 580
- Sugar: 6
- Sodium: 850
- Fat: 28
- Saturated Fat: 14
- Unsaturated Fat: 14
- Trans Fat: 1
- Carbohydrates: 55
- Fiber: 7
- Protein: 32
- Cholesterol: 95